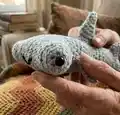
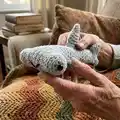
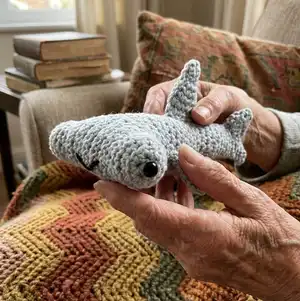
About This Hammerhead Shark Friend Amigurumi Pattern
This pattern guides you step-by-step to crochet a charming hammerhead shark amigurumi using DK or chunky yarn. It includes clear head and body shaping instructions, plus separate fin pieces for easy assembly. Photographs illustrate key shaping moments to help you follow along with confidence.
Suitable for crocheters comfortable with increases, decreases and working in rows and rounds. The pattern allows for customization in yarn weight and hook size to change final size.
Why You'll Love This Hammerhead Shark Friend Amigurumi Pattern
I absolutely love this pattern because it turns a simple set of stitches into a playful little shark with so much character. I enjoy how the head is worked in rows for a flat, hammer-shaped profile before joining to the body. The separate fin pieces are small and satisfying to make, and they let me position each fin just how I like it. I love that this design adapts well to different yarns — switching yarn weight totally changes the vibe, and that creative flexibility keeps me inspired.
Switch Things Up
I love experimenting with yarn types to change the look: using chunky yarn and a larger hook makes a cuddly, oversized shark while fine yarn yields a tiny collectible.
I sometimes swap grey for pastel or bright colors to give the shark a whimsical personality or to match nursery themes.
I like adding embroidered spots or stripes to the body before attaching fins to create unique markings without altering the construction.
Try different eye sizes or use embroidered eyes for a softer finish suitable for babies and small children.
Adjust the number and size of small fins to make your shark more anatomically correct or stylized depending on your preference.
I often make a mini keychain version by using thinner yarn and a 2.5-3.0mm hook and adding a small loop before fastening off.
For a poseable version, I add a thin wire armature inside the body before stuffing, which allows you to shape the tail and fins.
Want to add personality? Sew on tiny felt teeth or a small ribbon collar for a playful accessory.
I recommend trying a contrast-color mouth or underside for a two-tone effect that really pops against the main body color.
Finally, mixing yarn textures—such as a boucle for the belly and smooth DK for the top—can give an interesting tactile contrast that people love to touch.
Common Mistakes & How to Fix Them
✗ Skipping stitch markers during row-to-round transitions can cause misaligned joins; place a marker at joins and key stitch points to maintain symmetry.
✗ Not counting stitches after increases or decreases leads to uneven shaping; count your stitches at the end of each round and adjust immediately if needed.
✗ Stuffing too late or too little makes shaping difficult and squishy parts sag; stuff gradually as instructed, especially during narrowing sections, to keep form consistent.
✗ Crocheting with a too-large hook for DK yarn produces loose stitches and visible stuffing; use the recommended hook or size down 0.5-1.0mm for a tight fabric.
✗ Placing safety eyes without checking positions may look off-center; insert eyes in the beginning/end spaces as directed and check placement before fastening.