🧢 Beautiful ✨ Detailed πŸ’ Adorable

GrannySquare Baby Blanket with Shell Border Pattern

GrannySquare Baby Blanket with Shell Border Pattern
4.0β˜… Rating
5-7 Hours Time Needed
1.5K Made This
βœ‚οΈ

Beginner Friendly Level

Perfect for those just starting their crochet journey, with clear instructions and simple techniques

⏱️

Weekend Treat

Takes 5-7 hours, making it an enjoyable project to finish over a couple of days.

πŸ€—

Soft Hug

Gentle, plush, and full of warmth, creating a sense of comfort and coziness wherever they find a home.

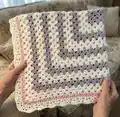
About This GrannySquare Baby Blanket with Shell Border Pattern

This pattern creates a classic granny square baby blanket worked from the centre out with three soft colours and finished with a shell border. It is beginner friendly and uses simple granny clusters and v-stitch shells to create an elegant edge. You can follow the step-by-step rounds exactly as written to build up the blanket and then add the scalloped shell border for a polished finish.

GrannySquare Baby Blanket with Shell Border Pattern crochet pattern - detailed view of completed project

Uses Paintbox Aran yarn in three colours to create subtle stripes and texture. Includes complete instructions for changing yarn, repeating colour rounds, and working the shell border.

Why You'll Love This GrannySquare Baby Blanket with Shell Border Pattern

I absolutely love this pattern because it takes a classic granny square and turns it into a cozy, modern baby blanket that feels special. I enjoy how simple clusters and a few colour changes create a lovely striped effect without complicated stitchwork. The shell border adds a delicate, handmade finish that really elevates the piece. I also love that it is beginner friendly β€” I wanted something I could recommend to new crocheters so they could build confidence while making something beautiful.

GrannySquare Baby Blanket with Shell Border Pattern step 1 - construction progress GrannySquare Baby Blanket with Shell Border Pattern step 2 - assembly progress GrannySquare Baby Blanket with Shell Border Pattern step 3 - details and accessories GrannySquare Baby Blanket with Shell Border Pattern step 4 - final assembly and finishing

Switch Things Up

I love how easy it is to customize this blanket by switching colours; try alternating brighter shades for a playful look or neutrals for a classic finish.

You can change the size by working more or fewer rounds; add extra colour repeats to make a larger throw or stop earlier for a baby-sized lovey.

I often switch yarn weights and hooks: bulky yarn with a larger hook creates a chunky, cuddly blanket while fingering weight makes a delicate, smaller piece.

Try substituting one of the white rounds with a textured stitch round (like front post/back post combinations) to add depth and interest.

Make a matching set by using the same colours to create a hat or booties, or turn the finished blanket into a cushion cover by sewing a backing on and stuffing.

I sometimes add a small applique9 or embroidered initial in one corner for a personalized gift touch.

Consider adding a fringe or pompom edging instead of the shell border for a boho vibe if you prefer a different aesthetic.

If you want to make a travel-sized version, reduce the number of rounds and carry the colour pattern proportionally for a compact lap blanket.

Block lightly after finishing the border to open up the shells and even the shape; I usually wet block or pin to shape while damp for a crisp edge.

Don't hesitate to experiment with placement of the final pink round; moving it one or two rounds in from the edge can change the balance of colour and highlight the shell border in different ways.

Common Mistakes & How to Fix Them

βœ— Skipping stitch counts for each round can make the square grow uneven; count your clusters and chain spaces after each round to ensure symmetry. βœ— Changing yarn carelessly can leave loose ends showing on the right side; secure and weave in ends neatly at the corner or on the wrong side immediately after changing colour. βœ— Working with inconsistent tension will distort the square and make corners uneven; maintain even, relaxed tension and check your square sits flat after each few rounds. βœ— Not fastening off and sewing in ends as you go will create a large finishing job; fasten off when instructed and weave ends in progressively to keep the finish tidy. βœ— Skipping the ch2 corner spacing or misplacing corner clusters will change the shape; always place the corner cluster [3dc, ch2, 3dc] in the designated chsp to maintain square corners. βœ— Rushing the shell border can produce uneven shells and gaps; work the v-stitch and 5dc shells with consistent stitch placement and check alignment around each corner before continuing.

GrannySquare Baby Blanket with Shell Border Pattern

Make a soft, cozy granny square baby blanket with a pretty shell border you will love to gift or keep. This beginner-friendly pattern walks you through every round so you can follow along easily. Use Paintbox Aran yarn in three colors for the same delicate stripe effect, or swap in your favorite shades to personalize your blanket. The finished blanket measures approximately 34" x 34" and includes a full shell border tutorial.

Beginner Friendly 5-7 Hours

Materials Needed for GrannySquare Baby Blanket with Shell Border Pattern

β€” Main Fabric

  • 01
    Paintbox Aran yarn - Paper white (Aran weight, quantity as needed for a 34" x 34" blanket; exact amount not specified in pattern)
  • 02
    Paintbox Aran yarn - Dusty rose (Aran weight, quantity as needed; used for two rounds repeated)
  • 03
    Paintbox Aran yarn - Candyfloss pink (Aran weight, small amount used for final pink round)

β€” Tools Required

  • 01
    Crochet hook size 5.0mm
  • 02
    Scissors
  • 03
    Yarn needle

Progress Tracker

0% Complete

β€” Materials :

Info :

You will need: 5mm crochet hook Scissors Yarn needle Yarn - I used Paintbox Aran yarn in 3 different colours Blanket measures approximately 34" x 34"

β€” Abbreviations :

Infos :

Abbreviations (US terms): ch Chain sc Single crochet dc Double crochet ss Slip stitch chsp chain space

β€” Notes :

Info :

This is a beginner friendly pattern. However, there are lots of videos on YouTube to help you along the way. I have included pictures at each stage but if you need any advice please message me and I will be happy to help :)

β€” Making the ring :

Info :

With dusty rose yarn make a slip knot and chain 3 ss in to first chain You have now made the ring :)

β€” Rounds (granny centre) :

Round 1 :

ch 3 (this counts as first dc) 2dc into ring 3dc in to ring, ch 2 (do this 2 more times) ss in to 3rd ch You should now have 4 clusters of dc with a chsp in between each one You should have 4 corners

Round 2 :

ch 3 (this counts as first dc) 2dc in to chsp [3dc, ch 2, 3dc] in to next chsp (this makes your corner) [3dc, ch2, 3dc] in to next chsp (this makes another corner) [3dc, ch2, 3dc] in to next chsp (this makes another corner) 3dc in to first chsp, ch2 then ss in to third ch

Round 3 :

ch 3 (this counts as first dc) 2dc into chsp 3dc in to next chsp [3dc, ch2, 3dc] in to next chsp (forms corner) 3dc in to next chsp [3dc, ch2, 3dc] in to next chsp (forms corner) 3dc in to next chsp [3dc, ch2, 3dc] in to next chsp (forms corner) 3dc in to next chsp 3dc in to first chsp, ch2 then ss in to third ch

Round 4 :

ch 3 (this counts as first dc) 2dc in to chsp 3dc in to next chsp 3dc in to next chsp [3dc, ch2, 3dc] in to next chsp (forms corner) 3dc in to next chsp 3dc in to next chsp [3dc, 2ch, 3dc] in to next chsp 3( forms corner) 3dc in to next chsp 3dc in to next chsp [3dc, 2ch, 3dc] in to next chs (forms corner) 3dc in to next chsp 3dc in to next chsp 3dc in to first chsp, ch2 then ss in to third ch

Round 5 :

ch 3 (this counts as first dc) 2dc in to chsp 3dc in to next chsp (4 times) in to corner chsp [3dc, ch2, 3dc] 3dc in to next chsp (4 times) in to next corner chsp [3dc, ch2, 3dc] 3dc in to next chsp (4 times) in to next corner chsp [3dc, ch2, 3dc] 3dc in to next chsp (4 times) 3dc in to first chsp, ch2 then ss in to third ch and fasten off

β€” Changing yarn :

Info :

Attach the white yarn to any corner

β€” Continue the blanket :

Info :

Continue with rounds starting with: ch3, 2dc and putting 3dc in every chsp 3dc,ch2, 3dc in to every corner 3dc, ch2, ss into 3rd ch into the starting corner

Info :

Repeat [3 rounds of white and 2 rounds of dusty rose] 4 times

β€” Finishing off :

Info :

Once you have completed your rounds, do 3 more rounds of white, fasten off Attach pink yarn and do one round, fasten off

β€” Shell boarder :

Info :

Attach white yarn ch1, 1sc in to every stitch 3sc in to every corner sc in to ch1

Info :

Now we are back at the first corner we can now do a v-stitch round: ch2, skip 1 (1dc, ch1, 1dc in to same stitch). This makes your v-stitch

Info :

Work [skip 2, (1dc, ch1, 1dc in to same stitch)] until you get to the corner.

Info :

As you come to your corner [skip1, (1dc, ch1, 1dc in to same stitch)] until the corner is finished. continue with v-stitch until you get back to the first corner

Info :

At the first corner, dc into same stitch as ch3, ch 1 then ss in to 3rd ch

β€” Shell border (alternate shell round) :

Info :

Now let's do the shell boarder :) ch3 [5dc into v-stitch, 1dc into next v-stitch] repeat until back at ch3

Info :

Once you are back to the ch3, ss in to 3rd ch

Info :

Fasten off and sew in all ends

β€” Blanket complete :

Info :

Blanket complete :)

Assembly Instructions

  • Attach the white yarn to any corner to begin the outer rounds and continue placing 3dc, ch2, 3dc into each corner space to maintain square shape.
  • After completing all colour repeats, work 3 rounds of white, fasten off, then attach the pink yarn and work one final pink round, fastening off when complete.
  • Attach white yarn for the shell border, work ch1 then 1sc into every stitch and 3sc into every corner before starting the v-stitch round.
  • Work the v-stitch round (ch2, skip 1, (1dc, ch1, 1dc in same stitch)) around, then work the shell round [ch3 then 5dc into each v-stitch, 1dc into next v-stitch] until back at ch3, slip stitch into 3rd ch and fasten off.
  • Fasten off securely and sew in all ends with a yarn needle, weaving ends into the fabric of the blanket to hide them neatly.

Important Notes

  • πŸ’‘Attach new yarn at a corner for the neatest join and to keep colour changes tidy across rounds.
  • πŸ’‘Work the corner sequence [3dc, ch2, 3dc] in the chain spaces only to maintain flat, even corners and a square shape.
  • πŸ’‘Fasten off the colour when instructed and weave in ends as you go to avoid a large finishing session at the end.
  • πŸ’‘Check alignment of the v-stitch and shell border around each corner before continuing to ensure shells sit evenly.

Thank you for choosing this Granny Square Baby Blanket pattern β€” I hope it brings warmth and comfort to the little one in your life. This pattern is simple, satisfying, and perfect for practising foundational crochet skills while creating something beautiful. Enjoy the rhythm of the rounds and the sweet finishing touch of the shell border. 🧢✨

You ask,

we answer.

FAQs

What size will the finished piece be?

The finished blanket measures approximately 34" x 34" when using Paintbox Aran yarn and a 5mm hook as indicated in the pattern.

Can I use different yarn weights for this pattern?

Yes, you can use different yarn weights, but this will affect the final size and drape. Adjust your hook size accordingly and make a gauge square if you need a specific finished measurement.

Do I need prior crochet experience for this pattern?

This pattern is rated beginner friendly, so basic knowledge of chains, double crochets, and slip stitches is sufficient. The pattern includes step-by-step rounds and photo references to help you along.

How long does this project typically take to complete?

Most crocheters complete this project in 5-7 hours total, though time may vary based on experience level, yarn choices, and how many pauses you take while working.