🧢 Beautiful ✨ Detailed πŸ’ Adorable

Leopard tote Pattern

Leopard tote Pattern
4.0β˜… Rating
8-10 Hours Time Needed
1.4K Made This
βœ‚οΈ

Intermediate Level

Ideal for those with basic crochet experience, featuring slightly more advanced stitches and techniques to expand your skills.

⏱️

All-Day Adventure

Requires 8-10 hours, ideal for a full day of immersive crocheting.

✨

Stylish Touch

An elegant detail to elevate any look, combining traditional techniques with contemporary design sensibilities.

About This Leopard tote Pattern

This pattern creates a roomy Leopard Tote crocheted in raffia yarn with a sturdy leather bottom and decorative fringe. Youll work jacquard colorwork to form the leopard spots and learn how to attach a prepared leather sole. The instructions include making a felt lining and sewing on handles for a finished professional look.

Leopard tote Pattern crochet pattern - detailed view of completed project

Perfect for intermediate crocheters who want to try jacquard with raffia yarn and learn bag construction techniques. Includes step-by-step photos, tips for working with raffia and finishing instructions for lining and fringe.

Why You'll Love This Leopard tote Pattern

I absolutely love this pattern because it turns simple raffia yarn into a fashionable, structural tote with a real designer feel. I enjoy the challenge of jacquard colorwork on a flat canvas and the way the leopard print pops with three contrasting colors. The leather bottom and felt lining make the bag practical and durable, which I always aim for in my projects. Adding fringes and the option to customize colors makes each finished tote uniquely yours and so satisfying to wear or gift.

Leopard tote Pattern step 1 - construction progress Leopard tote Pattern step 2 - assembly progress Leopard tote Pattern step 3 - details and accessories Leopard tote Pattern step 4 - final assembly and finishing

Switch Things Up

I love how easy it is to customize the color palette β€” try pastel tones for a soft, modern look or bold contrasting colors for maximum impact.

I sometimes switch the number of fringe pieces or their length to create a subtler edge or a dramatic statement; shorter fringe looks neater and longer fringe more boho.

If you prefer not to work jacquard, you can create a solid color canvas and add felt or embroidered spots for a similar effect.

Want a smaller or larger bag? Change the hook size and the number of base loops proportionally, or use thicker raffia for a chunkier tote.

I like to swap the leather bottom for a wooden or heavy vinyl base to change the bag weight and structure.

You can replace the felt lining with fabric and sew in pockets for extra organization if you plan to use the bag daily.

I often add decorative hardware or charms to the handles to create a luxury finish β€” you can stitch them on or attach with small rivets at the handle holes.

For a more durable finish, glue the handle ends with PVA and then sew for reinforcement; this helps handles withstand heavier loads.

Try mixing fringe colors in a repeating sequence to create stripes along the edge or alternate fringe placement for a staggered look.

I sometimes embroider initials or small motifs on the lining before inserting it for a personalized interior touch.

Don’t be afraid to experiment: changing yarns, hook sizes, handles and trims will give you a custom piece every time β€” have fun and make it yours!

Common Mistakes & How to Fix Them

βœ— Skipping the step of straightening raffia before crocheting leads to uneven loops and snags; always fluff or steam the raffia skeins so the strands work smoothly before you begin. βœ— Pulling jacquard threads tightly inside the canvas causes the fabric to pucker and distort the leopard motif; carry floats loosely and crochet the last stitch before color changes with the next color to avoid tension issues. βœ— Not marking the halves of the base row makes it hard to align the pattern across the seam; place markers in the first loops of each half to keep your 80+80 loop structure consistent. βœ— Failing to hide and strengthen ends at the base trim will make the trim look untidy and can loosen with wear; pull the end under the first loop, pull to the wrong side, tie securely and hide the ends as instructed. βœ— Neglecting to steam the base and fringe results in a floppy or misshapen bag; steam the base and fringe lightly with an iron after the recommended rows to set the shape and tidy the appearance.

Leopard tote Pattern

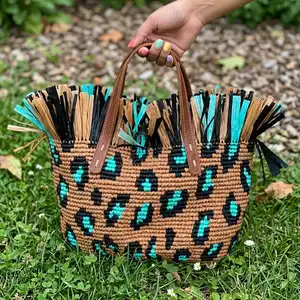
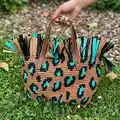
Make a stylish Leopard Tote with raffia yarn, a leather base and an eye-catching jacquard leopard print. This intermediate crochet pattern guides you step-by-step through attaching the leather bottom, crocheting the canvas with colorwork, adding fringe and sewing a neat felt lining. Youll love the textured finish and custom fringe for a trendy handmade bag you can gift or sell.

Intermediate 8-10 Hours

Materials Needed for Leopard tote Pattern

β€” Main Fabric

  • 01
    Raffia yarn, 3 colors, 225 yards (200 m) each (example: Ispie) β€” Autumn (main) approx 225 yd, Black approx 225 yd, Salt Lake (green) approx 225 yd
  • 02
    Leather bottom 12 x 4 inches (30 x 10 cm) with 60 holes
  • 03
    Felt for the lining, 2 mm thick β€” cut to leather bottom shape and a side strip (example: 9 inches x 36 inches / 23 x 90 cm)

β€” Tools Required

  • 01
    Crochet hook size 3.0 mm
  • 02
    Optional crochet hook 4.0-4.5 mm for base trim (to pull loops by 4-5 mm)
  • 03
    Plastic needle with large eyelet
  • 04
    Sewing needle and sewing thread
  • 05
    Sewing handles (75 x 1.5 cm)
  • 06
    Scissors
  • 07
    Stitch markers (2 or more)
  • 08
    PVA glue (for joining raffia ends and optional fixing)
  • 09
    Iron for steaming and shaping
  • 10
    Pins for lining placement

Progress Tracker

0% Complete

β€” Materials & Gauge :

Info :

Gauge: 15 stitches and 14 row = 4*4 inches (10*10cm). Finished bag from specified materials: length - 18 inches (45 cm), height without fringe - 9 1/2 inches (24 cm).

β€” Recommendation for working with raffia yarn :

Info :

1. Before crocheting with raffia, it must be straightened. If you have Fibranatura, fluff the yarn with your hands. If you have Ispie, you can steam yarn with an iron.

Info :

2. When the thread runs out, take a new skein and straighten the end. Put the working thread end and the new skein thread with a clearance of 5 mm. Glue together with PVA glue. After drying, lightly wrap the thread.

Info :

3. If you need to rip out your work, steam the thread with an iron; the yarn will return to its original shape.

β€” Base trim of the bottom :

Info :

Leave the end about 8 inches (20 cm) long to close the rows of the base trim. Crochet around the bottom edge as shown in the picture.

Step 1 :

Insert the hook in the side hole in the middle, pull the loop.

Step 2 :

Make CH, crochet 2 SC in the same hole.

Step 3 :

Next crochet 3 SC in each hole along the side part.

Step 4 :

Crochet 3 SC in 1 in the corner.

Step 5 :

Crochet 3 SC in 1, 2 SC in 1 along the long side of the bottom, repeat to the corner.

Step 6 :

Crochet 3 SC in 1 in the 2nd corner.

Step 7 :

Crochet 3 SC in each hole along the 2nd side part.

Step 8 :

Crochet 3 SC in 1 in the 3rd corner.

Step 9 :

Crochet 3 SC in 1, 2 SC in 1 along the 2nd long side of the bottom, repeat to the corner.

Step 10 :

Crochet 3 SC in 1 in the 4th corner.

Step 11 :

Crochet 3 SC in 1 in the hole which are left on the 1st side part.

Step 12 :

Crochet the last SC with the end. Pull out the end. Pull the end under the 1st loop of the row. Pull back to the wrong side.

Step 13 :

There are 160 loops now.

Step 14 :

Pull the working loop, crochet SlSt in each hole.

Step 15 :

Crochet the last SlSt with the end. Pull out the end. Pull the end under the 1st loop of the row. Pull back to the wrong side.

Step 16 :

Cut the thread, tie the knot. Hide the ends.

β€” Crochet the base part :

1 row :

Take 3 skeins of the raffia yarn. Place it so that the thread unwinds counterclockwise.

1 row :

Take the thread of the base color. Insert the hook in the middle loop on the side part of the bottom on the back loop and the jumper only.

1 row :

Pull the loop. Take 2 more thread of 2 different colors, put on along the row, crochet CH.

Info :

Crochet row with SC on the back loop and the jumper only. Crochet the leopard print following to the pattern provided in the attachment.

Important :

When crocheting jacquard, crochet the last stitch before the color change with the next color. Do not pull the threads tightly inside to avoid tightening the canvas.

Info :

Pattern consists of 80 loops, that is, we crochet 2 halves with the same pattern (=160). Place the markers in the 1st loops of the halves of the row.

Tip :

Always pull the working loop to the level of the hook by 15-17 mm to make the canvas even and tight. After crocheting, pull the loop back.

Step :

Crochet the last SC in the 1st loop of the row.

Instruction :

Next crochet a spiral.

β€” Body rows (jacquard canvas) :

2 row :

Crochet 80+80 SC following to the pattern (=160).

Recommendation :

Place the skeins at a distance so that the threads do not get tangled. Rearrange the threads in the same order as your skeins when changing the thread in jacquard.

Recommendation :

If the thread is very twisted, when it goes under the pattern, untwist it in the other direction, straight into the harness, until it is aligned. If nothing can be done, cut, straighten, glue PVA and crochet following to the pattern.

3 row :

Crochet 80+80 SC following to the pattern (=160).

4 row :

Crochet 80+80 SC following to the pattern (=160).

Note :

Now hide the ends at the beginning of crocheting, and cut off the excess.

5 row :

Crochet 80+80 SC following to the pattern (=160).

6-30 rows :

Crochet 80+80 SC following to the pattern (=160).

Info :

Steam the base of the bag with an iron after crocheting 10-12 rows.

β€” Height finishing and base trim :

Info :

You can crochet more rows in height following to the pattern as desired.

Final row :

In the last row, before 2 SC to the marker, cut off additional threads leaving only the main thread. Crochet 2 SC with a gradual decrease in the height of the SC.

Step :

Remove the markers.

Base trim :

Crochet SlSt in each SC of the last row. Pull the loop by 4-5 mm so as not to tighten the edge. You can take a 4-4.5 mm hook.

Finish :

Cut the thread, pull out the end. Pull the end under the 1st SlSt of the row. Pull back to the wrong side. Strengthen and hide the end on the wrong side. Steam the base of the bag with an iron.
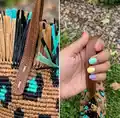
β€” Fringe :

Info :

Cut 160 pieces of fringe 8 inches (20 cm) long, of the main, green and black colors (approximately 80/60/20, respectively).

Step 1 :

Insert the hook from the wrong side under the braid and the loop of the base trim, grab the middle of the fringe, pull it out and pull the ends in the loop. Tighten the loop.

Step 2 :

Make the fringe in each loop of the edge (160 pieces). Choose the color of the fringe that matches the color of the braid of the last row.

Finish :

Steam the fringe with an iron, shape with hands and cut off the excess.

β€” Sew on the handles :

Step 1 :

Count 6 holes from the corners of the bottom. Put markers on the edge of the bag opposite the sixth holes.

Step 2 :

Put the handles near the markers.

Step 3 :

Sew on the handles with the plastic needle. Make a few stitches.

Finish :

Tie the knot and hide the ends. You can fix it with PVA glue.

β€” Lining :

Step 1 :

Take felt 2 mm thick for the lining. Cut the bottom according to the shape and size of the leather bottom without seam allowances. Make 4 notches on the bottom.

Step 2 :

Measure the perimeter of the edge of the bag (example: 36 inches / 90 cm). Measure the height of the bag (example: 9 inches / 23 cm).

Step 3 :

Cut a stripe from felt 9 inches (23 cm) high and 36 inches (90 cm) long. Sweep the stripe in a circle along the side seam.

Finish :

Make 4 notches. Match the notches of the bottom and the stripe, pin with pins. Sew the lining. Make 10 mm tucks at the corners as needed. At this stage you can give it to the atelier if desired.

β€” Sew in the lining :

Step 1 :

Put the lining in the bag and pin with pins.

Step 2 :

Sew neat stitches through one SC. Make several fixing stitches along the seam. Strengthen and hide the end of the thread.

β€” Finishing :

Info :

Steam the base of the bag with an iron for a final shape. Trim any excess threads and tidy the fringe. Your tote with trend print is ready.

Assembly Instructions

  • Insert and crochet around the leather bottom by pulling the raffia through each hole, making the base trim and forming 160 loops for the working row.
  • Attach the felt lining by cutting the bottom to the leather shape, pinning the notches, wrapping the side strip around and sewing neatly with 10 mm tucks at the corners.
  • Sew the handles by counting six holes from each corner, placing markers on the opposite edge, positioning handles at the markers and stitching securely with a plastic needle and strong thread.
  • Add the fringe by inserting the hook from the wrong side under the braid, pulling the middle of each fringe piece through and tightening; repeat for all 160 edge loops.
  • Hide and secure all thread ends under the first loop of the row or under the first SlSt, pull to the wrong side, tie knots and secure with PVA glue if needed.

Important Notes

  • πŸ’‘Use stitch markers to mark the first loops of each half (80 loops each) so the jacquard pattern aligns across the seam.
  • πŸ’‘Always pull the working loop to the level of the hook by 15-17 mm to keep the canvas even and tight, then pull it back after crocheting each stitch.
  • πŸ’‘Steam the raffia sections (base and fringe) lightly with an iron after 10-12 rows to set the shape and return raffia fiber to the correct form.
  • πŸ’‘When changing skeins, keep a 5 mm clearance and glue the ends with PVA glue to create a neat, secure join that will not slip during crocheting.

This Leopard Tote pattern gives you a chic, on-trend bag with a leather base, jacquard leopard print and playful fringe. The step-by-step instructions and photos make the process approachable for intermediate crocheters. Make one in your favorite colorway and enjoy a stylish handmade accessory you can be proud of. πŸ‘œβœ¨

You ask,

we answer.

FAQs

What size will the finished piece be?

The finished bag measures approximately 18 inches (45 cm) long and about 9.5 inches (24 cm) tall without fringe when using the specified materials.

Can I use different yarn weights for this pattern?

You can substitute a different raffia or cord type, but changing yarn weight will affect the final size and texture; adjust your hook size and test gauge before proceeding.

Do I need prior crochet experience for this pattern?

This pattern is rated intermediate, so experience with single crochet, working in the round/spiral and basic jacquard color changes is recommended for best results.

How long does this project typically take to complete?

Most crocheters complete this tote in about 8-10 hours, though time may vary based on experience, customization and finishing details.