About This Colourful Mini Dino Amigurumi Pattern
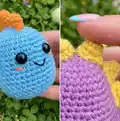
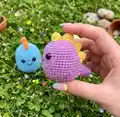
This pattern creates an adorable mini dinosaur amigurumi worked in DK (8 ply) cotton. The head and body are crocheted as one piece and the tail is joined later for a seamless finish. Spikes are made separately and sewn on to give your dino personality.

Perfect for using up scrap yarn or making colourful sets as gifts. The pattern uses UK terminology and includes clear placement and finishing notes.
Why You'll Love This Colourful Mini Dino Amigurumi Pattern
I absolutely love this pattern because it is small, quick to make and so satisfying to finish. I enjoy how the single-piece head and body make assembly simple and clean, while the separate spikes let you add colour and personality. The instructions are written to be approachable so I can share this with newer crocheters. Every finished dino feels cheerful and makes a lovely handmade gift.
Switch Things Up
I love trying different yarn colours to make each dino unique; swap the spike colour to create contrast or make a rainbow of spikes.
You can make a larger version by using a bulkier yarn and a larger hook for a cuddlier toy, or a thinner yarn and smaller hook for a tiny keychain version.
I often change the eye size for personality—use smaller safety eyes or embroider eyes for a softer look if making for babies.
Try embroidering different expressions: a small smile, a surprised O, or even closed eyes for a sleepy dino.
I like to add tiny accessories like a crocheted bow, scarf or a felt party hat to personalize each dino for gifts.
For a rustic or natural look, use cotton or linen blend yarns in muted tones; for playful toys, choose bright acrylic colours.
If you want posable limbs, experiment with thin wire inside the tail or body joints, but be cautious if making for children.
Mix and match spike sizes and spacing—move the small spike further forward or place the x-small spike last for an asymmetrical look.
I sometimes stuff the head a little firmer than the body to make the face sit upright; adjust stuffing to suit your preferred shape.
Try using safety eyes on washers or sewing buttons for eyes for a vintage style; always ensure secure attachment for safety.
Common Mistakes & How to Fix Them
✗ Placing safety eyes too high or low will change the dino's expression; follow the placement instruction and place the eyes between rounds 9 and 10, counted at stitches 12 and 18.
✗ Skipping stitch markers during continuous rounds causes you to lose track of round starts; use a stitch marker or scrap yarn to mark the beginning of every round.
✗ Not stuffing as you go results in lumps or collapsed shaping; stuff gradually starting when instructed, using small amounts to create an even shape.
✗ Pulling the yarn too tight when closing leaves puckered seams; leave a long tail, thread through front loops and pull gently to close and shape before weaving in the end.