🧶 Beautiful ✨ Detailed 💝 Adorable

Granny Clusters Crochet Skirt Pattern

Granny Clusters Crochet Skirt Pattern
4.1★ Rating
2-4 Hours Time Needed
3.3K Made This
✂️

Beginner Friendly Level

Perfect for those just starting their crochet journey, with clear instructions and simple techniques

⏱️

Bite-Sized Project

Finishes in 2-4 hours—perfect for an afternoon of creative relaxation.

👕

Casual Chic

Relaxed style with a modern twist, perfect for everyday wear while maintaining that handcrafted uniqueness.

About This Granny Clusters Crochet Skirt Pattern

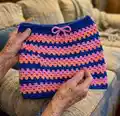
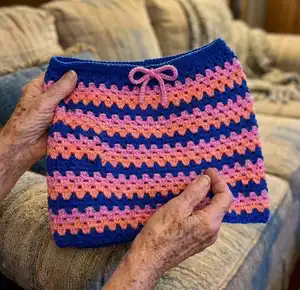
This pattern creates a comfortable, striped granny-cluster crochet skirt worked in the round with a neat waistband and drawstring casing. It features alternating color stripes using three Contrasts and a simple repeat granny cluster motif for a textured look. The skirt is written for multiple sizes with yardage guidance so you can make a perfectly fitting piece.

Granny Clusters Crochet Skirt Pattern crochet pattern - detailed view of completed project

Includes a diagram of the granny cluster and waistband stitch patterns plus a stitch key for quick reference. The easy construction makes this a great project for beginners or anyone wanting a fast, wearable crochet make.

Why You'll Love This Granny Clusters Crochet Skirt Pattern

I absolutely love this pattern because it combines the classic granny cluster texture with a modern striped palette that looks fresh and wearable. I love how quickly the skirt grows thanks to the open granny clusters, making it a satisfying project to finish. The waistband is clever and feminine with built-in eyelets for a drawstring, so you can customize the fit easily. The pattern is approachable but still yields a polished garment that I enjoy wearing and gifting.

Granny Clusters Crochet Skirt Pattern step 1 - construction progress Granny Clusters Crochet Skirt Pattern step 2 - assembly progress Granny Clusters Crochet Skirt Pattern step 3 - details and accessories Granny Clusters Crochet Skirt Pattern step 4 - final assembly and finishing

Switch Things Up

I love customizing the stripe order and color placement to make each skirt unique; try swapping which Contrast is used for the waistband or middle stripe to change the visual weight.

You can make a mini version by using a lighter weight yarn and smaller hook, or create a warmer, fuller skirt using a bulky yarn and larger hook.

I sometimes substitute neutral tones for a more classic look, or neon brights for a playful summer piece — changing colors every two rounds keeps the striping crisp.

If you want a longer skirt, simply repeat the granny cluster stripe pattern until you reach your desired length, keeping the waistband instructions the same.

I often add a decorative scalloped edging at the hem for a feminine finish — try a round of shells in Contrast A worked evenly around the bottom.

For a different texture, you can substitute half double crochet clusters in place of double crochet clusters, adjusting the pattern to keep stitch counts consistent.

I occasionally stitch a lightweight elastic into the waistband casing for extra support — feed elastic with a safety pin and sew ends together before closing the casing.

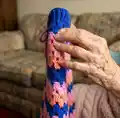
Try making a matching drawstring tassel or small pom-poms on the drawstring ends for a polished look and extra personality.

If you want pockets, add simple rectangular pocket pieces worked in sc and sew into side seams before forming the waistband casing.

For a festival-ready look, swap one color to a variegated or speckled yarn for a subtle color shift through the stripes.

Common Mistakes & How to Fix Them

✗ Skipping the note to carry unused colors loosely on the WS can create tight or bumpy stripes; carry colors loosely along the wrong side to avoid puckering. ✗ Twisting the foundation chain before joining can distort the skirt; be careful to join chains to form a ring without twisting the chain. ✗ Forgetting that ch 2 at the beginning of rnd does not count as a stitch leads to incorrect stitch counts; always treat ch 2 as turning height only and count actual stitches. ✗ Not checking gauge results in a skirt that does not fit as expected; make a gauge swatch of 13 sc and 14 rows = 4" [10 cm] and adjust hook size as needed. ✗ Working too tightly on the waistband rounds can make the casing too small; maintain even, slightly looser tension for the waistband rounds and check that drawstring passes through eyelets easily.

Granny Clusters Crochet Skirt Pattern

Make a fun, striped Granny Clusters Crochet Skirt using Caron Simply Soft yarn — a quick and stylish project you can wear. This easy pattern uses simple granny cluster stitches and a comfortable elastic-like waistband with eyelets for a drawstring. Perfect for making a fitted skirt in multiple sizes with clear diagrams and a handy stitch key to guide you.

Beginner Friendly 2-4 Hours

Materials Needed for Granny Clusters Crochet Skirt Pattern

— Main Fabric

  • 01
    Caron Simply Soft (6 oz/170 g; 315 yds/288 m)
  • 02
    Contrast A Iris (39747): XS/S 1 ball (277 yds/253 m), M 1 ball (305 yds/278 m), L 1 ball (335 yds/306 m), XL 2 balls (368 yds/337 m), 2/3XL 2 balls (423 yds/387 m), 4/5XL 2 balls (508 yds/465 m)
  • 03
    Contrast B Strawberry (COL0015): XS/S 1 ball (182 yds/166 m), M 1 ball (200 yds/183 m), L 1 ball (220 yds/201 m), XL 1 ball (242 yds/221 m), 2/3XL 1 ball (278 yds/254 m), 4/5XL 2 balls (334 yds/305 m)
  • 04
    Contrast C Blackberry (39792): XS/S 1 ball (153 yds/139 m), M 1 ball (168 yds/153 m), L 1 ball (185 yds/169 m), XL 1 ball (203 yds/186 m), 2/3XL 1 ball (234 yds/214 m), 4/5XL 1 ball (281 yds/256 m)

— Tools Required

  • 01
    Crochet hook U.S. G/6 (4 mm) Susan Bates Silvalume crochet hook or size needed to obtain gauge
  • 02
    Susan Bates yarn needle

Progress Tracker

0% Complete

— Abbreviations :

Info :

Approx = Approximately. Beg = Beginning. Ch = Chain(s). Cont = Continue(ity). Dc = Double crochet. Hdc = Half double crochet. Pat = Pattern. Rem = Remain(ing). Rep = Repeat. Rnd(s) = Round(s). Sc = Single crochet. Sl st = Slip stitch. Sp(s) = Space(s). St(s) = Stitches. WS = Wrong side. Yoh = Yarn over hook.

— Gauge :

Info :

13 sc and 14 rows = 4" [10 cm].

— Instructions :

Info :

The instructions are written for smallest size. If changes are necessary for larger sizes the instructions will be written thus XS/S (M-L-XL-2/3XL-4/5XL). Numbers for each size are shown in the same color throughout the pattern. When only one number is given in black, it applies to all sizes.

— Notes :

Info :

Carry color not in use loosely up WS of work. Ch 2 at beg of rnd does not count as st.

— Stripe Pat :

Info :

With A, work 2 rnds. With B, work 2 rnds. With C, work 2 rnds. These 6 rnds form Stripe Pat.

Info :

See diagram on page 3.

— Setup :

Info :

With A, ch 120 (132-144-165-183-204). Join with sl st to first ch to form a ring, being careful not to twist chain.

Info :

Setup rnd: Ch 1. 1 sc in each ch around. Join with sl st to first sc.

— Granny Cluster Pattern :

Round 1 :

With A, ch 2. 3 dc in same sp as sl st. Skip next 2 sc. *3 dc in next sc. Skip next 2 sc. Rep from * to end of rnd. Join with sc to top of first st.

Round 2 :

With A, ch 2. 3 dc around joining sc. *Skip next 3 dc. 3 dc between 3 dc just skipped and next 3 dc. Rep from * to end of rnd. Join with sc to top of first st. First 2 rnds of Stripe Pat are now in place.

Info :

Keeping cont of Stripe Pat, rep 1st and 2nd rnds until work from beg measures 16 (16-17-18-20-21)" [40.5 (40.5-43-45.5-51-53.5) cm]. Break B and C.

— Waistband and Facing :

Round 1 :

With A, ch 1. Skip joining sc. 1 sc in each st around. Join with sl st to first sc. 120 (132-144-165-183-204) sc.

Round 2 :

Ch 2. Working in front loops only, 1 hdc in each sc around. Join with sl st to first hdc.

Round 3 :

Ch 2. 1 hdc in each of next 58 (64-70-80-89-100). Ch 1. Skip next hdc. 1 hdc in each of next 2 (2-2-3-3-2) hdc. Ch 1. Skip next sc. 1 hdc in each st to end of row. Join with sl st to first hdc.

Round 4 :

Ch 2. Working in back loops only, 1 hdc in each st and ch-1 sp around. Join with sl st to first hdc.

Round 5 :

Ch 2. 1 hdc in each hdc around. Join with sl st to first hdc. Fasten off.

— Drawstring :

First st :

With C, ch 2. Draw up a loop in 2nd ch from hook. Yoh and draw through 1 loop on hook - ch made. Yoh and draw through 2 loops on hook - sc made.

Rem sts :

*Draw up a loop in "ch" of previous st. Yoh and draw through 1 loop on hook (ch). Yoh and draw through 2 loops on hook. Rep from * until Drawstring measures length to fit waist measurement and approx 12" [30.5 cm] extra length to tie. Fasten off.

— Finishing :

Info :

Fold Waistband between 3rd and 4th rnds, ensuring sts are aligned. With WS facing, join A with sl st to any unworked loop from sts worked in 1st rnd. Ch 1. Working up through unworked loops from 2nd rnd, and through both loops of sts worked in 5th rnd, work in sl st to create waistband casing around top of Skirt. Join with sl st to first sl st. Fasten off.

Info :

Using ch-1 sps worked in 3rd rnd of Waistband as eyelets, thread drawstring through Waistband casing.

— Stitch Key :

Info :

o = chain (ch). • = slip stitch (sl st). + = single crochet (sc). T = half double crochet (hdc). T (taller) = double crochet (dc). (symbol) = worked in back loop only. (symbol) = worked in front loop only.

Assembly Instructions

  • Fold the Waistband between the 3rd and 4th rounds, aligning stitches carefully to create an even fold for the casing.
  • With WS facing, join A with a slip stitch to any unworked loop from stitches worked in 1st rnd, ch 1, then work slip stitches through the unworked loops of the 2nd rnd and through both loops of stitches in the 5th rnd to form the waistband casing; join and fasten off.
  • Using the ch-1 spaces worked in 3rd rnd of the Waistband as eyelets, thread the drawstring through the waistband casing so it feeds evenly around the waist.
  • Make the drawstring with Contrast C as instructed, measuring to fit the waist plus approx 12" [30.5 cm] extra length to tie, then fasten off and trim ends.

Important Notes

  • 💡Carry colors not in use loosely up the wrong side of the work to avoid puckering and tension issues.
  • 💡Be careful not to twist the foundation chain when joining to form a ring to ensure the skirt lays flat.
  • 💡Ch 2 at the beginning of a round does not count as a stitch; count actual stitches when verifying stitch counts.
  • 💡Refer to the diagram on page 3 for visual guidance on the Waistband and Granny Cluster stitch placement.

This striped Granny Clusters Crochet Skirt is a quick and modern crochet project you can wear with pride. Make it in bright contrasts or subtle neutrals to suit your wardrobe and personality. The easy-to-follow pattern and built-in waistband casing make it both practical and stylish. 🧶✨

You ask,

we answer.

FAQs

What size will the finished piece be?

Finished hip measurements are: XS/S 37" [94 cm], M 40½" [103 cm], L 44½" [122 cm], XL 51" [129.5 cm], 2/3XL 56½" [143.5 cm], 4/5XL 63" [160 cm]. Length is approx 17 (17-18-19-21-22)" [43 (43-45.5-48.5-53.5-56) cm].

Can I use a different yarn weight?

You can substitute yarn, but the final size will change. The pattern is written for Caron Simply Soft (6 oz/170 g; 315 yds/288 m); make a gauge swatch (13 sc and 14 rows = 4" [10 cm]) and adjust hook size as needed.

What skill level is required to make this skirt?

This pattern is rated Easy and is beginner friendly; basic stitches like sc, hdc and dc and working in the round are used, plus simple cluster repeats.

How long does this project typically take to complete?

Most crocheters finish this skirt in 2-4 hours, depending on experience and the size being made.