About This Ginanita Bag Amigurumi Pattern
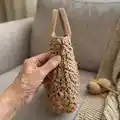
This pattern teaches you how to crochet the Ginanita Bag — a charming handbag made by combining eleven granny hexagons. It includes a clear written round-by-round hexagon pattern, diagram symbols, and stitch explanations like popcorn and crab stitch. You can make a smaller handbag or a larger tote by choosing the recommended yarn and hook size.

Follow the photo steps and diagrams to join hexagons in the (1-2-5-2-1) layout and finish the top edge and handles. Video tutorial links are provided for spiral handles and full bag assembly.
Why You'll Love This Ginanita Bag Amigurumi Pattern
I absolutely love this pattern because it blends classic granny hexagon motifs with textured popcorn stitches to create a bag that's both elegant and playful. The modular approach of making 11 hexagons makes the project flexible — you can easily scale the bag by changing yarn or hook. I enjoy the tactile process of joining hexagons with whip stitch; it always feels satisfying to see the shape form. The finishing — two rows of single crochet and a crab stitch border — gives a professional, durable edge that I admire. This pattern encourages creativity with handles and materials, so you can personalize it to your taste.
Switch Things Up
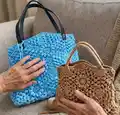
I love how easy it is to customize the Ginanita Bag by changing yarn color and weight; try pastel tones for a soft, feminine look or bold colors for a statement tote.
To make the bag larger, I use DK weight yarn and a 5/0 (3.0mm) hook; to make it smaller, I switch to fine weight yarn with a 4/0 (2.5mm) hook and fewer chains for handles.
I often experiment with different handle styles — crocheted oval handles, leather straps, or wooden handles all give a different character to the final bag.
For a more structured bag, I sometimes add a cotton or canvas lining and a small inner pocket for keys and phone; it makes the bag much more practical for everyday use.
If you like texture, try alternating popcorn stitch rounds with regular double crochet rounds to emphasize the motif and create more surface interest.
I sometimes embroider a tiny motif or attach a crocheted flower to one hexagon before joining as a focal point; it adds a handcrafted signature to each piece.
Want a crossbody option? Make longer crocheted strap pieces (or attach a removable strap with hardware) so you can wear the bag across your body for hands-free use.
I recommend blocking each hexagon lightly before joining; that small step ensures the edges match and the finished bag lays flat and even.
Try combining yarns — a cotton blend for durability or a soft acrylic for washability — depending on how you plan to use the bag.
I enjoy making sets by using the same hexagon motif to create matching accessories, like coin purses or small pouches, so everything coordinates beautifully.
Common Mistakes & How to Fix Them
✗ Skipping the stitch count checks after each round can lead to uneven hexagons; always count your stitches at the end of each round to ensure the correct number.
✗ Not blocking or measuring your hexagon can result in mismatched pieces during assembly; measure corner-to-corner and side-to-side and block if necessary before joining.
✗ Joining hexagons with inconsistent tension causes puckering or gaps; use even tension and pin pieces in place before whip stitching to maintain shape.
✗ Using a different yarn weight without adjusting the hook will change the final size dramatically; change hook size proportionally when you swap yarn weights and check gauge.
✗ Overstuffing or pulling the joining yarn too tight while sewing handles can distort the bag shape; sew handles with small, even stitches and check placement frequently.