🧶 Beautiful ✨ Detailed 💝 Adorable

Finger Puppets Set Teremok Amigurumi Pattern

Finger Puppets Set Teremok Amigurumi Pattern
4.1★ Rating
12-15 Hours Time Needed
3.7K Made This
✂️

Intermediate Level

Ideal for those with basic crochet experience, featuring slightly more advanced stitches and techniques to expand your skills.

⏱️

Multi-Day Project

A rewarding 12+ hour journey—perfect for dedicated crafters who love detailed work.

🎁

Tiny Treasure

Small, sweet, and gift-worthy creations that fit perfectly in the palm of your hand with detailed charm.

About This Finger Puppets Set Teremok Amigurumi Pattern

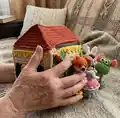
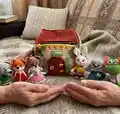
This pattern pack teaches you how to crochet a full set of Teremok finger puppets with a wooden house and several characters. You get step-by-step round-by-round instructions for each head, body, ears, legs, and clothing pieces. The small scale uses thin yarn and tiny hooks to create delicate detail and charming outfits. Photos and assembly tips are included to help you finish each puppet cleanly.

Finger Puppets Set Teremok Amigurumi Pattern crochet pattern - detailed view of completed project

Each character pattern includes complete rounds, color change notes, and finishing instructions so you can recreate the set exactly. Ideal for makers who enjoy small amigurumi and storytelling toys.

Why You'll Love This Finger Puppets Set Teremok Amigurumi Pattern

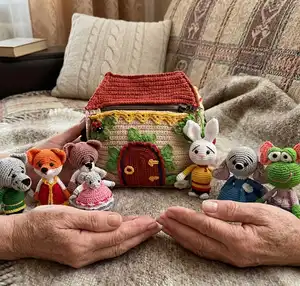
I absolutely love this pattern because it brings the classic Teremok story to life in a delightful, palm-sized format. I enjoy the tiny details like ruffled skirts and tiny ears which make each puppet feel unique and full of personality. The construction is thoughtful — heads, skirts and arms are all shaped to sew together cleanly. Working on small pieces is so satisfying and quick to complete, making it rewarding to finish a whole cast of characters. This set is perfect for gifting or for imaginative play, and I hope you enjoy making them as much as I do.

Finger Puppets Set Teremok Amigurumi Pattern step 1 - construction progress Finger Puppets Set Teremok Amigurumi Pattern step 2 - assembly progress Finger Puppets Set Teremok Amigurumi Pattern step 3 - details and accessories Finger Puppets Set Teremok Amigurumi Pattern step 4 - final assembly and finishing

Switch Things Up

I love how easy it is to customize these tiny puppets by changing colors; try pastel shades for a soft nursery set or bold hues for theatrical characters.

You can change the yarn weight and hook to scale the puppets up or down; bulky yarn will give you a chunky puppet while lace-weight yarn makes an ultra-miniature version.

I often add embroidered facial expressions to create different personalities — a tilted eyebrow or smile can transform the character instantly.

Try swapping the skirt styles: replace the ruffled skirt with a simple straight skirt or add tiny appliqued pockets for extra charm.

For child-safe toys, use embroidered eyes or securely sew beads in place rather than removable safety eyes.

I like to use metallic thread sparingly for decorative trims or collars to add a festive sparkle.

You can create outfits that mix-and-match between characters so the little set becomes a pretend-play wardrobe.

Consider making a matching felt or fabric house lining instead of cardboard for a softer interior — I sometimes add a tiny pillow too.

I sometimes add a small loop at the top of the house to hang it as an ornament or to attach the puppets with tiny ribbons for storage.

If you want posable limbs, insert a thin jewelry wire before you close the arms or legs; be sure to cover wire ends safely with stuffing and secure stitching.

For gifting, package a family of puppets with a mini story booklet — this makes the set feel extra special and ready for play.

Common Mistakes & How to Fix Them

✗ Skipping stitch markers when changing rounds can cause misaligned increases and decreases; place a marker at the start of each round and move it after completing the round. ✗ Overstuffing heads or bodies may distort shaping and make seams hard to close; stuff gradually and test shape frequently, adding small amounts to keep curves smooth. ✗ Not counting stitches after increases or decreases leads to incorrect stitch counts later; count your stitches after each increase/decrease round to verify totals. ✗ Pulling color-changing loops too tight will pucker the fabric and distort the pattern; change color by completing the last loop of the old color then finishing the stitch with the new color, keeping tension even. ✗ Skipping back-loop or front-loop instructions will change the intended texture; always work into the specified loop (BLO/FLO) when instructed to create the correct skirt or shirt shaping.

Finger Puppets Set Teremok Amigurumi Pattern

Make a charming set of tiny finger puppets inspired by the Teremok wooden house tale. This collection includes multiple characters with full step-by-step rounds, color changes, and assembly instructions so you can crochet a complete storytelling set. You'll enjoy detailed shaping for heads, ears, legs and tiny outfits that bring each puppet to life. Perfect for gifting or playful storytelling with little ones.

Intermediate 12-15 Hours

Materials Needed for Finger Puppets Set Teremok Amigurumi Pattern

— Main Fabric

  • 01
    Thin yarn Vita Cotton Iris (25 gr/150 meters) — white, red, yellow, blue, grey, green, brown, orange, pink, light blue and some black color (small amounts of each)
  • 02
    Worsted/Aran weight yarn for the wooden house CHARM VITA (50g/106 m) or Sport weight/4ply YarnArt jeans or GAZZAL baby cotton for house (brown and beige colors)
  • 03
    Small amounts of additional colors for details (white/black) as needed
  • 04
    Lace and tulle for house decoration (approx. 9 cm lace, 7x7 cm tulle)
  • 05
    Small piece of cotton cloth for house interior approx. size 12 x 16 cm
  • 06
    Zipper size 12-15 cm for house closure

— Tools Required

  • 01
    Crochet hook size 1.2 - 1.5 mm (for thin yarn Vita Cotton Iris)
  • 02
    Crochet hook size 2.0 mm (for base and house)
  • 03
    Small yarn needle for sewing and weaving ends
  • 04
    Scissors
  • 05
    Stitch markers
  • 06
    12 beads to make the eyes 1.5 – 2 mm
  • 07
    Toy stuffing (hollow fiber)
  • 08
    Pins for assembly
  • 09
    Cardboard paper for house structure
  • 10
    Tulle or organza 7 x 7 cm
  • 11
    Lace 9 cm long
  • 12
    Zipper 12–15 cm

Progress Tracker

0% Complete

— Mouse :

Info :

Work in grey yarn color

Round 1 :

Start 6sc in a mr

Round 2 :

(1 sc, inc) x 3 times (9)

Round 3 :

(2 sc, inc) x 3 times (12)

Round 4-5 :

12 sc in the round

Round 6 :

3 sc, 6 inc, 3 sc (18)

Round 7 :

3 sc, (1 sc, inc) x 6 times, 3 sc (24)

Round 8 :

(3 sc, inc) x 6 times (30)

Round 9 :

(4 sc, inc) x 6 times (36)

Round 10 :

36 sc in the round

Round 11 :

(5 sc, inc) x 6 times (42)

Round 12 :

42 sc in the round

Round 13 :

(6 sc, inc) x 6 times (48)

Round 14-20 :

48 sc in the round (7 rounds)

Round 21 :

(6 sc, dec) x 6 times (42)

Round 22 :

(5 sc, dec) x 6 times (36)

Round 23 :

(4 sc, dec) x 6 times (30)

Round 24 :

(3 sc, dec) x 6 times (24)

Info :

Stuff.

Round 25 :

(2 sc, dec) x 6 times (18)

Round 26 :

(1 sc, dec) x 6 times (12)

Round 27 :

6 dec

— Ears (make 2) :

Info :

Work in pink yarn color

Round 1 :

Start 6sc in a mr

Round 2 :

6 inc (12)

Round 3 :

(1 sc, inc) x 6 times (18)

Round 4 :

(2 sc, inc) x 6 times (24)

Round 5 :

(3 sc, inc) x 6 times (30)

Round 6 :

(4 sc, inc) x 6 times (36)

Info :

Fasten off, cut the yarn.

Info :

Work in grey yarn color

Round 1 :

Start 6sc in a mr

Round 2 :

6 inc (12)

Round 3 :

(1 sc, inc) x 6 times (18)

Round 4 :

(2 sc, inc) x 6 times (24)

Round 5 :

(3 sc, inc) x 6 times (30)

Round 6 :

(4 sc, inc) x 6 times (36)

Info :

Put 2 parts together and crochet sc in the round (36 sc).

— Body :

Info :

Make 18 stitches on the head (use light blue yarn color). Follow the instructions: 2sc on the back, 1sc obliquely, 3sc on the sideline, 1sc obliquely, 4 sc in front of the work, 1 sc obliquely, 3 sc on the sideline, 1 sc obliquely, 2 sc on the back.

Round 1-6 :

1-6 Rnd – 18 sc

— Crochet top skirt :

Round 7 :

into front loops only 18 inc (36)

Round 8 :

36 inc (72)

Round 9-20 :

72 sc (12 rounds)

— Use white color to crochet lower skirt :

Info :

Go back to the 7th round, work into back loops only

Round 1 :

(5 sc, inc) x 3 times (21)

Round 2-5 :

in the round 21 sc (4 rounds)

Round 6 :

(6 sc, inc) x 3 times (24)

Round 7-13 :

in the round 24 sc (7 rounds)

Round 14 :

crochet a round to decorate, (ch1, sc) x 24 times

— Front legs :

Info :

Work in grey yarn color

Round 1 :

Start 6sc in a mr

Round 2 :

(1 sc, inc) x 3 times (9)

Round 3-4 :

9 sc in the round

Round 5-15 :

change yarn to light blue color and crochet 9 sc in the round (11 rounds)

Info :

Do not stuff the legs

Round 15 :

put together and crochet 4sc through the loops of both sides.

Info :

Cut the yarn, leaving a tail to sew.

— Decoration and assembly :

Info :

Fold the ears in half; sew 4 stitches through the loops of both sides. Pin the ears to the head in the 15-16th rounds, sew the ears. Embroider the nose, the eyebrows; sew the eyes (beads). Sew the arms on the border where the head and the body meet.

— The flower on the dress :

Info :

15 ch, start working from the 2nd stitch from hook, 14 inc, between each sc 1 ch, roll the flower into two tiers, in the middle you can sew a bead.

— Frog :

Info :

Head - Work in green yarn color

Round 1 :

ch11, start working from the 2nd stitch from hook 9 sc, 3 sc into last stitch, continue into the unused loops on the opposite side of the chain 8 sc, inc (22)

Round 2 :

inc, 8 sc, 3 inc, 8 sc, 2 inc (28)

Round 3 :

1 sc, inc, 8 sc, (1 sc, inc) x 3 times, 8 sc, (1 sc, inc) x2 times (34)

Round 4 :

2 sc, inc, 8 sc, (2 sc, inc) x 3 times, 8 sc, (2 sc, inc) x2 times (40)

Round 5 :

3 sc, inc, 8 sc, (3 sc, inc) x 3 times, 8 sc, (3 sc, inc) x2 times (46)

Round 6-13 :

46 sc (8 rounds)

Round 14 :

3 sc, dec, 8 sc, (3 sc, dec) x3 times, 8 sc, (3 sc, dec) x2 times (40)

Round 15 :

2 sc, dec, 8 sc, (2 sc, dec) x3 times, 8 sc, (2 sc, dec) x2 times (34)

Round 16 :

1 sc, dec, 8 sc, (1 sc, dec) x3 times, 8 sc, (1 sc, dec) x2 times (28)

Round 17 :

dec, 8 sc, 3 dec, 8 sc, 2 dec (22)

Info :

Stuff.

Round 18 :

dec, 6 sc, 2 dec, 8 sc, dec (18)

Info :

Fasten off, cut the yarn, leaving a tail and sew the opening. Use remained yarn tail.

— Eyes (make 2) :

Round 1 :

Start 6 sc in a mr

Round 2 :

6 inc (12)

Round 3 :

(1 sc, inc) x 6 times (18)

Round 4-6 :

18 sc (3 rounds)

Info :

Add some stuffing.

Round 7 :

(1 sc, dec) x 6 times (12)

Round 8 :

-6 dec; cut the yarn and hide inside the work.

Info :

Sew the beads to whites; pull the thread a little to place whites deeper inside the eyes

— Eyelid :

Info :

Use green yarn color.

Round 1 :

Start 6sc in a mr

Round 2 :

6 inc (12)

Round 3 :

(1 sc, inc) x 6 times (18)

Round 4 :

(2 sc, inc) x 6 times (20)

Round 5-6 :

work in the round 20 sc

Info :

Install whites inside eyelid, sew. Sew the eyes together and sew to the head.

— Dress :

Info :

Work in pink yarn color

Round 1 :

make 18 stitches on the head.

Round 2-6 :

work in the round 18 sc (5 rounds)

Round 7 :

BLO 18 sc

Round 8 :

(5 sc, inc) x 3 times (21)

Round 9-10 :

21 sc

Round 11 :

BLO 21 sc

Round 12 :

21 sc

Round 13 :

(6 sc, inc) x 3 times (24)

Round 14 :

24 sc

Round 15 :

BLO 24 sc

Round 16-20 :

24 sc (5 rounds)

Info :

Cut the yarn, hide inside the work.

— Ruffled ending :

Info :

Now crochet ruffled ending, go back to the 6th round and work into front loops only.

Round 1 :

ch 3, 18 dc inc, sl st (36)

Round 2 :

ch 3, 36 dc inc, sl st

Round 3 :

attach another yarn color and crochet sc in the round.

Info :

Also I recommend you to crochet 2 ruffled endings in the 10th and the 14th rounds.

— Front legs (make 2) :

Info :

Green yarn color

Round 1 :

Start 6sc in a mr

Round 2 :

6 inc (12)

Round 3-5 :

work in the round 12 sc (3 rounds)

Round 6 :

(2 sc, dec) x 3 times (9)

Round 7-15 :

change yarn to pink color and crochet 9sc in the round (9 rounds)

Info :

Add some stuffing inside the hands.

Round 16 :

put together and crochet 4sc through the loops of both sides.

Info :

Cut the yarn, leaving a tail to sew.

— Decoration and assembly (Frog) :

Info :

Embroider the mouth and the nostrils. Sew front legs. Also I recommend you to sew a bow.

— Bunny :

Info :

Head - Work in white yarn color

Round 1 :

Start 6 sc in a MR

Round 2 :

6 inc (12)

Round 3 :

(1 sc, inc) x 6 times (18)

Round 4 :

(2 sc, inc) x 6 times (24)

Round 5 :

(3 sc, inc) x 6 times (30)

Round 6 :

(4 sc, inc) x 6 times (36)

Round 7 :

(5 sc, inc) x 6 times (42)

Round 8 :

(6 sc, inc) x 6 times (48)

Round 9-16 :

48 sc (8 rounds)

Round 17 :

(6 sc, dec) x 6 times (42)

Round 18 :

(5 sc, dec) x 6 times (36)

Round 19 :

(4 sc, dec) x 6 times (30)

Round 20 :

(3 sc, dec) x 6 times (24)

Info :

Stuff

Round 21 :

(2 sc, dec) x 6 times (18)

Round 22 :

BLO (1 sc, dec) x 6 times (12)

Round 23 :

6 dec, tighten the hole and weave in the yarn ends.

— Body (Bunny) :

Round 1 :

in red color through front loops of round 21 of the head, 18 sc

Round 2 :

18 sc

Round 3 :

change color to white, BLO 18 sc

Round 4-6 :

18 sc (3 rounds)

Round 7 :

(5 sc, inc) x 3 times (21)

Round 8-11 :

21 sc (4 rounds)

Round 12 :

(6 sc, inc) x 3 times (24)

Round 13 :

change color to blue, BLO 24 sc

Round 14-19 :

24 sc (6 rounds)

Round 20 :

23 sc, 1 sl st

Info :

TIP – crochet in the last round a little bit more to hide the yarn in the leg.

— Shirt :

Info :

Return to round 2 of the body, crochet in yellow color through front loops. Hold the toy upside down.

Round 1 :

18 sc

Round 2 :

(2 sc, inc) x 6 times (24)

Round 3 :

(3 sc, inc) x 6 times (30)

Round 4 :

(4 sc, inc) x 6 times (36)

Round 5-9 :

36 sc (5 rounds)

Round 10 :

(4 sc, dec) x 6 times (30)

Round 11 :

(3 sc, dec) x 6 times (24). Stuff the tummy slightly.

Round 12 :

crochet through stitches on the shirt and front loops of round 13 of the body: 24 sc

Round 13 :

(1 sc, inc) x 12 times (36)

Round 14 :

36 sc

Round 15 :

change color to red, 35 sc, 1 sl st, fasten off, do not cut the yarn, pull it to round 13 and crochet the belt with sl st. Cut the yarn, weave in the yarn end in the shirt. Embroider a collar on the shirt in red color.

— Arms (2 pcs.) :

Info :

Work in white yarn color

Round 1 :

Start 6 sc in a MR

Round 2 :

6 inc (12)

Round 3-5 :

12 sc (3 rounds)

Round 6 :

(2 sc, dec) x 3 times (9)

Round 7-15 :

change color to yellow, 9 sc (9 rounds). Stuff the palms slightly.

Round 16 :

fold the arm in half and crochet 4 sc through both sides. Cut the yarn, leaving a long tail for sewing.

— Legs :

Round 1 :

Start 6 sc in a MR

Round 2 :

6 inc (12)

Round 3-4 :

12 sc (2 rounds)

Round 5 :

fold the arm in half and crochet 6 sc through both sides. Cut the yarn, leaving a long tail for sewing.

— Ears (2 pcs.) :

Info :

Crochet in white color.

Round 1 :

Start 6 sc in a MR

Round 2 :

(1 sc, inc) x 3 times (9)

Round 3 :

9 sc

Round 4 :

(2 sc, inc) x 3 times (12)

Round 5 :

(3 sc, inc) x 3 times (15)

Round 6 :

(4 sc, inc) x 3 times (18)

Round 7 :

(5 sc, inc) x 3 times (21)

Round 8-10 :

21 sc (3 rounds)

Round 11 :

(5 sc, dec) x 3 times (18)

Round 12 :

(4 sc, dec) x 3 times (15)

Round 13 :

(3 sc, dec) x 3 times (12)

Round 14-15 :

12 sc

Info :

Cut the yarn, leaving a long tail for sewing.

— Assembly and decoration :

Info :

Sew on the legs. Sew the arms approximately to round 2 of the shirt. Place the ears on the head as you like more, sew them on. Sew on eyes, inserting the needle at the back between the stitches. Fix the eyes and exit the needle through the starting point. Tie a knot, pulling tightly. The eyes should drown a little. Next, embroider a mouth and eyebrows. You can apply blush with pastel pencils or shadows.

— Fox :

Info :

Head - Work in orange yarn color

Round 1 :

Start 6 sc in a MR

Round 2 :

6 inc (12)

Round 3 :

(1 sc, inc) x 6 times (18)

Round 4 :

(2 sc, inc) x 6 times (24)

Round 5 :

(3 sc, inc) x 6 times (30)

Round 6 :

(4 sc, inc) x 6 times (36)

Round 7 :

(5 sc, inc) x 6 times (42)

Round 8-12 :

42 sc (5 rounds)

Round 13 :

(6 sc, inc) x 6 times (48)

Info :

Change color to white.

Round 14-16 :

48 sc (3 rounds)

Round 17 :

(6 sc, dec) x 6 times (42)

Round 18 :

(5 sc, dec) x 6 times (36)

Round 19 :

(4 sc, dec) x 6 times (30)

Round 20 :

(3 sc, dec) x 6 times (24). Stuff

Round 21 :

(2 sc, dec) x 6 times (18)

Round 22 :

BLO (1 sc, dec) x 6 times (12)

Round 23 :

6 dec, tighten the hole and weave in the yarn ends.

— Muzzle :

Round 1 :

Start 6sc in a MR (orange yarn color)

Info :

Now work in orange and white colors.

Round 2 :

3 inc orange yarn color, 3 inc white yarn color (12)

Round 3-4 :

6 sc orange yarn color, 6 sc white yarn color (12)

Info :

It may help to close last loop of color changing in new yarn color. As a result, color changing looks neat (as pictured below).

Round 5 :

(3 sc, inc, 2 sc) orange yarn color, (2 sc, inc, 2 sc, inc) white yarn color (15)

Round 6-7 :

7 sc orange yarn color, 8 sc white yarn color (15)

Info :

Cut the yarn, leaving a long tail for sewing. Stuff.

— Ears (2 pcs.) :

Info :

Crochet in orange color.

Round 1 :

Start 6 sc in a MR

Round 2 :

6 sc

Round 3 :

(1 sc, inc) x 3 times (9)

Round 4 :

(2 sc, inc) x 3 times (12)

Round 5 :

(1 sc, inc) x 6 times (18)

Round 6 :

(2 sc, inc) x 6 times (24)

Round 7-9 :

24 sc (3 rounds)

Info :

Cut the yarn, leaving a long tail for sewing. Do not stuff.

— Arms (Fox) :

Info :

Crochet in orange color.

Round 1 :

Start 6 sc in a MR

Round 2 :

6 inc (12)

Round 3-5 :

12 sc (3 rounds)

Round 6 :

(2 sc, dec) x 3 times (9)

Round 7-15 :

change color to white, 9 sc (9 rounds). Stuff the palms slightly.

Round 16 :

fold the arm in half and crochet 4 sc through both sides. Cut the yarn, leaving a long tail for sewing.

— Petticoat :

Round 1 :

in white color through front loops of round 21 of the head, 18 sc

Round 2-6 :

18 sc (5 rounds)

Round 7 :

(5 sc, inc) x 3 times (21)

Round 8-11 :

21 sc (4 rounds)

Round 12 :

(6 sc, inc) x 3 times (24)

Round 13-19 :

24 sc (7 rounds)

Round 20 :

(ch 1, slst) x 24 times

— Top skirt :

Round 1 :

crochet in red color between rounds 4 and 5: 18 sc, inserting the hook between the stitches.

Round 2 :

18 inc (36)

Round 3-14 :

36 sc (12 rounds)

Round 15 :

change color to yellow, 36 sc

Round 16 :

(1 sc, ch 3) x 36 times

Assembly Instructions

  • Fold the ears in half and sew 4 stitches through the loops of both sides; pin the ears to the head at rounds 15-16 and sew securely.
  • Sew beads or eyes into the whites, pull the thread slightly to sink the whites deeper, then attach the eyes to the head and secure by exiting the needle at the starting point.
  • Attach arms to the border where the head and body meet and sew legs to the bottom of the body evenly for stability.
  • For skirts and dresses, crochet ruffled endings as directed, then attach decorative flowers or beads to the skirt center, sewing through the layers to secure.
  • Use cardboard and a zipper to construct the wooden house base (see materials); attach lace and tulle decorations and sew cloth lining as instructed.

Important Notes

  • 💡Use stitch markers to mark the beginning of rounds, especially when working tiny counts and color changes.
  • 💡Stuff small pieces gradually and shape with your fingers to avoid lumps and to maintain the intended proportions.
  • 💡Weave in ends inside the work and hide tails when changing colors to keep the small toys tidy and durable.
  • 💡When joining two parts (ears, legs, skirts), pin them first to check symmetry before sewing permanently.

This Teremok finger puppet set brings a little cast of characters to life in tiny, handcrafted detail. Create the whole wooden house and adorable puppets to tell stories and delight little hands. These mini amigurumi make perfect gifts and charming keepsakes. 🎁🧶

You ask,

we answer.

FAQs

What size will the finished piece be?

The finished finger puppets measure approximately 3.15 inches (8 cm) when made with the recommended thin yarn and hook sizes; sizes vary with different yarn weights.

Can I use different yarn weights for this pattern?

Yes, you can use different yarn weights, but the final size will change; adjust the hook accordingly and expect larger or smaller puppets.

Do I need prior crochet experience for this pattern?

This pattern is rated intermediate, so basic knowledge of amigurumi techniques, increases, decreases, and working in rounds is recommended.

How long does this project typically take to complete?

Most makers will complete the full set in a multi-day session; expect approximately 12-15 hours total depending on experience and number of characters made.

Are safety eyes recommended for these small puppets?

The pattern suggests using small beads (1.5–2 mm) sewn into the white eye pieces, which is safer for tiny toys and helps keep the look scale-appropriate.