🧢 Beautiful ✨ Detailed πŸ’ Adorable

The Carissa Blanket Pattern

The Carissa Blanket Pattern
4.1β˜… Rating
5-7 Hours Time Needed
3.8K Made This
βœ‚οΈ

Beginner Friendly Level

Perfect for those just starting their crochet journey, with clear instructions and simple techniques

⏱️

Weekend Treat

Takes 5-7 hours, making it an enjoyable project to finish over a couple of days.

πŸ€—

Soft Hug

Gentle, plush, and full of warmth, creating a sense of comfort and coziness wherever they find a home.

About This The Carissa Blanket Pattern

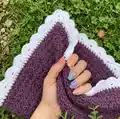
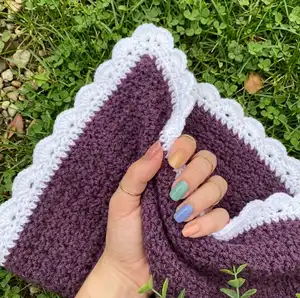
This pattern creates the Carissa baby blanket featuring a textured suzette stitch body and a scalloped shell border. It is designed for chunky weight yarn and worked flat, then edged in rounds for a neat finish. The finished blanket measures approximately 26.5 inches x 37 inches including the border. Ideal for beginners who want a lovely handmade baby blanket with a decorative edge.

The Carissa Blanket Pattern crochet pattern - detailed view of completed project

The pattern uses US crochet terms and an 8mm hook to achieve the same drape as pictured. You can easily customize color combinations or enlarge the blanket by adjusting the starting chain in multiples of 2+1.

Why You'll Love This The Carissa Blanket Pattern

I absolutely love this pattern because it combines simple, repetitive stitches with a beautiful scalloped border that makes the finished blanket look special without complicated techniques. I adore how the suzette stitch gives a lovely textured fabric that is soft and cozy to the touch. Working with chunky yarn and an 8mm hook makes the project quick to finish, which is very satisfying. I also love the flexibility of color choicesβ€”switch the main and border colors to suit any nursery or gift recipient. This pattern is rewarding for beginners while still producing an elegant result I am proud to display or gift.

The Carissa Blanket Pattern step 1 - construction progress The Carissa Blanket Pattern step 2 - assembly progress The Carissa Blanket Pattern step 3 - details and accessories The Carissa Blanket Pattern step 4 - final assembly and finishing

Switch Things Up

I love how easily this pattern customizesβ€”swap the main and border colors to change the mood instantly.

I often try pastel palettes for nurseries or bold contrasts for statement throws.

To make the blanket larger, I increase the starting chain in multiples of 2+1 and work more rows until it reaches the size I want.

I like to experiment with different yarn weights and adjust the hook size; using a DK yarn and smaller hook yields a lighter blanket.

For a chunkier, cozy version I use a super bulky yarn and a larger hook to create a warm, lap-sized throw.

I sometimes alter the borderβ€”try a simple single crochet border, a picot edge, or add two rounds of shell stitches for extra frill.

I enjoy adding small embellishments like crocheted flowers or embroidered initials on the corner for personalization.

For gifting, I add a contrasting hanging loop or tiny pom-poms to the corners to make each blanket unique.

I recommend testing stitch placement before committing to the border; move your marker to see how scallops fall along the edge.

When making multiple blankets, I keep a swatch notebook noting yarn, hook, and finished measurements so I can reproduce a favorite size easily.

Common Mistakes & How to Fix Them

βœ— Not counting the starting chain correctly can throw off the entire foundation; recount your chain to ensure CH 52+1 (53) before beginning Row 1. βœ— Forgetting that CH 1 at the beginning of each row counts as a stitch will change your row endings; always treat the starting CH 1 as a ST when you reach the end of each row. βœ— Placing HDCs incorrectly along the foundation chain can distort the border shape; when working the border, place HDC into each CH 1 post and SC post exactly as instructed and refer to the placement pictures. βœ— Missing the HDC in the skipped CH on the second short side will reduce your HDC total; take extra care and place an HDC in the skipped CH so the border stitch count matches. βœ— Inconsistent tension, especially with chunky yarn, makes scallops and corners uneven; maintain consistent, relaxed tension and check counts frequently to keep scallops uniform.

The Carissa Blanket Pattern

Make a cozy, textured baby blanket with the Carissa Blanket Pattern. This beginner-friendly design uses chunky yarn and a simple suzette stitch body with a scalloped shell border for a lovely finished edge. You can customize colors and make it larger by adjusting the starting chain. Enjoy an easy-to-follow pattern that creates a warm, handmade gift you will be proud to give.

Beginner Friendly 5-7 Hours

Materials Needed for The Carissa Blanket Pattern

β€” Main Fabric

  • 01
    King Cole Value Chunky shade Plum - approximately 200 grams (334 yards / 304 metres) for main blanket
  • 02
    Paintbox Simply Chunky shade Paper White - approximately 100 grams (149 yards / 136 metres) for border

β€” Tools Required

  • 01
    Crochet hook 8mm
  • 02
    Scissors
  • 03
    Darning needle to sew in ends

Progress Tracker

0% Complete

β€” Special Stitches :

Info :

Shell Stitch – SK 1 ST, 5 DC into same ST, SK 1 ST, SC into the next ST.

Info :

NOTE : I have increase the number of DC into the corners spaces to 8 DC on this pattern.

Info :

Suzzette Stitch – SK 1 ST, SC,DC into the next ST, SK 1 ST, SC, DC into the next ST.

β€” Gauge :

Info :

Gauge is not important in this pattern, however using other yarn weights and hook sizes will change your finished blanket size.

Info :

This blanket's finished size is 26.5 inches x 37 inches (including border)

Info :

My gauge for this using the King Cole Big Value was 10 DC x 5 rows in 10cm square

β€” Pattern Notes :

Info :

CH 1 at the beginning of each row counts as ST throughout.

Info :

This pattern is a baby blanket size measuring 26.5 inches x 37 inches - it can be made bigger using longer starting chain in multiples of 2+1.

β€” Pattern Instruction :

Info :

With a 8mm hook CH 52+1 (53)

Round 1 :

ROW 1 – SC into the second CH from the hook, DC into the same CH, SK 1 CH, *SC,DC into the next CH, SK 1 CH. Repeat from * until you have 1 CH remaining, 1 SC into this CH, CH 1 and turn work.

Round 2 :

ROW 2 – SK 1 ST, SC,DC, into the next ST, SK the next ST, *SC,DC into the next ST, SK the next ST. Repeat from * until you have 1 ST remaining, SC into the last remaing ST, CH 1 and turn work.

Round 3-69 :

ROWS 3-69 are a repeat of row 2.

Info :

After row 69 FO and sew in your ends.

β€” Border :

Info :

We will now work in the round. Attach you border colour to top right corner right side facing you. (This should be the short side of the blanket and be the end you FO on).

Round 1 :

ROUND 1 – CH 4 (this counts as a HDC and CH 2), HDC into the same space, *HDC into each ST until you reach the second corner, HDC, CH 2, HDC into the corner ST. Working along the first long side, HDC into each CH 1 post and SC post of each row (see picture 1 for placement) until you reach the third corner, HDC, CH 2, HDC. Working the second short side repeat from * until you have reached the CH 4 from the begining, SS into top of the 2nd CH.

Info :

You should have a total of 246 HDC around the blanket including corners.

Info :

NOTE: When completing the second short side (the one which works into the foundation CH) take extra care when placing you HDC STs don’t forget to place one in the skipped CH (see picture 2 for placement).

Round 2 :

ROUND 2 – CH 2, HDC, CH 2, HDC into the CH 2 space creating your first corner, *HDC into every ST until you reach the second corner, HDC, CH 2, HDC into the CH 2 space. Repeat from * until you reach the CH 2 at the beginning SS into the to top of the CH 2.

Info :

You should have a total of 256 HDC around the blanket including corners.

Round 3 :

ROUND 3 – CH 1 (does not count at ST), SK a ST, 8 DC into the 2 CH corner space, *SK a ST, SC into the next ST, SK a ST, 5 DC into the next ST. Repeat from * until you have 3 STs remaining before the corner, SK a ST, SC into the next ST, SK a ST, 8 DC into the CH 2 corner space (you should have 13 scallops between the corners). Repeat from * until you have 3 STs remaining before the corner, SK a ST, SC into the next ST, SK a ST, 8 DC into the CH 2 corner space (you should have 17 scallops between the corners). Repeat from * until you have 3 STs remaining before the corner, SK a ST, SC into the next ST, SK a ST, 8 DC into the CH 2 corner space (you should have 13 scallops between the corners). Repeat from * until you have 1 ST remaining and your starting CH 1, SC into the base of the CH 1, SS to the CH 1 and FO (you should have 17 scallops between the corners).

Info :

Sew in your ends.

Info :

YOUR BLANKET IS NOW COMPLETE.

Assembly Instructions

  • Attach border colour to the top right corner with right side facing you; this should be the short side of the blanket and the end you FO on.
  • Work the border in the round: follow Round 1 instructions, placing HDC into each CH 1 post and SC post of each row along the long sides for consistent placement.
  • When completing the second short side (the side worked into the foundation chain), take extra care to place an HDC into the skipped CH so stitch counts remain correct.
  • After completing Round 3 of the border, fasten off and sew in all ends securely, weaving tails into the body of the blanket so they are hidden and secure.

Important Notes

  • πŸ’‘CH 1 at the beginning of each row counts as a stitch throughout the pattern; always count the starting CH 1 as a ST.
  • πŸ’‘Gauge is not critical for this pattern but changing yarn weight or hook size will affect finished blanket size and yarn required.
  • πŸ’‘When working the border, place HDC into each CH 1 post and SC post as shown to maintain an even edge and correct stitch placement.
  • πŸ’‘Double-check stitch counts around the blanket after Round 1 and Round 2 of the border so you have 246 then 256 HDC including corners as noted.

This Carissa Blanket pattern is a sweet, handmade baby blanket designed to be quick and satisfying to make. The textured suzette body and scalloped shell border give it a delicate, classic look that complements any nursery. Perfect for gifting or keeping cozy at home, this pattern brings warmth and charm to every stitch. 🧢🀍

You ask,

we answer.

FAQs

What size will the finished piece be?

The finished blanket measures approximately 26.5 inches x 37 inches including the border when made with the recommended chunky yarn and 8mm hook.

Can I use different yarn weights for this pattern?

Yes, you can use other yarn weights, but the finished size and yarn requirements will change; gauge is not critical, so adjust the starting chain and hook to achieve your desired size.

Do I need prior crochet experience for this pattern?

This pattern is beginner friendly and uses basic stitches (SC, DC, HDC) and simple repeats, so basic crochet knowledge is recommended to follow the rows and border successfully.

How do I make the blanket larger?

To make a larger blanket, start with a longer foundation chain in multiples of 2+1 and continue the same row pattern and border instructions until you reach your desired size.

Can I sell items made from this pattern?

Yes, the designer gives permission for items made using this pattern to be sold, provided credit is given to Crafty Little Cottontail as stated in the pattern.