๐Ÿงถ Beautiful โœจ Detailed ๐Ÿ’ Adorable

Festive Gnomes Amigurumi Pattern

Festive Gnomes Amigurumi Pattern
4.0โ˜… Rating
5-7 Hours Time Needed
1.9K Made This
โœ‚๏ธ

Intermediate Level

Ideal for those with basic crochet experience, featuring slightly more advanced stitches and techniques to expand your skills.

โฑ๏ธ

Weekend Treat

Takes 5-7 hours, making it an enjoyable project to finish over a couple of days.

๐Ÿงธ

Cute Companion

An adorable friend to cherish, handcrafted with love to bring comfort and joy for years to come.

About This Festive Gnomes Amigurumi Pattern

This pattern teaches you how to crochet a pair of festive gnomes with a round base, tall hat, and optional braided or looped beards. You will use Paintbox Cotton DK yarn and a 3mm hook to make neat, firm stitches that hold the gnome shape. The design includes embroidery details and a cardboard base for stability to give a professional finish.

Festive Gnomes Amigurumi Pattern crochet pattern - detailed view of completed project

Clear step-by-step rounds guide you through the body, hands, nose, beard, hat and finishing. Suitable for crocheters comfortable with basic increases, decreases and simple surface embroidery.

Why You'll Love This Festive Gnomes Amigurumi Pattern

I absolutely love this pattern because it combines classic amigurumi shaping with delightful holiday details that make each gnome feel handmade and unique. I enjoy the satisfying shaping of the round body and the playful tall hat that gives the gnome so much character. The braid and looped beard options let me personalize each gnome and experiment with texture. Sewing the pieces together and adding tiny embroidered stars is where these little characters truly come to life.

Festive Gnomes Amigurumi Pattern step 1 - construction progress Festive Gnomes Amigurumi Pattern step 2 - assembly progress Festive Gnomes Amigurumi Pattern step 3 - details and accessories Festive Gnomes Amigurumi Pattern step 4 - final assembly and finishing

Switch Things Up

I love how adaptable this pattern is; I often change colours to make themed gnomes for different holidays or seasons.

I sometimes swap the red hat for green or grey and embroider different motifs instead of stars to give each gnome its own personality.

If you want a chunkier gnome, try a bulkier yarn and a larger hook to make a squishier, larger version.

For a tiny keychain gnome use finer yarn and a smaller hook to create a miniature that fits in the palm of your hand.

I like to experiment with beard styles: looped beards look soft and curly, while braids give a neat, whimsical look.

Add wire inside the arms if you want posable hands that can hold small props like a tiny gift or heart.

Changing the nose size slightly alters the character โ€” a smaller nose peeking out from under a hat looks shy, a larger nose is comical.

Use different embroidery patterns on the body: snowflakes, hearts, or initials make each gnome a personalized gift.

Try felt or tiny safety embellishments like beads or buttons for eyes if making non-child-safe decorative gnomes.

I often make sets in coordinating colours to create a festive family of gnomes for a mantel display.

Common Mistakes & How to Fix Them

โœ— Skipping stitch markers during rounds can cause you to lose track of the beginning of the round; place a marker at the start of each round and move it up as you work to maintain correct stitch counts. โœ— Not inserting the cardboard circle before closing the bottom will make the base unstable and uneven; insert the cardboard disc into the bottom when instructed so the base sits flat and then continue stuffing and closing. โœ— Overstuffing the body can distort the shaping and make sewing pieces together difficult; stuff gradually and test the shape often, adding small amounts until you achieve a firm but not overly tight finish. โœ— Forgetting to change yarn color cleanly at the hands or hat causes messy joins; break yarn cleanly and join the new color with a neat slip stitch, weaving in ends securely before finishing. โœ— Skipping counting after increase or decrease rounds will lead to wrong stitch counts later; count your stitches after each increasing or decreasing round to ensure you match the pattern exactly.

Festive Gnomes Amigurumi Pattern

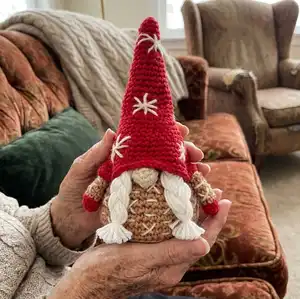
Make two charming festive gnomes using Paintbox Cotton DK yarn and simple amigurumi techniques. You will create a sweet round body, a tall slouchy hat, tiny hands, and a cute nose with options for a looped beard or braided hair. The pattern is clear and richly detailed so you can stitch delightful holiday decorations or thoughtful handmade gifts. Perfect for gifting or adding seasonal cheer to your home.

Intermediate 5-7 Hours

Materials Needed for Festive Gnomes Amigurumi Pattern

โ€” Main Fabric

  • 01
    Paintbox Yarns Cotton DK, 50g ball - Soft Fudge 410 (A) - 1 ball
  • 02
    Paintbox Yarns Cotton DK, 50g ball - Red Wine 416 (B) - 1 ball
  • 03
    Paintbox Yarns Cotton DK, 50g ball - Vanilla Cream 408 (C) - 1 ball
  • 04
    Paintbox Yarns Cotton DK, 50g ball - Champagne White 403 (D) - 1 ball

โ€” Tools Required

  • 01
    US D-3 (3mm) crochet hook
  • 02
    Toy stuffing (polyester fiberfill)
  • 03
    Scissors
  • 04
    Yarn needle for sewing and weaving ends
  • 05
    Cardboard circle 2 1/4 - 2 3/4 in / 6-7 cm diameter to make flat bottom
  • 06
    Stitch markers (recommended)

Progress Tracker

0% Complete

โ€” Body :

Round 1 :

6 sc(dc) in ring. | 6 sts.

Round 2 :

Inc in each st around. | 12 sts.

Round 3 :

[1 sc(dc), inc] 6 times. | 18 sts.

Round 4 :

[2 sc(dc), inc] 6 times. | 24 sts.

Round 5 :

[3 sc(dc), inc] 6 times. | 30 sts.

Round 6 :

[4 sc(dc), inc] 6 times. | 36 sts.

Round 7 :

[5 sc(dc), inc] 6 times. | 42 sts.

Round 8 :

[6 sc(dc), inc] 6 times. | 48 sts.

Round 9 :

Sc(dc) blo around.

Round 10 - 14 :

Sc(dc) around.

Info :

Insert cardboard circle into bottom of work.

Round 15 :

[6 sc(dc), dec] 6 times. | 42 sts.

Round 16 :

Sc(dc) around.

Round 17 :

[5 sc(dc), dec] 6 times. | 36 sts.

Round 18 :

Sc(dc) around.

Round 19 :

[4 sc(dc), dec] 6 times. | 30 sts.

Round 20 - 22 :

Sc(dc) around.

Round 23 :

[3 sc(dc), dec] 6 times. | 24 sts.

Round 24 :

[2 sc(dc), dec] 6 times. | 18 sts.

Info :

Add stuffing.

Round 25 :

[1 sc(dc), dec] 6 times. | 12 sts.

Round 26 :

[Dec] 6 times. | 6 sts.

Info :

Cut yarn. Fasten off. Using C embroider the pattern on the body.

โ€” Hands (Make 2) :

Round 1 :

6 sc(dc) in ring. | 6 sts.

Round 2 :

Sc(dc) around.

Round 3 :

[1 sc(dc), inc] 3 times. | 9 sts.

Info :

Break B, join in A.

Round 4 - 9 :

Sc(dc) around.

Info :

Break yarn leaving a tail for sewing. Using C embroider the pattern on the arms. Sew hands between 17th and 18th rounds of body leaving 14 sts between them.

โ€” Beard :

Round 1 :

Ch 4. 1 sc(dc) in 2nd ch from hook and in each of next 2 ch, turn. | 3 sts.

Round 2 :

3 lp st, turn.

Round 3 :

Inc, 1 sc(dc), inc, turn. | 5 sts.

Round 4 :

5 lp st, turn.

Round 5 :

Inc, [1 sc(dc), inc] twice, turn. | 8 sts.

Round 6 :

8 lp st, turn.

Round 7 :

[Inc, 1 sc(dc)] 4 times, turn. | 12 sts.

Round 8 :

12 lp st, turn.

Round 9 :

[Inc, 2 sc(dc)] 4 times, turn. | 16 sts.

Round 10 :

16 lp st. Break yarn leaving a tail for sewing. Sew between arms on 12th - 21st rounds.

โ€” Braids :

Info :

Using D cut 27 pieces of yarn each 12in/30cm long. Divide into 3 even parts and make a braid. Cut 2 pieces 2in/5cm long and tie the braid from each side to keep them together. Cut the ends leaving 1/2in/1cm long tassels.

Info :

Fold braid in half and place it on front of the gnome so it will form both braids. Connect the middle (at point of fold) to the 25th - 26th rounds of body with a 2-3in/5-7cm piece of yarn.

โ€” Nose :

Round 1 :

6 sc(dc) in ring. | 6 sts.

Round 2 :

[1 sc(dc), inc] 3 times. | 9 sts.

Round 3 :

Sc(dc) around. Break yarn leaving a tail for sewing.

Info :

For bearded gnome sew nose on top of the beard. For braided gnome sew nose between braids on 17th - 19th rounds.

โ€” Hat :

Round 1 :

6 sc(dc) in ring. | 6 sts.

Round 2 :

Sc(dc) around.

Round 3 :

[1 sc(dc), inc] 3 times. | 9 sts.

Round 4 - 6 :

Sc(dc) around.

Round 7 :

[2 sc(dc), inc] 3 times. | 12 sts.

Round 8 - 10 :

Sc(dc) around.

Round 11 :

[3 sc(dc), inc] 3 times. | 15 sts.

Round 12 - 14 :

Sc(dc) around.

Round 15 :

[4 sc(dc), inc] 3 times. | 18 sts.

Round 16 - 17 :

Sc(dc) around.

Round 18 :

[5 sc(dc), inc] 3 times. | 21 sts.

Round 19 - 20 :

Sc(dc) around.

Round 21 :

[6 sc(dc), inc] 3 times. | 24 sts.

Round 22 :

Sc(dc) around.

Round 23 :

[7 sc(dc), inc] 3 times. | 27 sts.

Round 24 :

Sc(dc) around.

Round 25 :

[8 sc(dc), inc] 3 times. | 30 sts.

Round 26 :

[9 sc(dc), inc] 3 times. | 33 sts.

Round 27 :

[10 sc(dc), inc] 3 times. | 36 sts.

Round 28 :

[11 sc(dc), inc] 3 times. | 39 sts.

Round 29 :

[12 sc(dc), inc] 3 times. | 42 sts.

Round 30 :

[13 sc(dc), inc] 3 times. | 45 sts.

Round 31 :

[14 sc(dc), inc] 3 times. | 48 sts.

Round 32 :

[15 sc(dc), inc] 3 times. | 51 sts.

Info :

Break yarn leaving a tail for sewing. Using C embroider big stars randomly. Place hat on top of the body and position at beginning of the arms and nose. Sew to back of body and around arms.

Assembly Instructions

  • Insert the cardboard circle into the bottom of the body work before closing to make a flat, stable base and then continue stuffing and finishing the bottom.
  • Sew the hands between the 17th and 18th rounds of the body, leaving 14 stitches between them and using matching yarn tails to secure firmly.
  • Sew the beard between the arms so it sits from around the 12th to the 21st rounds of the body; for the braided version attach the folded braid middle to the 25th-26th rounds.
  • Sew the nose on top of the beard for the bearded gnome, or between the braids on rounds 17-19 for the braided gnome, using the long tail to secure and hide ends.
  • Place the hat on top of the body positioned to begin at the arms and nose, then sew the hat to the back of the body and around the arms, embroidering stars with C as desired.

Important Notes

  • ๐Ÿ’กUse stitch markers to mark the beginning of each round so you can keep accurate stitch counts throughout shaping.
  • ๐Ÿ’กStuff the body gradually and evenly to maintain smooth shaping; overstuffing can distort the silhouette and make sewing difficult.
  • ๐Ÿ’กPin parts in place before sewing to check placement and symmetry, especially the hat, nose and hands for correct alignment.
  • ๐Ÿ’กWeave in yarn ends neatly and tuck tails inside the body to secure attachments and create a tidy finish.

These Festive Gnomes are the perfect handmade touch for holiday displays and gift-giving. Create a pair and mix bearded and braided styles for charming variety. Add embroidered stars or personal colors to match your decor and make each one unique. ๐ŸŽ„๐Ÿงถ

You ask,

we answer.

FAQs

What size will the finished piece be?

The finished gnome measures approximately 6 1/4 in / 16 cm in height when using the recommended Paintbox Cotton DK yarn and a 3mm hook.

Can I use different yarn weights for this pattern?

Yes, you can use different yarn weights but this will change the final size; select an appropriate hook to match your yarn and expect a larger or smaller finished gnome.

Do I need prior crochet experience for this pattern?

This pattern is rated intermediate, so basic crochet skills like working in the round, increases, decreases and simple surface embroidery are recommended.

How long does this project typically take to complete?

Most crocheters complete one gnome in about 5-7 hours, depending on experience, finishing details and whether you make beards or braids.

How do I make the looped beard or braids secure?

For the looped beard use the lp st technique as described and sew the base securely; for braids fold and attach the braid midpoint to rounds 25-26 and tie small yarn pieces to secure ends.