Make adorable barnyard-themed baby booties that double as tiny amigurumi companions. This pattern guides you through creating five animal styles with clear shaping, rounds and assembly directions. Youll love the detailed instructions, helpful gauge notes, and color suggestions to customize every pair. Perfect for handmade gifts and baby shower makes.
Progress Tracker
0% Complete
— Base Bootie (make 2) :
Info :
Remember to measure baby’s foot to ensure the correct size is being made. Age ranges indicated below are just estimates.
Info :
0-3 Month (3.5” use G hook) 3-6 Month (4” use H hook) For other sizes, proceed to next size section.
— Sole (bottom of bootie) - 0-3 Month :
Rnd 1 :
Using Sole Color, CH 10, SC in 2nd CH from hook, SC in next 5 CH, HDC in next CH, 2 HDC in next CH, 5 HDC in next CH, working down opposite side of starting CH, 2 HDC in next CH, HDC in next CH, SC in next 5 CH, 2 SC in next CH. (24 Stitches)
Info :
This piece is worked in continuous rounds so do not SL ST to join. Just continue on to next round. Use a stitch marker to mark the beginning stitch.
Rnd 2 :
2 SC in first SC, SC in next 8 stitches, *2 SC in next stitch, SC in next stitch*, repeat from * to * 2 more times, SC in next 8 stitches, 2 SC in next stitch. (29 SC)
Rnd 3 :
2 SC in next stitch, SC in next 9 stitches, 2 SC in next stitch, *SC in next stitch, 2 SC in next stitch*, repeat from * to * 2 more times, SC in next 9 stitches, 2 SC in next stitch, SC in next stitch, SL ST in next stitch. (35 SC)
Info :
Check gauge here. Sole should measure 3.5” with G hook or 4” with H hook. If gauge is off, adjust as needed.
— Main Bootie - 0-3 Month :
Row 1 :
CH 1, working in back loops only, SC in same stitch as joining and in each SC around, SL ST in first SC to join. (35 SC)
Info :
At this point you can change colors if desired to have the sole one color and the bootie a contrasting color. If the decision is to change colors, fasten off, and attach new color in same stitch.
Row 2 :
CH 1, working in both loops, SC in each SC around, SL ST in first SC to join. (35 SC)
Row 3 :
CH 1, SC in same stitch as joining and in each SC around, SL ST in first SC to join. (35 SC)
Row 4 :
CH 1, SC in same stitch as joining and in next 11 stitches, skip next stitch, HDC in next stitch, skip next stitch, DC in next stitch, DC DEC next 2 stitches together, DC in next stitch, skip next stitch, HDC in next stitch, skip next stitch, SC in next 13 stitches, SL ST in first SC to join. (30 stitches)
Row 5 :
CH 1, skip joining stitch, SC in next 10 stitches, skip next stitch, SC in next stitch, skip next stitch, SC in next 2 stitches, skip next stitch, SC in next stitch, skip next stitch, SC in next 10 stitches, skip last stitch, SL ST in first SC to join. (24 SC)
Row 6 :
CH 1, SC in same stitch as joining and in next 7 SC, *skip next SC, SC in next SC*, repeat from * to * 2 more times, skip next SC, SC in next 8 SC, skip last SC, SL ST in first SC to join. (19 SC)
Row 7 :
CH 1, using front loops only, SC in same stitch as joining and in next 7 SC, skip next SC, SC in each of the next 2 SC, skip next SC, SC in next 7 SC, SL ST in first SC to join. (17 SC)
Info :
The last 3 rows form the ankle cuff.
Row 8 - 10 :
CH 1, using front loops only, SC in same stitch as joining and in each SC around, SL ST in first SC to join, at end of row 10, fasten off and weave in ends. (17 SC)
— Base Bootie (sizes continued) :
Info :
6-12 Month (4.5” use G hook) 12-18 Month (5” use H hook) For 5.5” slipper, proceed to next section
— Sole (bottom of bootie) - 6-12 Month :
Rnd 1 :
Using Sole Color, CH 14, SC in 2nd CH from hook, SC in next 9 CH, HDC in next CH, 2 HDC in next CH, 5 HDC in next CH, working down opposite side of starting CH, 2 HDC in next CH, HDC in next CH, SC in next 9 CH, 2 SC in next CH. (32 Stitches)
Info :
This piece is worked in continuous rounds so do not SL ST to join. Just continue on to next round. Use a stitch marker to mark the beginning stitch.
Rnd 2 :
2 SC in first SC, SC in next 12 stitches, *2 SC in next stitch, SC in next stitch*, repeat from * to * 2 more times, SC in next 12 stitches, 2 SC in next stitch. (37 SC)
Rnd 3 :
2 SC in next stitch, SC in next 13 stitches, 2 SC in next stitch, *SC in next stitch, 2 SC in next stitch*, repeat from * to * 2 more times, SC in next 13 stitches, 2 SC in next stitch, SC in next stitch, SL ST in next stitch. (43 SC)
Info :
Check gauge here. Sole should measure 4.5” with G hook or 5” with H hook. If gauge is off, adjust as needed.
— Main Bootie - 6-12 Month :
Row 1 :
CH 1, working in back loops only, SC in same stitch as joining and in each SC around, SL ST in first SC to join. (43 SC)
Info :
At this point you can change colors if desired to have the sole one color and the bootie a contrasting color. If the decision is to change colors, fasten off, and attach new color in same stitch.
Row 2 :
CH 1, working in both loops, SC in each SC around, SL ST in first SC to join. (43 SC)
Row 3 :
CH 1, SC in same stitch as joining and in each SC around, SL ST in first SC to join. (43 SC)
Row 4 :
CH 1, SC in same stitch as joining and in next 15 stitches, skip next stitch, HDC in next stitch, skip next stitch, DC in next stitch, DC DEC next 2 stitches together, DC in next stitch, skip next stitch, HDC in next stitch, skip next stitch, SC in next 17 stitches, SL ST in first SC to join. (38 stitches)
Row 5 :
CH 1, skip joining stitch, SC in next 14 stitches, skip next stitch, SC in next stitch, skip next stitch, SC in next 2 stitches, skip next stitch, SC in next stitch, skip next stitch, SC in next 14 stitches, skip last stitch, SL ST in first SC to join. (32 SC)
Row 6 :
CH 1, SC in same stitch as joining and in next 11 SC, *skip next SC, SC in next SC*, repeat from * to * 2 more times, skip next SC, SC in next 12 SC, skip last SC, SL ST in first SC to join. (27 SC)
Row 7 :
CH 1, using front loops only, SC in same stitch as joining and in next 11 SC, skip next SC, SC in each of the next 2 SC, skip next SC, SC in next 11 SC, SL ST in first SC to join. (25 SC)
Info :
The last 4 rows form the ankle cuff.
Row 8 - 11 :
CH 1, using front loops only, SC in same stitch as joining and in each SC around, SL ST in first SC to join, at end of row 11, fasten off and weave in ends. (25 SC)
— Sole (bottom of bootie) - 18-24 Month :
Rnd 1 :
Using Sole Color, CH 15, SC in 2nd CH from hook, SC in next 10 CH, HDC in next CH, 2 HDC in next CH, 5 HDC in next CH, working down opposite side of starting CH, 2 HDC in next CH, HDC in next CH, SC in next 10 CH, 2 SC in next CH. (34 Stitches)
Info :
This piece is worked in continuous rounds so do not SL ST to join. Just continue on to next round. Use a stitch marker to mark the beginning stitch.
Rnd 2 :
2 SC in first SC, SC in next 13 stitches, *2 SC in next stitch, SC in next stitch*, repeat from * to * 2 more times, SC in next 13 stitches, 2 SC in next stitch. (39 SC)
Rnd 3 :
2 SC in next stitch, SC in next 14 stitches, 2 SC in next stitch, *SC in next stitch, 2 SC in next stitch*, repeat from * to * 2 more times, SC in next 14 stitches, 2 SC in next stitch, SC in next stitch. (46 SC)
Rnd 4 :
1 SC in next stitch, 2 SC in next stitch, 1 SC in next 42 stitches, 2 SC in next stitch, SL ST in last stitch. (48 SC)
Info :
Check gauge here. Sole should measure 5.5” with H hook. If gauge is off, adjust as needed.
Row 1 :
CH 1, working in back loops only, SC in same stitch as joining and in each SC around, SL ST in first SC to join. (48 SC)
Info :
At this point you can change colors if desired to have the sole one color and the bootie a contrasting color. If the decision is to change colors, fasten off, and attach new color in same stitch.
Row 2 :
CH 1, working in both loops, SC in each SC around, SL ST in first SC to join. (48 SC)
Row 3 :
CH 1, SC in same stitch as joining and in each SC around, SL ST in first SC to join. (48 SC)
Row 4 :
CH 1, SC in same stitch as joining and in next 18 stitches, skip next stitch, HDC in next stitch, skip next stitch, DC in next stitch, DC DEC next 2 stitches together, DC in next stitch, skip next stitch, HDC in next stitch, skip next stitch, SC in next 19 stitches, SL ST in first SC to join. (43 stitches)
Row 5 :
CH 1, skip joining stitch, SC in next 17 stitches, skip next stitch, SC in next stitch, skip next stitch, SC in next 2 stitches, skip next stitch, SC in next stitch, skip next stitch, SC in next 17 stitches, SL ST in first SC to join. (38 SC)
Row 6 :
CH 1, SC DEC next 2 SC, SC in next 12 SC, SC DEC next 2 SC, *skip next SC, SC in next SC*, repeat from * to * 2 more times, skip next SC, SC DEC next 2 SC, SC in next 11 SC, SC DEC last 2 SC, SL ST in first SC to join. (30 SC)
Row 7 :
CH 1, SC DEC next 2 SC, SC in next 11 SC, skip next SC, SC in each of the next 2 SC, skip next SC, SC in next 11 SC, SC DEC last 2 SC, SL ST in first SC to join. (26 SC)
Row 8 :
CH 1, SC in same stitch as joining and in next 10 SC, skip next SC, SC in next 3 SC, skip next SC, SC in next 10 SC, SL ST in first SC to join. (24 SC)
Info :
The last 4 rows form the ankle cuff.
Row 9 - 12 :
CH 1, using front loops only, SC in same stitch as joining and in each SC around, SL ST in first SC to join, at end of row 12, fasten off and weave in ends. (24 SC)
— HEAD (make 2 - all sizes) :
Info :
This head will work for all bootie sizes and uses an “F” hook. This piece is made in continuous rounds. Use a stitch marker if needed.
Rnd 1 :
Using color of choice and F hook, CH 2, 6 SC in 2nd CH from hook. Do not join. Use stitch marker if needed. (6 SC)
Rnd 2 :
2 SC in each SC around. (12 SC)
Rnd 3 :
*SC in next SC, 2 SC in next SC*, repeat from * to * around. (18 SC)
Rnd 4 - 7 :
SC in each SC around. (18 SC)
Rnd 8 :
*SC DEC in next 2 SC, SC in next SC*, repeat from * to * around. (12 SC)
Rnd 9 :
*SC DEC next 2 SC*, repeat from * to * around, fasten off leaving approximately a 12” tail to sew. (6 SC)
Info :
Continue to your animal of choice!
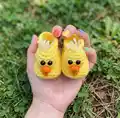
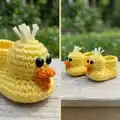
— DUCK / CHICK :
Beak - Make 2 (all sizes) :
Rnd 1: With Orange and F hook, CH 2, SC in 2nd CH from hook, CH 1, turn. (1 SC)
Rnd 2 :
2 SC in next SC, CH 1, turn. (2 SC)
Rnd 3 :
Working in back loops only, SC in each of the next 2 SC, CH 1, turn. (2 SC)
Rnd 4 :
Working in both loops, SC DEC, CH 1, turn. (1 SC)
Rnd 5 :
Working around beak in each stitch and row ending, SL ST in each stitch around to form border, SL ST to join, fasten off leaving a tail for sewing.
— Assembly / Duck (begin) :
Info :
You should now have two booties, two heads, and two beaks. We will now begin the assembly process.
Step 1 :
Stuff the head with fiberfill until it is round and to your desired firmness.
Step 2 :
Insert 9mm eyes between Rnd 4 and 5 with a 1 – 2 stitch gap between the eyes. Do not attach the backs yet.
Info :
At this point you are placing the eyes to ensure they are in the ideal position. If you fasten the backs now, you won’t be able to move them later if you need to make an adjustment so I recommend not fastening them just yet.
Step 3 :
Pick up a beak. Weave in the starting tail if needed. Beak will fold in the middle. With the sewing tail, weave the tail back towards the fold so you can sew the fold to the face.
Step 4 :
Sew the beak at Rnd 6 & 7 centered with the eyes. If after the beak is sewn down you need to adjust your eyes, do so now.
These Barnyard Buddies Bootimals combine useful baby booties with adorable animal details for a handmade keepsake. Choose your colors and create cows, ducks, pigs, bunnies and more with simple shaping and sweet faces. Perfect for baby showers, newborn gifts, and tiny treasured moments. 🧶🐣