๐Ÿงถ Beautiful โœจ Detailed ๐Ÿ’ Adorable

Feather Locklear the Chick Amigurumi Pattern

Feather Locklear the Chick Amigurumi Pattern
4.8โ˜… Rating
5-7 Hours Time Needed
1.6K Made This
โœ‚๏ธ

Intermediate Level

Ideal for those with basic crochet experience, featuring slightly more advanced stitches and techniques to expand your skills.

โฑ๏ธ

Weekend Treat

Takes 5-7 hours, making it an enjoyable project to finish over a couple of days.

๐Ÿงธ

Cute Companion

An adorable friend to cherish, handcrafted with love to bring comfort and joy for years to come.

About This Feather Locklear the Chick Amigurumi Pattern

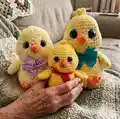
This pattern creates a sweet 6-inch chick worked from the top of the head to the bottom of the body. It includes full-round instructions for the head, body, wings, feet, tail, beak and optional hair. The pattern also provides assembly directions and helpful photos showing eye placement and finishing techniques. You can make variations using different yarns to create a fluffy or chenille chick.

Feather Locklear the Chick Amigurumi Pattern crochet pattern - detailed view of completed project

Detailed materials and abbreviations are included for clarity and ease of use. The pattern is written in continuous-round amigurumi style with helpful notes for shaping and finishing.

Why You'll Love This Feather Locklear the Chick Amigurumi Pattern

I absolutely love this pattern because it blends simple amigurumi construction with personality-packed details like the sunken eye option and embroidered cheeks. I enjoy how versatile the pattern is โ€” you can make a tiny chick or a fluffy chenille version with only small changes to yarn and hook. I love the step-by-step eye shaping method included, which gives the chick a unique expression. The design always brings a smile when I finish the little face and sew on the feet.

Feather Locklear the Chick Amigurumi Pattern step 1 - construction progress Feather Locklear the Chick Amigurumi Pattern step 2 - assembly progress Feather Locklear the Chick Amigurumi Pattern step 3 - details and accessories Feather Locklear the Chick Amigurumi Pattern step 4 - final assembly and finishing

Switch Things Up

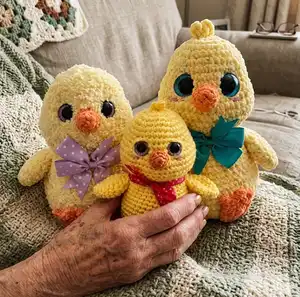
I love showing how versatile this little chick can be โ€” changing yarn and hook size will give you very different results.

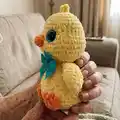
If you want a plush, fluffy chick try a fluffy chenille yarn or a novelty 'little bunny' yarn and use a larger hook for a soft, cuddly finish.

For a tidy, defined finish use worsted weight #4 yarn with a 3.25 mm (D) hook for the sample size shown in the pattern.

Make a tiny keychain version by using lighter weight yarn and a smaller hook; swap safety eyes for embroidered eyes for safety on small items.

I often change the eye size to change expression โ€” larger eyes give a more whimsical look while smaller eyes make the chick appear more realistic.

Embroider small blush spots or eyelids with pink or yellow thread to add character and a handmade touch.

You can alter the beak color or feet color to give seasonal variations โ€” try pastel beaks for spring or bold orange for contrast.

Add accessories like a tiny bow, scarf, or a crocheted egg for a themed set; these small props change the personality dramatically.

I sometimes add wire in the wings for slight posability when displaying, but omit for baby-safe toys.

If you prefer a sunken eye look, follow the eye-shaping step exactly and leave off the eye backs until instructed; it gives a distinct, expressive face.

Common Mistakes & How to Fix Them

โœ— Skipping stitch markers during continuous rounds often causes you to lose the start of the round; place a stitch marker at the beginning of every round and move it each round to stay aligned. โœ— Forgetting to stuff as you work will make the body difficult to shape and close neatly; stuff gradually during the body rounds and shape consistently to avoid lumps. โœ— Placing safety eyes too early or without checking spacing can lead to crooked features; mark round positions, count holes between eyes carefully, and use pins to test placement before securing. โœ— Not removing stuffing before adding eye washers will make it hard to attach backs; remove most stuffing, fit washers securely, then re-stuff to achieve the sunken eye look. โœ— Using the wrong hook size for chenille or fluffy yarn creates different gauge and eye placement issues; check the helpful tips and adjust eye placement when changing yarn/hook size.

Feather Locklear the Chick Amigurumi Pattern

Make an adorable hand-crocheted chick with this detailed Feather Locklear pattern. You will get step-by-step rounds, clear assembly photos, and helpful tips so you can create a cuddly, characterful chick. This pattern includes multiple size and yarn options so you can make a fluffy or chenille version to suit your style. Perfect for a thoughtful handmade gift or a bright addition to your amigurumi collection.

Intermediate 5-7 Hours

Materials Needed for Feather Locklear the Chick Amigurumi Pattern

โ€” Main Fabric

  • 01
    Worsted weight yarn (#4), approximately 50g main color (Color A: Yellow)
  • 02
    Accent yarn: approximately 20g of orange (Color B: Orange)
  • 03
    Exact Yellow examples: Red Heart With Love Daffodil (used for sample)
  • 04
    Exact Orange example: I Love This Yarn Carrot (used for sample)
  • 05
    Fluffy Chick option: Little Bunny Yellow or Parfait Mango (used with F hook) โ€” eye size 23 mm
  • 06
    Chenille Chick option: Parfait Yellow, Parfait Mango, Flecks yarn loops and thread Sunshine (double stranded together) โ€” eye size 28 mm
  • 07
    Fiberfill stuffing (polyester) for body and head stuffing
  • 08
    Additional small amounts of yarn for embroidered cheeks and eyelids (pink, white or yellow as desired)

โ€” Tools Required

  • 01
    Crochet hook size 3.25 mm (D) - recommended for the main pattern
  • 02
    Crochet hook size F (3.75 mm) - used for fluff/chenille versions (see page 12 helpful tips)
  • 03
    Scissors
  • 04
    Sewing/yarn needle for sewing parts and weaving ends
  • 05
    Stitch markers to mark the beginning of rounds
  • 06
    Safety eyes: 18 mm (standard for this pattern)
  • 07
    Optional safety eye sizes referenced: 23 mm (fluffy chick), 28 mm (chenille chick)
  • 08
    Pins for assembly and placement
  • 09
    Polyester fiberfill stuffing

Progress Tracker

0% Complete

โ€” Head and Body :

Info :

Crocheted from top of head to bottom. With Color A.

Round 1 :

Make 12 sc into a magic ring= 12

Round 2 :

Increase in each st around= 24

Round 3 :

(3 sc, inc) x 6= 30

Round 4 :

sc in each st around

Round 5 :

(4 sc, inc) x 6= 36

Round 6-8 :

sc in each st around

Info :

Mark the 6th and 7th inc with a st marker on round 9 for placement of eyes

Round 9 :

inc x 6, 6 sc, inc x 6, 18 sc= 48

Round 10-12 :

sc in each st around

Round 13 :

dec x 6, 6 sc, dec x 6, 18 sc= 36

Round 14 :

sc in each st around

Round 15 :

(dec, 4 sc) x 6= 30

Info :

Place eyes between rounds 8 and 9, leaving 9 holes between them. With the eyes facing you, the left eye will be placed before the stitch marker between rounds 8 and 9. The right eye will be placed after the stitch marker. If you want the sunken eye look, do not place the backs of the eyes on until round 29.

Round 16 :

(dec, 3 sc) x 6= 24

Round 17 :

sc in each st around

Info :

Now for the eyes. Stuff the head well. Cut a long piece of yarn and remove the eyes. Place the needle in the hole where the first eye was and insert the needle into a hole next to the eye hole. Go back and forth between each eye hole repeating the process from the first eye. Pull slightly on the yarn after going through each hole. Do this about 3 times on each side until you reach the look you want. Follow the pictures on pg. 5 for help. There is also a youtube video I have for extra help on this process. https://www.youtube.com/watch?v=9XoBnTY6k70&t=55s

โ€” Head and Body Continued :

Info :

To place the backs of the eyes you will need to remove most of the stuffing to place the washers on the eyes, then re stuff it.

Round 18 :

(inc, 3 sc) x 6= 30

Round 19 :

(inc, 4 sc) x 6= 36

Round 20 :

sc in each st around

Info :

Stuff the body as you work

Round 21 :

(inc, 11 sc) x 3= 39

Round 22 :

sc in each st around

Round 23 :

(inc, 12 sc) x 3= 42

Round 24 :

sc in each st around

Round 25 :

(6 sc, inc) x 6= 48

Round 26 :

(7 sc, inc) x 6= 54

Round 27-29 :

sc in each st around

Round 30 :

(7 sc, dec) x 6= 48

Round 31 :

(6 sc, dec) x 6= 42

Round 32 :

(5 sc, dec) x 6= 36

Round 33 :

(4 sc, dec) x 6= 30

Round 34 :

(3 sc, dec) x 6= 24

Round 35 :

(2 sc, dec) x 6= 18

Round 36 :

(sc, dec) x 6= 12

Round 37 :

dec x 6 = 6

Info :

F/O and sew the hole closed

โ€” Beak :

Round 1 :

With Color B: Make 6 sc into a magic ring= 6

Round 2 :

(sc, inc) x 3= 9

Info :

F/O and leave a long tail for sewing

โ€” Wings (Make 2) :

Round 1 :

With Color A: Make 6 sc into a magic ring= 6

Round 2 :

(sc, inc) x 3= 9

Round 3 :

(2 sc, inc) x 3= 12

Round 4 :

sc in each st around

Info :

Do not stuff the wings

Round 5 :

(sc, inc) x 6= 18

Round 6 :

sc in each st around

Round 7 :

(sc, dec) x 6= 12

Round 8 :

(2 sc, dec) x 3= 9

Round 9 :

(sc, dec) x 3= 6

Info :

Fold the wings in half and sc the opening closed. F/O and leave a long tail for sewing

โ€” Tail :

Round 1 :

With Color A: Make 6 sc into a magic ring= 6

Round 2 :

(sc, inc) x 3= 9

Round 3 :

Inc x 3, 6 sc= 12

Info :

F/O and leave a long tail for sewing

โ€” Feet (Make 2) :

Round 1 :

With Color B: Make 6 sc into a magic ring= 6

Round 2 :

Increase in each st around= 12

Round 3 :

(sc, inc) x 6= 18

Round 4 :

(ch 3, sl st in 2nd ch from hook, sl st in next ch, sl st in next 2 sts on circle) x 3

Info :

F/O and leave a long tail for sewing

โ€” Hair on Head(optional) :

Info :

With Color A: Attach yarn in the magic ring with a sl st (Ch 4, sl st in 2nd ch from hook and across) x 2 F/O and weave in the tail end

โ€” Assembly :

Info :

Face assembly and eye highlight instructions follow. Use photos for guidance.

Face Step 1 :

Take a long strand of white yarn and thread your needle. Insert the needle into a hole in between the eyes. Bring the needle to the lower corner of the eye. Wrap the needle around the outside of the eye. Insert the needle into a hole on the top of the eye. Pull a little tightly to create a highlight for the eye. Repeat for the 2nd eye.

Face Step 2 :

Optional: Take a long strand of yellow yarn and insert the needle into a hole on the head. Bring the needle up to a corner on the eye. Wrap the needle in front of the eye. Make an eyelid. Repeat one more time. Repeat on the 2nd eye. Weave in the tail end.

Face Step 3 :

Optional: Cut a strand of pink yarn or thread. Embroider 2 cheeks.

Beak :

Pin the beak onto the front of the face in between the eyes. I did not stuff my beak.

Wings :

Pin the wings onto the side of the body approximately between rounds 18 and 19. Sew the wings onto the body.

Feet :

Pin the feet onto the front of the body. Sew the feet onto the body.

Tail :

Pin the tail onto the back of the body. Sew the tail onto the body.

Finishing :

You have your finished chick! Thank you for your purchase! If you have any questions or concerns please email me at sweetoddityart@gmail.com or etsy convo me. I will get back to you asap. Please share your finished chick with me as often as you want! I love seeing them!

Assembly Instructions

  • Pin the wings onto the side of the body approximately between rounds 18 and 19, angle them slightly for a natural pose, and sew them securely using the long tail left when you F/O the wing.
  • Pin each foot onto the front lower body, matching the two feet evenly spaced; sew the feet onto the body with the long tail left from finishing, securing with several passes so they stay attached.
  • Pin the beak between the eyes on the front of the face and sew the beak in place using the long tail; the pattern author did not stuff the beak before attaching.
  • To place the backs of the eyes for a sunken look, remove most of the stuffing, fit the eye washers, then re-stuff and close the opening carefully so the eyes sit at the desired depth.
  • Pin the tail onto the back center of the body and sew it securely using the long tail from the tail piece; weave in and hide all sewing tails neatly inside the body.

Important Notes

  • ๐Ÿ’กDo not join rounds unless stated; work in a continuous spiral for the amigurumi sections.
  • ๐Ÿ’กUse a stitch marker to mark the beginning of each round and move it as you complete rounds to keep accurate stitch counts.
  • ๐Ÿ’กAll stitches are worked in both loops unless stated otherwise in the pattern.
  • ๐Ÿ’กStuff the head and body gradually as you work to maintain shape and avoid overstuffing which can distort the piece.

This Feather Locklear chick is a joyful and lovable amigurumi perfect for gifting or decorating your space.๐Ÿงถ The pattern gives you clear rounds, eye shaping techniques, and assembly photos to guide you every stitch of the way.๐Ÿฅ Make a fluffy or chenille version by changing yarn and hook for a charming, unique handmade companion.โœจ

You ask,

we answer.

FAQs

What size will the finished piece be?

The finished amigurumi measures approximately 6 inches from bottom to top of head when using worsted weight #4 yarn and a 3.25 mm hook.

Can I use different yarn weights for this pattern?

Yes, you can use different yarn weights and hooks, but this will change the final size and may require adjustment of eye placement; the pattern includes helpful notes for fluffy and chenille variations.

Do I need prior crochet experience for this pattern?

This pattern is rated intermediate; basic knowledge of single crochet, increases and decreases, and working in continuous rounds is recommended for best results.

How long does this project typically take to complete?

Most crocheters complete this project in 5-7 hours, though time will vary depending on experience, yarn choice, and assembly detail work.

What eye sizes can I use?

The pattern references 18 mm eyes for the standard version, 23 mm for a fluffy chick, and 28 mm for the chenille chick; you may need to adapt eye placement when changing sizes.