🧢 Beautiful ✨ Detailed πŸ’ Adorable

Delilah Boho Bag Pattern

Delilah Boho Bag Pattern
4.7β˜… Rating
8-10 Hours Time Needed
2.3K Made This
βœ‚οΈ

Intermediate Level

Ideal for those with basic crochet experience, featuring slightly more advanced stitches and techniques to expand your skills.

⏱️

All-Day Adventure

Requires 8-10 hours, ideal for a full day of immersive crocheting.

✨

Stylish Touch

An elegant detail to elevate any look, combining traditional techniques with contemporary design sensibilities.

About This Delilah Boho Bag Pattern

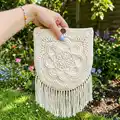
This pattern creates the Delilah Boho Bag β€” a decorative crochet bag with a mandala-style front panel, scalloped edge, and long fringe. It combines textured stitches, clusters, and openwork to form a statement panel that becomes the bag body. The instructions include photo sequence references for each round and clear finishing guidance for the top edge and strap.

Delilah Boho Bag Pattern crochet pattern - detailed view of completed project

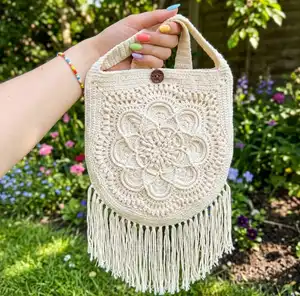
You will make a single decorative panel, join rounds to form the bag shape, and add a sturdy crocheted strap. The pattern emphasizes texture and shape, perfect for crochet lovers seeking a beautiful wearable project.

Why You'll Love This Delilah Boho Bag Pattern

I absolutely love this pattern because it turns simple crochet stitches into an intricate, eye-catching mandala that becomes a functional bag. I adore how the textured clusters and scalloped arcs create depth and movement across the panel. The finishing steps like the neat top edge and long fringe make each bag feel bespoke and luxurious. Working this design is relaxing and rewarding β€” you can see progress quickly as the motif grows into a real bag.

Delilah Boho Bag Pattern step 1 - construction progress Delilah Boho Bag Pattern step 2 - assembly progress Delilah Boho Bag Pattern step 3 - details and accessories Delilah Boho Bag Pattern step 4 - final assembly and finishing

Switch Things Up

I love experimenting with color changes in this pattern; try a gradient of three colors across the rounds to make the mandala pop.

You can use a lighter sport-weight yarn with a smaller hook to create a delicate, smaller bag for a feminine look.

If you want a chunkier boho feel, swap to bulky yarn and a larger hook for an oversized, cozy bag that holds its shape.

I often add a lining to my bags for extra durability β€” choose a coordinating fabric and sew it in after finishing the top edge.

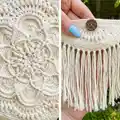
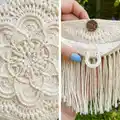
Try adding decorative beads or wooden spacers to the fringe for a rustic boho vibe that catches the eye.

For a crossbody version, make the strap longer or work two straps and attach them at midpoints for even weight distribution.

I sometimes embroider simple motifs onto the finished panel before joining to personalize the design.

Consider making a matching coin purse using the central motif at a smaller scale; it pairs beautifully with the full bag.

If you prefer a more structured bag, add a thin interfacing or cardboard insert to the base and cover it with fabric for stability.

I recommend testing a small section of the bobble rows on scrap yarn first to get comfortable with the cluster repeats before committing to the full round.

Common Mistakes & How to Fix Them

βœ— Skipping the photo reference for each round can lead to misplaced clusters and arcs; always check the corresponding photo before continuing to ensure correct stitch placement. βœ— Not counting your stitches at the end of rounds causes uneven edges and mismatched sections; count regularly and compare with the motif to keep symmetry. βœ— Using an inappropriate hook size may flatten or stretch the motif; swatch and match the hook to the yarn weight to maintain the intended texture and drape. βœ— Failing to block the panel before joining will make finishing difficult and uneven; gently block the panel to shape scallops and arcs for a clean final assembly. βœ— Attaching the strap without pinning can cause uneven placement and twist; pin the strap in place and check balance before sewing securely.

Delilah Boho Bag Pattern

Create a beautiful Delilah Boho Bag that adds handmade charm to any outfit. This pattern guides you through a decorative mandala-style panel and finishing techniques to turn it into a structured boho shoulder bag. You will enjoy the textured stitches, scalloped edges, and the long fringe that give this bag its signature look. Perfect for makers who love a relaxed, artisan accessory.

Intermediate 8-10 Hours

Materials Needed for Delilah Boho Bag Pattern

β€” Main Fabric

  • 01
    Cotton or cotton-blend yarn, worsted weight (#4), approximately 350-450g main color (natural/cream shown)
  • 02
    Extra yarn (50-100g) for fringe and finishing
  • 03
    Optional: contrast color small amount for decorative accents (10-25g)

β€” Tools Required

  • 01
    Crochet hook size 5.0mm (recommended for worsted weight cotton)
  • 02
    Tapestry/yarn needle for weaving in ends and sewing strap
  • 03
    Scissors
  • 04
    Stitch markers
  • 05
    Measuring tape
  • 06
    Wooden or decorative button for closure (optional)
  • 07
    Pins for blocking and assembly
  • 08
    Blocking mat and pins

Progress Tracker

0% Complete

β€” Photos & Notes :

Info :

These photos are to be used in conjunction with the written pattern.

β€” Main Motif :

Round 1 :

See photo reference for Round 1; follow the photo for stitch placement and initial center rounds.

Round 2 :

See photo reference for Round 2; follow the photo for stitch placement and increases as shown.

Round 3 :

See photo reference for Round 3; follow the photo for cluster formation and spacing.

Round 4 :

See photo reference for Round 4; follow the photo for shaping the petal outlines.

Round 5 :

See photo reference for Round 5; follow the photo for extending the motif and creating arc shapes.

Round 6 :

See photo reference for Round 6; follow the photo for additional rounds of texture that define the petals.

Round 7 :

See photo reference for Round 7; follow the photo for forming the elongated loop and stitch group details.

Round 8 :

See photo reference for Round 8; follow the photo to build the raised arc and fill round.

Round 9 :

See photo reference for Round 9; follow the photo to shape the round scallop elements.

Round 10 :

See photo reference for Round 10; follow the photo to continue building the scallop centers and join points.

Round 11 :

See photo reference for Round 11; follow the photo for deeper scallop shaping and stitch counts as visible.

Round 12 :

See photo reference for Round 12; follow the photo to continue shaping and smoothing the scallops.

Round 13 :

See photo reference for Round 13; follow the photo for additional double crochet rows adding height to arcs.

Round 14 :

See photo reference for Round 14; follow the photo to add open spaces and define the edge of the motif.

Round 15 :

See photo reference for Round 15; follow the photo for the next textured row and spacing for later scallops.

Round 16 :

See photo reference for Round 16; follow the photo to create a line of tall stitches and chain spaces forming the outer detail.

Round 17 :

See photo reference for Round 17; note areas marked 'No ch3 space' in the photo to avoid adding chain-3 spaces where indicated.

Round 18a :

See photo reference for Round 18a; follow the photo for the first portion of the bobble/cluster row and the straight dc row above it.

Round 18b :

See photo reference for Round 18b; this image shows a repeat section (x5) of the bobble and chain space sequence β€” follow the photo for placement.

Round 18c :

See photo reference for Round 18c; follow the photo for the continuation of the bobble cluster sequence along the edge as shown.

Round 18d :

See photo reference for Round 18d; continue following the photographic repeat across the arc sections to complete the round.

Round 18e :

See photo reference for Round 18e; finish the bobble/chain sequence and prepare to move to the next smoothing rounds.

Round 19 :

See photo reference for Round 19; photo shows the motif smoothed into a consistent round with completed bobble rows.

Round 20 :

See photo reference for Round 20; follow the photo for the final smoothing round before square shaping/joining.

Round 21 :

See photo reference for Round 21; this row completes the motif and prepares it for joining to create the bag shape.

β€” Joining & Top Edge :

Joining row :

See photo reference for the joining row; join rounds and shape the top into a flattened opening as shown in the photo.

Top edge - Round 1 :

See photo reference for Top edge - Round 1; follow photo to work the first neat row of single/half double crochet along the top edge and create a button loop if desired.

Top edge - Round 2 :

See photo reference for Top edge - Round 2; add a second tidy row to consolidate the edge and define the opening.

Top edge - Round 3 :

See photo reference for Top edge - Round 3; finalize the top edge shaping and finishing details as shown.

β€” Strap :

Strap - Row 1 :

See photo reference for Strap - Row 1; begin the strap at the chosen edge point and work the first row of double crochets as shown.

Strap - Row 2-61 :

See photo reference for Strap - Rows 2-61; continue working straight rows to the desired strap length (illustrated through multiple rows in the photo).

Strap - Joining :

See photo reference for Strap - Joining; join the strap neatly to the opposite side and tidy the seam as pictured.

Assembly Instructions

  • Block the completed motif flat and allow to dry before joining the sides to form the bag shape, ensuring scallops are aligned.
  • Join the outer rounds to form the bag body by sewing or slip-stitch joining across the top section to create a flat opening, as shown in the joining row photo.
  • Work the top edge rounds (Round 1-3) to tidy the opening; create a button loop centered on the flap if desired, and sew a button opposite the loop.
  • Make the strap by working the strap rows to the desired length (Rows 2-61 shown), then join the strap ends to the bag body with a neat seam in the positions shown in the Strap - Joining photo.
  • Attach fringe along the bottom edge evenly, using multiple lengths of yarn folded and knotted into the final round to create the long boho fringe.

Important Notes

  • πŸ’‘Use the photo references for each round β€” the pattern photos show placement and shaping details not contained in simple stitch counts.
  • πŸ’‘Block the motif before assembly to open the lace and shape the scallops evenly for a neat join and top edge.
  • πŸ’‘Count repeats and use stitch markers to keep track of where the scallops and bobble sequences begin and end.

This Delilah Boho Bag pattern brings artisanal texture and boho flair to your wardrobe with a handmade mandala panel and flowing fringe. Create a statement bag that feels both vintage and modern, perfect for everyday use or special moments. Make one for yourself or as a heartfelt gift β€” enjoy the process and the beautiful results! 🧢✨

You ask,

we answer.

FAQs

What size will the finished bag be?

The finished bag size will vary with yarn and tension; using worsted weight cotton and the recommended hook yields a medium shoulder bag approximately 35-40 cm wide (measurement may vary).

Can I use a different yarn weight or hook?

Yes, you can change yarn weight and hook size, but this will alter the finished size and the look of the texture; adjust strap length and fringe accordingly.

Are the photos required to complete the pattern?

The photos are essential as they show stitch placement and shaping for many rounds; refer to each photo while you work the corresponding round for best results.

How do I attach the strap securely?

Sew the strap ends to the bag body using a yarn needle and matching yarn, reinforcing the seam with several passes and backstitching for durability.