🧢 Beautiful ✨ Detailed πŸ’ Adorable

Daisy Flowers Car Hanging Pattern

Daisy Flowers Car Hanging Pattern
4.0β˜… Rating
5-7 Hours Time Needed
2.4K Made This
βœ‚οΈ

Intermediate Level

Ideal for those with basic crochet experience, featuring slightly more advanced stitches and techniques to expand your skills.

⏱️

Weekend Treat

Takes 5-7 hours, making it an enjoyable project to finish over a couple of days.

🏑

Cozy Accent

A warm touch for your space that transforms ordinary corners into inviting nooks filled with handmade charm.

About This Daisy Flowers Car Hanging Pattern

This pattern teaches you to crochet mini daisy and yellow flowers, eucalyptus stems, soil, and a hanging pot to assemble a sweet car hanging. It uses superfine yarn and small hooks to create delicate, detailed floral pieces. You will learn seamless petal techniques, stem wrapping for wire, and simple pot construction.

Daisy Flowers Car Hanging Pattern crochet pattern - detailed view of completed project

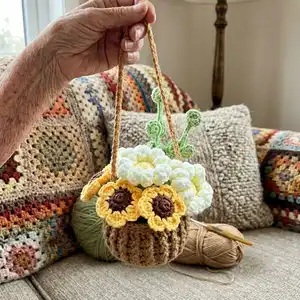
Perfect for gifting or decorating your car, this project includes step-by-step rounds and assembly tips. Photos and clear stitch counts guide you through each small piece for a polished finished ornament.

Why You'll Love This Daisy Flowers Car Hanging Pattern

I absolutely love this pattern because it brings together tiny, detailed pieces into a single charming decoration that brightens any space. I enjoy the tactile process of making many small petals and stems and watching them transform into a full bouquet. The pattern balances simple rounds with a few creative techniques like stem wrapping and seamless petals that keep the project interesting. It is portable and rewarding to finish, and I love gifting these because they feel handmade and personal.

Daisy Flowers Car Hanging Pattern step 1 - construction progress Daisy Flowers Car Hanging Pattern step 2 - assembly progress Daisy Flowers Car Hanging Pattern step 3 - details and accessories Daisy Flowers Car Hanging Pattern step 4 - final assembly and finishing

Switch Things Up

I love customizing this pattern by changing colors and sizes; try pastel shades for a soft, vintage look or bright primaries for a cheerful vibe.

If you want a larger hanging, use a thicker yarn and a larger hook and make more petals for each flower to maintain proportion.

To create keychains or tiny gifts, make the flowers with thinner yarn and skip the potβ€”simply attach a jump ring or small chain.

I often add embroidered details to the centers of daisies to create different facial expressions or texture variations.

Try using metallic or sparkly yarn for the hanging chain to add a touch of glam without changing the flowers themselves.

For sturdier stems, use floral wire wrapped tightly with yarn; this helps stems hold poses and makes arranging easier.

You can swap the foam Type 2 soil for small wooden discs or felt rounds if you prefer a non-stuffed base inside the pot.

Mix and match flower types – combine these daisies with tiny roses or leaves to make a fuller bouquet in the same pot.

I sometimes add beads or tiny buttons to the centers of flowers for a different focal point and added weight for stability.

Consider making matching sets in varied color palettes to sell or gift; each variation teaches a small technique and adds delightful diversity to your creations.

Common Mistakes & How to Fix Them

βœ— Skipping the magic ring start can create a loose center and uneven pieces; always begin rounds with a secure magic ring and pull it tight. βœ— Not stuffing at the recommended petal or round will alter shape and fullness; start stuffing gradually from the rounds indicated to maintain the intended form. βœ— Using inconsistent tension will result in mismatched flower sizes and uneven edges; maintain steady tension and check your stitch counts frequently. βœ— Forgetting to leave long tails for sewing or short tails for wrapping wire makes assembly difficult; cut and leave tails as instructed to simplify finishing. βœ— Ignoring the BLO instruction when specified can change the pot texture and fit; work in the back loop only where directed to create the ribbed look.

Daisy Flowers Car Hanging Pattern

Create a charming daisy flower car hanging with this easy-to-follow crochet pattern. You will make tiny daisies, sunflowers, eucalyptus stems, a mini pot and soil to assemble a delightful hanging ornament. The pattern uses superfine yarn and small hooks for delicate detail and portability. Perfect as a handmade gift or a cheerful accent for your car or small spaces.

Intermediate 5-7 Hours

Materials Needed for Daisy Flowers Car Hanging Pattern

β€” Main Fabric

  • 01
    Supper fine yarn, 1.8 oz (50 g) skeins
  • 02
    Color: green - small amount for stems and leaves
  • 03
    Color: white - small amount for daisy petals
  • 04
    Color: blue - small accent (optional)
  • 05
    Color: yellow - small amount for yellow flower petals and centers
  • 06
    Color: brown - small amount for yellow flower centers and pot
  • 07
    Cotton (for details, unspecified amount)
  • 08
    Cotton filling - small amount for stuffing
  • 09
    Foam - piece to fit pot (Type 2 soil option)

β€” Tools Required

  • 01
    Crochet hook size 2.5-3.0 mm
  • 02
    Crochet hook size 3.0 mm (for pots)
  • 03
    Stitch marker
  • 04
    Sewing needle
  • 05
    Scissors
  • 06
    Hot gun glue
  • 07
    Wire (for stems and wrapping)
  • 08
    Polyester stuffing or cotton filling
  • 09
    Foam for Type 2 soil
  • 10
    Pins for assembly (optional)

Progress Tracker

0% Complete

β€” Materials :

Info :

Weight/yardage: supper fine 1.8 oz (50 g). Color: green, white, blue, yellow, and brown. Hook size: 2.5-3.0 mm. Stitch maker. Sewing needle. Scissors. Hot gun glue. Cotton. Wire. Foam. Cotton filling.

β€” Abbreviations :

Infos :

MR : Magic Ring. st(s) : stitch(es). sl st : slip stitch. sk : skip. ch: chain. SC : single crochet. DC : double crochet. HDC : half double crochet. INC : increase. BLO : back loop only. FLO: Front loop only. TRC: Triple crochet. FPDC: Front post double crochet. BPDC: Back post double crochet.

β€” Daisy Flower :

Item Name (Pistils & Peduncle) :

(make 2 : one by green one by yellow) Row 1 : MR, 6 SC (6sts)

Round 2 :

Row 2 : 6 SC inc (12sts)

Round 3 :

Row 3 : 12 SC (12sts)

Item Name (Petal white) :

Seamless piece Join with petal crochet

Round 1 :

( chain 8, You're going to be working into the second from the hook : 7HDC, slst in next st ) x 12 times (start stuffing from 9th petal) *wrap yarn around the stems*

β€” Yellow Flower :

Item Name (Pistils & Peduncle) :

(make 2 piece : one by green one by brown) Row 1 : MR, 6 SC (6sts)

Round 2 :

Row 2 : 6 SC inc (12sts)

Item Name (Petal yellow) :

Seamless piece Join with petal crochet

Round 1 :

Chain 2, 3HDC in one st

Round 2 :

Chain 2, sl st in next st

Info :

X 6 times (start stuffing from the 4th petal)

β€” Eucalyptus Stems :

Infos :

(make 2)

Row 1 (make 2) :

MR, 8 SC (6sts) cut yarn and leave a shot tail for wrap wire

Row 1 (make 4) :

MR, 6 SC (6sts) cut yarn and leave a shot tail for wrap wire

Info :

The first one we stick 2 piece (8sc piece) together and star wrap around the wire to stick each leaves on the stem (look like photo)

β€” Pots :

Info :

Using 3mm size hook

Row 1 :

8sc (8)

Row 2 :

8 inc (16)

Row 3 :

(sc,inc) 8 times (24)

Row 4 :

(2sc,inc) 8 times (32)

Row 5 :

(3sc,inc) 8 times (40)

Row 6 :

BLO 40dc (40)

Row 7-9 :

1FPDC, 1BPDC repeat in end (40)

Row 10 :

40sc (40)

Row 11 :

40slst

Info :

continue chain 70 to make hanging

β€” The Soil :

Type 1 - Row 1 :

8 SC in an MR (8sts)

Row 2 :

8 SC INC (16sts)

Row 3 :

(1 SC + 1 INC ) 8 times (24sts)

Row 4 :

(2SC + 1 INC) 8 times (32sts)

Row 5-9 :

SC in each st to end

Row 10 :

(2 SC + 1 DEC) 8 times (24sts)

Row 11 :

(1 SC + 1 DEC) 8 times (16sts)

Info :

*stuffing*

Row 12 :

8 DEC (8sts)

Info :

Cut yarn and leave a long tail for sewing, close off the hole.

Type 2 :

Cut the foam to fit the size of the pot and place the foam in the plant pot

β€” Mixed Flowers :

Info :

-This is all we have. Finally fixed tegether

Step :

Put the soil in plant pots

Step :

Insert each flower into a pots

β€” Assembly :

Info :

Arrange daisy and yellow flowers, eucalyptus stems and soil inside the pot and secure with yarn wrapping and hot glue as needed (see photos).

Assembly Instructions

  • Put the soil into the plant pot and position it so the hole is at the top for inserting flowers.
  • Insert each flower stem into the soil, arranging daisies and yellow flowers evenly around the pot opening and angle stems for balance.
  • Wrap the wire stems with yarn and glue or sew ends to secure them; for eucalyptus, stick two pieces together and wrap around wire to attach leaves as shown.
  • Attach the hanging chain by continuing chain 70 from the pot edge, then secure and weave in ends so the hanging is strong and neat.
  • If using Type 2 soil, cut foam to fit inside the pot first, then insert stems into the foam for easy placement and stability.

Important Notes

  • πŸ’‘Start stuffing from the petal number indicated (daisy from 9th petal, yellow from 4th petal) to achieve the correct shape and fullness.
  • πŸ’‘Leave yarn tails as instructed for sewing and for wrapping wire; these small tails make assembly and finishing much easier.
  • πŸ’‘Use a 3mm hook for the pot to achieve correct proportions and switch to 2.5-3.0mm for flowers and stems to match gauge.
  • πŸ’‘Work in BLO where indicated for the pot to create the ribbed texture before folding or finishing the edge.
  • πŸ’‘Pin and arrange pieces before sewing or gluing so placement is symmetrical and pleasing, then secure permanently.

This cheerful Daisy Flowers car hanging brings a touch of handmade charm to your travels and small spaces. It combines tiny daisies, sunny yellow blooms, eucalyptus stems, and a cozy pot into a portable bouquet you can hang anywhere. Make one to gift or to brighten your dayβ€”each piece is crafted with love and small details. πŸ§ΆπŸŒΌπŸš—

You ask,

we answer.

FAQs

What size will the finished piece be?

The finished car hanging measures approximately palm-sized; actual dimensions depend on your yarn tension and hook sizes, but it is designed to be small and portable for car or small space hanging.

Can I use different yarn weights for this pattern?

Yes, you can change yarn weight, but it will alter the final size; if you use a thicker yarn, increase hook size accordingly and expect a chunkier hanging ornament.

Do I need wire for the stems?

Wire is recommended for eucalyptus and stem stability so you can shape and wrap leaves; you can omit wire but stems will be less posable and may need stronger wrapping.

Which parts should I stuff and when?

Stuff the daisy petals starting from the 9th petal and yellow petals from the 4th petal as indicated; stuff the soil piece before closing the hole in Type 1.

How long does this project typically take to complete?

Most crocheters complete this project in 5-7 hours, though time may vary based on experience level and whether you make multiple flowers.