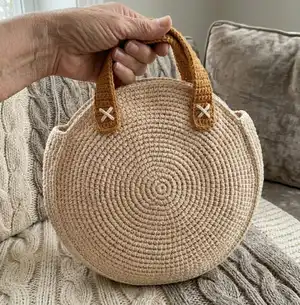
Make a stylish round crochet bag using sturdy cord and simple single crochet rounds. This pattern guides you step-by-step through making two circular panels, a long side strip, and joining everything into a chic circle bag you can wear every day. Clear photos and assembly instructions make construction straightforward so you can achieve a professional finish.
Progress Tracker
0% Complete
— Round :
Infos :
6 sc in MR (Magic Ring) (pic.1-2) (Step by step guide for making a Magic Ring (MR) can be found on page 10). Tightly pull the ring. Work in a spiral. When you make the first stitch in each round, place a marker (for counting rounds). Try to crochet tighter.
Round 1 :
6 inc (12) hide the end inside the stitches then cut it off
Round 2 :
[ inc, sc ]*6 (18)
Round 3 :
[ 2 sc, inc ]*6 (24)
Round 4 :
[ inc, 3 sc ]*6 (30)
Round 5 :
2 sc, [ inc, 4 sc ]*5, inc, 2 sc (36)
Round 6 :
4 sc, [ inc, 5 sc ]*5, inc, sc (42)
Round 7 :
[ 6 sc, inc ]*6 (48)
Round 8 :
[ inc, 7 sc ]*6 (54)
Round 9 :
2 sc, [ inc, 8 sc ]*5, inc, 6 sc (60)
Round 10 :
4 sc, [ inc, 9 sc ]*5, inc, 5 sc (66)
Round 11 :
6 sc, [ inc, 10 sc ]*5, inc, 4 sc (72)
Round 12 :
8 sc, [ inc, 11 sc ]*5, inc, 3 sc (78)
Round 13 :
10 sc, [ inc, 12 sc ]*5, inc, 2 sc (84)
Round 14 :
12 sc, [ inc, 13 sc ]*5, inc, 1 sc (90)
Round 15 :
[ 14 sc, inc ]*6 (96)
Round 16 :
[ inc, 15 sc ]*6 (102)
Round 17 :
2 sc, [ inc, 16 sc ]*5, inc, 14 sc (108)
Round 18 :
4 sc, [ inc, 17 sc ]*5, inc, 13 sc (114)
Round 19 :
6 sc, [ inc, 18 sc ]*5, inc, 12 sc (120)
Round 20 :
8 sc, [ inc, 19 sc ]*5, inc, 11 sc (126)
Info :
Cut off the cord, leaving the end about 20 cm. Pull the cord out as shown on pic. 10. Using a needle close the round as it is shown on pic. 11-13. Hide the end on wrong side and cut it off (pic. 14).
Info :
Crochet a second round using rounds 1-20 (pic. 15).
— Side of the Bag :
Row 1 :
start from the second ch from the hook: 8 sc, ch1, turn (8) (pic 17)
Row 2 :
skip 1 stitch: 6 sc, inc, ch1, turn (8) (pic 18-21)
Rows 3-88 :
skip 1 stitch, 8 sc, ch1, turn (8) (pic 22-24) Take note, the last 8th sc in each rounds must be crocheted a little on the side (pic. 22)
Info :
Do not cut the end of the cord.
— Closing and Finishing :
Info :
Cut off the cord, leaving the end about 20 cm. Pull the cord out as shown on pic. 38. Using a needle close the round as it is shown on pic. 39-41. Hide the end on wrong side and cut it off (pic. 42).
— Assembly :
Info :
Steam the parts. Follow the recommendations for your cord or yarn.
Info :
Put the round and side parts next to each other, as shown in pic. 25.
Info :
Begin to join the parts with sl st to the end of the rectangular part (pic. 26-30).
Info :
Make sl st around the perimeter of the round all the way (pic. 31-32).
Info :
Cut off the cord, leaving the end about 20 cm. Pull the cord out as shown on pic. 38. Using a needle close the round as it is shown on pic. 39-41. Hide the end on wrong side and cut it off (pic. 42).
Info :
Take new crochet cord, the second round piece and attach it to the side piece with sl st (pic. 43-46). Make sl st around the perimeter of the round all the way (pic. 47).
Info :
Cut off the cord, leaving the end about 20 cm. Pull the cord out as shown on pic. 38. Using a needle close the round as it is shown on pic. 39-41. Hide the end on wrong side and cut it off.
Info :
Sew leather handles to the bag (pic. 48).
Thank you for making this lovely round bag with me — I hope it becomes a favorite accessory you use every day. The pattern is designed to be flexible and forgiving, so feel free to tweak materials and details to suit your style. Happy crocheting and enjoy your handmade bag! 🧶 ✨