🧢 Beautiful ✨ Detailed πŸ’ Adorable

Crochet Wine Tote Bag Pattern

Crochet Wine Tote Bag Pattern
4.0β˜… Rating
5-7 Hours Time Needed
4.1K Made This
βœ‚οΈ

Intermediate Level

Ideal for those with basic crochet experience, featuring slightly more advanced stitches and techniques to expand your skills.

⏱️

Weekend Treat

Takes 5-7 hours, making it an enjoyable project to finish over a couple of days.

✨

Stylish Touch

An elegant detail to elevate any look, combining traditional techniques with contemporary design sensibilities.

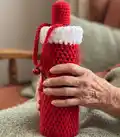
About This Crochet Wine Tote Bag Pattern

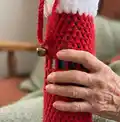
This easy-to-follow pattern creates a tall wine tote bag with a solid base, cylindrical body and a perforated decorative panel. It uses half-double crochet rounds for a dense, sturdy fabric and a short section of openwork to form the perforated squares. The pattern finishes with braided straps and optional velvet trim for a festive, finished look.

Crochet Wine Tote Bag Pattern crochet pattern - detailed view of completed project

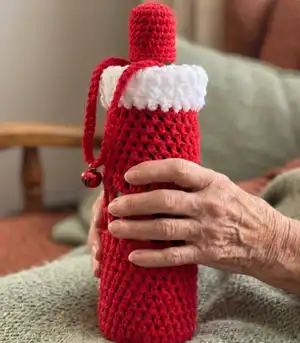
Perfect as a holiday gift bag or a reusable wine carrier, the design is adjustable for different bottle sizes. Techniques include working in the round, creating perforated rows (dc and chain spaces), and switching yarns for a velvet finish.

Why You'll Love This Crochet Wine Tote Bag Pattern

I absolutely love this pattern because it turns simple stitches into a practical and beautiful gift-ready piece. I enjoy how the solid base transitions into the decorative perforated panel β€” it adds a handmade, thoughtful detail that people really appreciate. The pattern is flexible so I can easily change yarn or strap length to make unique versions for different bottles. Working the velvet trim at the end always makes the finished tote look polished and a little luxurious.

Crochet Wine Tote Bag Pattern step 1 - construction progress Crochet Wine Tote Bag Pattern step 2 - assembly progress Crochet Wine Tote Bag Pattern step 3 - details and accessories Crochet Wine Tote Bag Pattern step 4 - final assembly and finishing

Switch Things Up

I love how easy it is to customize this tote by changing yarn and hook size; try a thicker cotton for a sturdier, rustic look or a silky yarn for a sleeker finish.

You can make the tote taller or shorter simply by working more or fewer rounds of the solid hdc body to accommodate larger or smaller bottles.

If you want a wider opening, increase the base rounds by adding a further increase round following the same increase pattern (keeping stitch multiples consistent).

Swap the perforated square section for a different openwork lace stitch to create a unique decorative band or add color changes to make stripes or color blocks.

I often braid two thinner straps together for extra strength or make a single long strap to wear crossbody if you want hands-free carrying.

For a lined tote, cut fabric to size and sew in a cotton lining before attaching straps; this adds protection and a more finished interior.

Add beads, a small pocket, or an embroidered initial on the front to personalize the bag as a gift.

To make a festive version, use metallic or glittery yarn for the perforated rows or add pom-poms or tassels at the base of the straps.

Try switching the color of just the perforated panel for contrast β€” I like a contrasting band about 6-8 rows tall for visual interest.

Remember: changing yarn weight or hook will change gauge, so adjust rounds and strap length and test with your bottle to ensure a good fit.

Common Mistakes & How to Fix Them

βœ— Not counting stitches during the increase rounds leads to uneven bases and incorrect stitch totals; count carefully after each increase round to ensure you reach the numbers stated. βœ— Working perforated (openwork) rows too tightly causes the squares to close up and lose their shape; crochet the open rows more loosely and maintain a relaxed tension when making chain spaces. βœ— Switching to fluffy velvet yarn without securing ends can cause slipping and messy joins; tie off and weave in velvet yarn ends carefully and check joins before trimming. βœ— Skipping the step of joining rounds at the correct stitch can shift the pattern alignment; always slip stitch into the top of the first hdc or the indicated ch when closing each round.

Crochet Wine Tote Bag Pattern

Make a charming crochet wine tote bag that's perfect for gifting bottles or adding a handmade touch to celebrations. This pattern walks you through creating a sturdy, stylish bottle carrier with a decorative perforated panel and velvet-trimmed straps. You'll enjoy working rounds of half-double crochet and simple openwork to create a functional, festive accessory.

Intermediate 5-7 Hours

Materials Needed for Crochet Wine Tote Bag Pattern

β€” Main Fabric

  • 01
    Macrame yarn, approximately 100 g (main color used for body and straps)
  • 02
    White velvet yarn, approximately 20 g (for optional trim)
  • 03
    Suggested: medium/bulky macrame-style cotton or cotton-blend yarn for structure

β€” Tools Required

  • 01
    Crochet hook size 4.5 mm
  • 02
    Scissors
  • 03
    Yarn needle for sewing in ends
  • 04
    Stitch markers (optional)
  • 05
    Measuring tape or ruler
  • 06
    A wine bottle or substitute to test fit

Progress Tracker

0% Complete

β€” Wine Tote :

Infos :

Materials: 4,5 MM HOOK. 100 G MACRAME YARN, 20G WHITE VELVET YARN.

Infos :

Crochet terms: Chain (ch) - yarn over, pull yarn through stitch on hook. Slip Stitch (Slip St) - insert hook into stitch or space indicated, yarn over, pull yarn through both loops on hook. Single crochet (Sc) - insert hook into stitch or space indicated, yarn over, pull up a loop (2 loops in hook), yarn over, pull yarn through loops on hook. Half double crochet (hdc) - yarn over, insert hook into stitch or space indicated, pull up a loop (3 loops in hook), yarn over, pull yarn through loops on hook. Double crochet (dc) - yarn over; insert hook into stitch or space indicated, pull up a loop (3 loops in hook) * yarn over, pull yarn through 2 loops on hook; repeat from * once more. Treble crochet (tr) - yarn over twice, insert hook into stitch or space indicated, pull up a loop (4 loops in hook) * yarn over, pull yarn through 2 loops on hook; repeat from * 2 times.

Round 1 :

Make 6 ch. and connect to the first ch to form a ring. Make 10 hdc into the ring. Close the row by sinking into the top of the first hdc. With 2 ch go to the top row (we have reached the 2nd row). here we will make 2 hdc into each stitch. at the end of the row we will have a total of 20 hdc. it is important to proceed by counting. When we come to the end, connect to the top of the first hdc.

Round 2 :

Make 3 ch to go up to the 3rd row. make 1 more hdc into the same ch. (In the 2nd row we made 2 hdc into each ch. In the 3rd row we will advance the row by making 1 double 1 single.) 1 hdc on the next ch, 2 hdc on the next ch...When we come to the end, connect to the top of the first hdc.

Round 3 :

Let's move on to row 4 with 2 ch. in this row our work on all chains will be as follows; 1 hdc on 1ch, 1 hdc on the next 1 ch, 2 hdc single on the next 1 ch, ie 2 hdc single, 1 hdc double so when we complete the row, connect to the first hdc and close row 4. To move to row 5, make 2 ch. we will no longer increase. make 1 hdc on each ch. the trick here is to make the hdc ch sin only on the edge line. we do this for a complete curl. (picture a-b) When we complete the row, connect to the first hdc and close the 5th row. In rows 4 and 5, it will start to curl inwards and take the bottle form.

Round 4 :

In all the next 10 rows, when we close the row, we go to the top row with 1 ch. and we make 1 hdc on each ch.

Round 5 :

in this order, we go to the top row with 4 ch. (The reason why it is 4 is that we have moved to the perforated row) Skip 1 ch and make 1 dc on the 2nd ch. Make 1 ch, make 2 ch, skip 1 ch and make 1 dc on the next ch. complete the whole row like this. When closing the row, connect to the 3rd of the first 4 ch groups and close. When the row is completed, go up to the top row with 4 ch. make 1 dc on top of the dc in the next row. make 2 ch, make 1 dc on top of the next dc. so we will form squares. When closing the row, connect to the 3rd of the first group of 4 ch and close.

Round 6 :

in this order, we switch from perforated rows to straight rows again. in this order, we switch from perforated rows to straight rows again. In the bottom row, we made 2 ch between the squares. in this row, we will only work on 2 chs. we will complete the whole row by making 2 hdc in every 2 ch spaces. do not knit tightly in this row, knit more freely so that it does not tighten. When you reach the end of the row, connect to the first ch. Go to the top row with 1 ch. In this and the next 7 rows, we will make 1 ch on each ch. (total 8 row)

Round 7 :

we're moving on to making stalks. Let's make 40 ch. (you can extend the length here as much as you want. you can also do it by measuring here. Skip 8 ch and connect on the 9th ch. Here we must make it tight while connecting. we will call it a belt. we will complete the belt by making 1 hdc on each ch kin on the belt. connect to the beginning and cut the rope. knot tightly.

Round 7 :

Count 4 ch from the end of the arch and tie into ch 5. Make 40 ch. (this will be the 2nd arch.) skip 8 ch and tie tightly to the 9th ch. go back and make 1 hdc in all ch. tie at the beginning and cut the rope. knot tightly.

Round 8 :

and in this order we switch to velvet thread. the trick here. after knitting the straps, I continue with velvet because I want the straps to stay inside. follow this way for a more beautiful look. Since the velvet rope is fluffy, it may be difficult for you to see the chains. try to understand with your hand. we will continue in this way for a total of 2 rows by making 1 ch on each ch.

Info :

For the perforated areas here; if you want, you can decorate it with velvet threads. If you want, you can write a cute note on the note paper and tie it. Or you can keep it simple.

Assembly Instructions

  • Sew the bottom and side seams as needed to secure the cylindrical shape if any gaps appear; generally the piece is worked in the round and requires no side seam.
  • Attach the braided straps (made by making chains and reinforcing with hdc) to the sides of the tote, knotting and sewing the ends tightly to the inside of the bag so the straps sit securely.
  • When making the belt/arches, tie and knot the chain ends securely and sew the ends into place on the inside of the bag to prevent slipping.
  • Add the white velvet trim by switching yarn and working 2 rows of 1 ch on each ch around the top edge, then weave in ends and adjust trim so straps sit inside as described.

Important Notes

  • πŸ’‘Keep consistent tension during the solid hdc rounds to ensure the bag stays cylindrical and even.
  • πŸ’‘When working perforated (open) rows, crochet more loosely so the squares remain open and even.
  • πŸ’‘Switch to velvet yarn for the trim after completing straps and secure joins well since fluffy yarn can hide stitches.

This cheerful wine tote makes a thoughtful, handmade present for holidays or special occasions. It combines sturdy macrame-style yarn with a decorative openwork panel and optional velvet trim for a festive finish. Whether you personalize colors or add a little note, this bag is sure to delight the recipient. 🧢🍷✨

You ask,

we answer.

FAQs

What size will the finished piece be?

The finished wine tote fits a standard wine bottle and measures approximately the height of a typical bottle when using the recommended macrame yarn and 4.5 mm hook; final size varies with yarn and tension.

Can I use different yarn weights for this pattern?

Yes β€” using a thicker/bulkier yarn will create a firmer, larger tote while thinner yarn will make it smaller; be sure to adjust the hook size accordingly and check fit with a bottle as you go.

Do I need prior crochet experience for this pattern?

This pattern is rated intermediate and assumes you are comfortable working in the round, half-double crochet, double crochet, and making chain-spaced openwork rows.

How long does this project typically take to complete?

Most crocheters complete this project in 5-7 hours, though time may vary depending on experience, yarn choice, and how many decorative touches you add.