๐Ÿงถ Beautiful โœจ Detailed ๐Ÿ’ Adorable

Crochet Market Bag Pattern

Crochet Market Bag Pattern
4.1โ˜… Rating
5-7 Hours Time Needed
3.3K Made This
โœ‚๏ธ

Intermediate Level

Ideal for those with basic crochet experience, featuring slightly more advanced stitches and techniques to expand your skills.

โฑ๏ธ

Weekend Treat

Takes 5-7 hours, making it an enjoyable project to finish over a couple of days.

โœจ

Stylish Touch

An elegant detail to elevate any look, combining traditional techniques with contemporary design sensibilities.

About This Crochet Market Bag Pattern

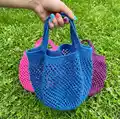
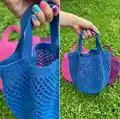
This pattern teaches you how to crochet a flexible, sturdy market bag using cotton crochet cord and a 4 mm hook. The mesh design stretches to accommodate groceries yet collapses small for storage. You can make the bag in a single color or combine multiple shades for a fun two-tone look.

Crochet Market Bag Pattern crochet pattern - detailed view of completed project

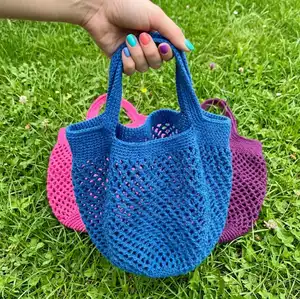
The pattern includes a circular base, mesh body, and instructions to create comfortable handles. Clear row-by-row directions and photos guide you through each stage.

Why You'll Love This Crochet Market Bag Pattern

I absolutely love this pattern because it turns basic crochet stitches into a highly functional, beautiful tote. I enjoy how the mesh structure is both stretchy and sturdy, making it perfect for everyday shopping. The pattern is flexible โ€” I often change colors or yarn types to create different looks. Building the circular base and seeing the bag form is one of my favorite parts of the process. It feels great to make something sustainable and useful that replaces plastic bags.

Crochet Market Bag Pattern step 1 - construction progress Crochet Market Bag Pattern step 2 - assembly progress Crochet Market Bag Pattern step 3 - details and accessories Crochet Market Bag Pattern step 4 - final assembly and finishing

Switch Things Up

I love customizing this bag by changing colors every 10 rows to create stripes and playful transitions.

You can use a thicker cotton cord and a larger hook to make a chunkier, sturdier tote, or switch to lighter cotton for a more delicate market bag.

If you want a smaller bag for gifts or produce, work fewer rounds on the base and stop the mesh section earlier.

Make the handles longer by increasing the 65-chain sections in row 47, or make short shoulder straps by reducing that chain length equally on both sides.

I often add a fabric lining with a zipper to create a secure bag for smaller items โ€” simply sew the lining to the inside after finishing the crochet piece.

For extra durability, you can crochet a reinforced base by adding an additional round of single crochet around the bottom before starting the mesh section.

Try adding a small pocket to the inside by crocheting a rectangular panel and sewing it into the top band before finishing the handles.

I sometimes embellish the exterior with a crocheted flower or a wooden bead accent at the handle join for a custom look.

To make a market bag for heavy loads, use tighter tension and consider double-stranding the cord for added strength while keeping the same pattern.

For a quick gift, create a mini keychain version by using thinner yarn and reducing the base to a few rounds, then adding a short strap and metal ring.

When experimenting, always keep one sample swatch to test hook size and gauge so your finished bag matches the dimensions you expect.

I recommend washing a swatch of your chosen cotton cord before starting, as some colors may bleed or change slightly after the first wash.

Common Mistakes & How to Fix Them

โœ— Skipping stitch markers makes it hard to track rounds and increases; place a marker at the first chain of each row to keep accurate counts and know where rows begin and end. โœ— Not counting stitches after increases leads to a warped base or uneven shape; count stitches at the end of each increase round to make sure the totals match the pattern. โœ— Pulling chains too tight when creating the mesh causes small, stiff holes; keep chain tension loose and consistent so the mesh remains flexible and stretches properly. โœ— Starting handles without marking positions can cause uneven placement; mark or count stitches carefully before chaining for the handles so both sides match. โœ— Failing to weave in ends securely can cause the bag to unravel with use; weave ends back along stitches and knot or backstitch where needed for stability.

Crochet Market Bag Pattern

Make a durable, reusable market bag that stretches to hold groceries yet folds small for easy storage. This pattern uses cotton crochet cord and simple mesh stitches to create a roomy, attractive tote you can customize with color and size. Perfect for eco-conscious crafters who want a practical, handmade alternative to single-use bags. Follow clear step-by-step instructions and photos to guide you through every stage.

Intermediate 5-7 Hours

Materials Needed for Crochet Market Bag Pattern

โ€” Main Fabric

  • 01
    Cotton crochet cord suitable for a 4 mm crochet hook (recycled cotton cord recommended)
  • 02
    Two rolls of recycled cotton cord used in sample (each roll approximately 200 grams)
  • 03
    Yarn usage: Approximately 400 grams of cotton cord (some leftover expected)
  • 04
    Optional: Variegated cotton cord or multiple colors for color changes

โ€” Tools Required

  • 01
    Crochet hook: 4 mm
  • 02
    Stitch marker (useful but not absolutely necessary)

Progress Tracker

0% Complete

โ€” Introduction :

Info :

Reusable shopping bags are a must these days, and with this pattern you can create a large, sturdy market bag to keep in your purse or your car, ready to be used when needed. The net pattern gives it the flexibility to stretch and accommodate bulkier objects or larger loads, while still being small enough to fold when not in use. You can make the market bag in just one color or as many colors as you want. Variegated yarn works very well too.

โ€” Materials :

Info :

Yarn: cotton crochet cord than can be used with a 4 mm crochet hook. While you can basically use any kind of cotton yarn, cotton cord makes the bag sturdier (although a little heavier too). For the bags presented in this tutorial, two rolls or recycled cotton cord were used (shown below). Each roll weights approximately 200 grams. Yarn Usage: Approximately 400 grams of cotton cord, although you should have a little leftover. If you're using a lighter cotton yarn, adjust the yarn usage accordingly. Crochet hook: 4 mm. Stitch marker: not absolutely necessary but useful to help keep track of the rows.

โ€” Size :

Info :

When made with the yarn above, the bag will have an approximate diameter of 30 cm/12 inches at the top and an approximate height of 50 cm/19.5 inches (70 cm/28 inches when including the handles). Please note that different yarns may result in different finished sizes.

โ€” Abbreviations :

Infos :

Ch: Chain. Sst: Slip stitch. Sc: Single crochet. Dc: Double crochet.

โ€” Instructions :

Round 1 :

On a magic ring Ch 2 (counts as a double crochet) and then add 11 Dc into the ring (12 stitches in total). Pull the thread to close the ring and join with a Sst.

Round 2 :

Ch 2 (counts as a double crochet) and then add 1 Dc in the same stitch from Row 1. Add two Dc over each of the stitches from Row 1 (24 stitches in total). Join with a Sst.

Round 3 :

Ch 2 (counts as a double crochet), then add two Dc over the next stitch from previous row. Alternated *one Dc in the next stitch, two Dc in the following stitch*. Repeat between * until the end of the row. Join with a Sst (36 stitches in total).

Round 4 :

Ch 2 (counts as a double crochet), one Dc in the next stitch from previous row, two Dc in the following one. *One Dc, one Dc, two Dc in the following stitch*. Repeat between * until the end of the row. Join with a Sst (48 stitches in total).

Round 5 :

Ch 2 (counts as a double crochet), one Dc in each of the next two stitches from previous row, two Dc in the next one. *One Dc, one Dc, one Dc, two Dc in the following stitch*. Repeat between * until the end of the row. Join with a Sst (60 stitches in total).

Round 6 :

Ch 2, *Sc in the next stitch from the previous row, Ch 1*. Repeat between * until the end of the row (you will have the same sixty stitches from the previous row, now with a chain space between each of them).

Info :

From this point onwards it's useful to use a crochet marker at the first chain of each row so that you can keep track of the increases. Also, there's no need to slip stitch at the end of each row, you can work in spiral and start the next row chains right after the last stitch from the previous row.

Round 7 :

*Ch 2, Sc over the next chain from the previous row*. Repeat between * until the end of the row. Please note that each Sc goes over the chain space from previous row, not the stitches from previous row.

Round 8 :

*Ch 3, Sc over the next chain from the previous row*. Repeat between * until the end of the row.

Round 9 :

*Ch 4, Sc over the next chain from the previous row*. Repeat between * until the end of the row.

Info :

If you're using stitch markers, place one now at the end of this row and leave it there. Since the next rows are a repetition of row 9, it is much easier to keep track of the number of rows you've finished if you know where row 9 ends and row 10 begins. If you're not using stitch markers, you can for example tie a contrasting piece of yarn in place.

Round 10-40 :

Repeat row 9. This is how your stitches will look like as you work.

Info :

You can make your bag all in one color, or change colors any time you want. In the case of this particular bag, I used two colors, so you can see below the color change.

Round 41 :

Ch 2. *One Sc over the Sc from previous row, one Sc over the chain from previous row, one Sc over the next Sc from previous row, skip the next chain*. Repeat the pattern between * until the end of the row. Sst over the initial chain to finish the row (90 stitches in total). Basically you'll be adding one Sc over each Sc from row 40 and one Sc on alternated chains from row 40.

Round 42 :

Ch 2. Add one Sc over each of the stitches from previous row. Sst to join at the end of the row (always 90 stitches).

Round 43 :

Repeat row 42.

Round 44 :

Repeat row 42.

Round 45 :

Repeat row 42.

Round 46 :

Repeat row 42.

Info :

After row 46, you will start to create the bag handles.

Round 47 :

Ch 2. Add one Sc over each of the next 12 stitches from previous row. Ch 65, skip 20 stitches and then add one Sc over each of the next 25 stitches from previous row. Ch 65, skip 22 stitches, and add one Sc over the next 13 stitches from previous row, to complete the row. Sst over the initial chain to join.

Info :

Note: as per the instructions above, the handles will have an approximate total length of 47 cm/18.5 inches. If you want your bag handles longer or shorter, increase or decrease the 65 chains in row 47 (make sure the number of chains is the same on both handles). Everything else remains the same.

Round 48 :

Ch 2 and add one Sc over each stitch from previous row, including the chains. Sst to join at the end.

Round 49 :

Repeat row 48.

Round 50 :

Repeat row 48.

Round 51 :

Repeat row 48.

Info :

Note: as per the instructions above, the handles will have an approximate total width of 2.5 cm/1 inch. If you want your bag handles wider or narrower, increase or decrease the number of rows after row 48. Everything else remains the same.

Info :

Cut the yarn, weave in ends, and your new crochet market bag is ready to be used.

Assembly Instructions

  • Use a stitch marker at the start of each row (especially after row 6) to keep track of where rows begin and end so the mesh and increases stay even.
  • When creating handles at row 47, count and mark stitch positions before chaining to ensure both handles align symmetrically across the top.
  • Work rows 48 to 51 over the chains to secure the handle area; adjust the number of rows to widen or narrow the handle width as desired.
  • After finishing the final row, cut the yarn and weave in ends securely along the top band and handle area so the bag can withstand use and washing.
  • If changing colors, fasten off neatly at color changes and weave in ends on the wrong side or inside the handle band to keep the exterior tidy.

Important Notes

  • ๐Ÿ’กUse a stitch marker at the first chain of each row to track increases and transitions between rounds accurately.
  • ๐Ÿ’กYou can work in a spiral and avoid slip stitching at the end of each row; begin the next row chains immediately after the last stitch from the previous row.
  • ๐Ÿ’กAdjust handle length by changing the 65-chain sections in row 47; make sure both handles use the same number of chains for symmetry.

This market bag pattern helps you create a practical, beautiful tote you will reach for again and again. Choose bold colors or natural cotton cord to match your style and make sustainable shopping more stylish. Have fun customizing the handles and colors to make it truly yours! ๐Ÿงถ โ™ป๏ธ

You ask,

we answer.

FAQs

What size will the finished piece be?

When made with the recommended cotton cord and 4 mm hook, the bag has an approximate top diameter of 30 cm (12 inches) and a height of about 50 cm (19.5 inches), 70 cm (28 inches) including the handles.

Can I use different yarn weights for this pattern?

Yes, you can, but different yarn weights will change the finished size; use a suitable hook for your chosen yarn and expect to need less or more yarn accordingly.

Do I need prior crochet experience for this pattern?

This pattern is rated intermediate; basic knowledge of double crochet, single crochet, chains and working in rounds or spirals is recommended.

How long does this project typically take to complete?

Most crocheters finish this market bag in 5-7 hours depending on experience and whether you add color changes or adjustments to handle length.