About This Bobble Clutch Pattern
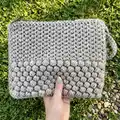
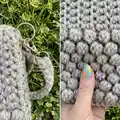
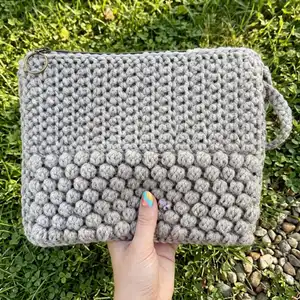
This Bobble Clutch pattern creates a stylish, textured zipper pouch featuring a bold bobble stitch panel and a crochet moss stitch top. You will make two matching bag faces, join them with a zipper, and add a simple crocheted handle for carrying. The pattern is written in UK terminology and uses chunky yarn for a cozy, structured finish.
Suitable for intermediate crocheters familiar with double crochet and working in rows, the pattern includes special instructions for making bobbles and working in the back loop only. Clear finishing and handle instructions are included to complete the clutch.
Why You'll Love This Bobble Clutch Pattern
I absolutely love this pattern because the bobble stitch gives such a tactile, modern texture that instantly elevates a simple clutch. I adore how quickly the chunky yarn and 6mm hook build up into a structured, substantial bag that still feels soft to the touch. The combination of bobble stitch and crochet moss stitch adds visual interest while keeping the construction straightforward. I enjoy finishing pieces with a zipper because it makes the project feel professional and gift-ready. Working this pattern is relaxing and rewarding, and the finished clutch is something I am proud to carry or give away.
Switch Things Up
I love experimenting with color blocks in this clutch; try making the bobble panel a contrasting color to the moss stitch top for a bold look.
You can change the size by altering the starting chain: add or remove multiples to widen the bag and adjust the number of rows to change the length.
If you want a smaller keyring-sized pouch, use DK yarn and a 4mm hook to create a mini version that still shows nice bobble texture.
For a more polished interior, add a fabric lining and a small inner pocket; sew the lining in before attaching the zipper to hide seams neatly.
Switch the open-ended zipper for a magnetic snap if you prefer a cleaner closure without a zipper bulk, though zippers keep contents more secure.
Try using a boucle or slightly textured yarn for the bobble panel to create an even richer, tactile surface.
Make the handle longer for a wristlet or shorter for a loop handle; adjust the chain count and stitch into the loop to secure the desired length.
Add decorative details like a tassel or small crocheted flower attached to the zipper ring for a personalized finishing touch.
Work the joining row in a contrasting color to create a subtle piping effect around the edge of the clutch for extra visual interest.
I often sew in a lightweight interfacing between the rows when using softer yarns to keep the bag structured and prevent sagging with use.
Common Mistakes & How to Fix Them
✗ Skipping the second chain when starting the foundation row can change the stitch count; always work 1 dc in the 2nd ch from hook to maintain correct width.
✗ Not securing the bobble properly can cause it to unravel later; follow the MB instruction to pull through all loops and ch 1 to secure each bobble.
✗ Failing to count stitches after each row can lead to uneven edges and mismatched bag faces; count your 29 sts at the end of the foundation row and periodically check counts.
✗ Joining the zipper without checking alignment can make the bag lopsided; cut the zipper to length first and pin or baste both bag faces before stitching to ensure even placement.