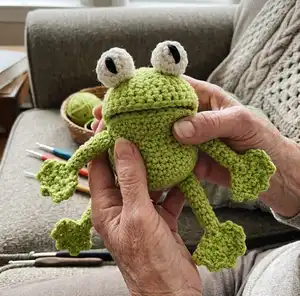
Make a sweet, squishy crochet frog using this easy-to-follow pattern by Annemarie Benthem. You will create a rounded beak-style body, two expressive eyes, and four playful legs with clear step-by-step rounds and helpful photos. Perfect for gifting or decorating, this charming frog is a fun, quick project you can personalize with color choices.
Progress Tracker
0% Complete
— Body :
Round 1 :
Make a magic ring. Chain 6 in the ring. (6) (If you don’t know how to make a magic ring, do the following: chain 2, SC6 in 2nd chain from hook.)
Round 2 :
SC2 in every SC. (12)
Round 3 :
SC2 in next SC, SC1 in next. Repeat around. (18)
Round 4 :
SC2 in next SC, SC1 in next 2 stitches. Repeat around. (24)
Round 5 :
SC2 in next SC, SC1 in next 3 stitches. Repeat around. (30)
Round 7 :
Chain 1. (If you want the inside of the beak to be pink, change to pink here.)
Round 8 :
Go back in the direction you came from and SC15. Chain 1. (15)
Round 9 :
SC1, skip one stitch, SC3, skip one stitch, SC3, skip one stitch, SC3, skip one stitch, SC1. Chain one. (11)
Round 10 :
SC2, skip one stitch, SC2, skip one stitch, SC2, skip one stitch, SC2. Chain one (8)
Round 11 :
SC2, skip one stitch, SC2, skip one stitch, SC2. Chain one. (6)
Round 12 :
SC1, skip one stitch, SC2, skip one stitch, SC1. (4)
Info :
This is what it should look like right now:
Round 13 :
SC4. Chain one. (4)
Round 14 :
SC2 in next stitch, SC2, SC2 in next stitch. Chain one. (6)
Round 15 :
SC1, SC2 in next stitch, SC2, SC2 in next stitch, SC1. Chain one. (8)
Round 16 :
SC1, SC2 in next stitch, SC2, SC2 in next stitch, 1SC, SC2 in next stitch, SC1. Chain one. (11)
Round 17 :
SC1, SC2 in next stitch, SC2, SC2 in next stitch, SC1, SC2 in next stitch, SC2, SC2 in next stitch, SC1. Chain one. (15) (If you made the inside of the beak pink, change here to green again.)
Info :
Now close the side of the beak by going up with SL ST. Go around the back of the beak with SL ST as well and go down on the other side with SL ST.
Info :
Here’s what it should look like when you start on the first side of the beak.
Info :
After finishing row 20 you have to attach the eyes to the head. The head is not the part you are working on. It’s the part you have finished already. After you have attached the eyes, follow the rest of the pattern.
Round 21 :
DEC 1 stitch, SC3. Repeat around. (24)
Round 22 :
DEC 1 stitch, SC2. Repeat around. (18)
Round 23 :
DEC 1 stitch, SC1. Repeat around. (12)
Info :
Now stuff both parts of the beak and the body. Don’t use too much stuffing.
Round 24 :
DEC 1 stitch, SC1. Repeat around. (8)
Info :
Fasten off and leave a tail. Close the body.
— Eyes (make 2) :
Round 1 :
Make a magic ring. Chain 8 in the ring. (8) (If you don’t know how to make a magic ring, do the following: chain 2, SC8 in 2nd chain from hook.)
Round 2 :
SC2 in every second stitch. (12)
Round 4 :
DEC 6 by crocheting every 2SC together. (6)
Round 5 :
Fasten off and leave tail for sewing the eye to the head.
Round 6 :
Make the black part of the eyes.
Info :
If you prefer safety eyes, you can push the safety eye through the middle of the white part (see picture). It’s best to push the back of the eye through the body so the washer is on the inside of the body.
— Hind-legs (make 2) :
Round 1 :
Chain 4. Close the ring with a SL ST.
Round 2 :
SC1 in every chain. (4)
Info :
The leg now looks like this:
Round 11 :
SC2 on the top of the leg. Chain 1.
Info :
Just push your crochet hook through the top of the leg as shown in the picture.
Info :
After you’ve done the SC2 of row 11, it should look like this.
Round 12 :
SC2 in every SC. Chain 1. (4)
Round 13 :
SC2 in the first stitch, SC2, SC2 in the last stitch. (6)
Round 15 :
Skip the first stitch. SC1 in the next.
Round 17 :
SC1 in the next stitch.
Round 18 :
Repeat 3 more times until you have 5 toes.
— Front-legs (make 2) :
Round 1 :
Chain 4. Close the ring with a SL ST.
Round 2 :
SC1 in every chain. (4)
Info :
If you need help by making this part of the leg, just take a look at the pictures from row 10 and 11 of the hind-legs.
Round 8 :
SC2 on the top of the leg. Chain 1. (2)
Round 9 :
SC2 in every SC. Chain 1. (4)
Round 10 :
SC2 in the first stitch, SC2, SC2 in the last stitch. (6)
Round 12 :
Skip the first stitch. SC1 in the next.
Round 14 :
SC1 in the next stitch.
Round 15 :
Repeat 3 more times until you have 5 toes.
Info :
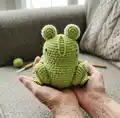
After you’ve finished all four legs, sew them onto the body on the positions as shown on the picture on top of this pattern.
Info :
Last but not least: Do not make copies of this pattern or distribute it as your own design. If you post your frog online, please refer to the author/shop.
Thank you for choosing this little frog pattern — I hope it brings smiles and a touch of handmade charm to your day. Make as many frogs as you like for gifts or decor, and have fun customizing colors and expressions. Share your finished frogs online and kindly credit the pattern author if you post photos. 🐸🧶