🧢 Beautiful ✨ Detailed πŸ’ Adorable

Crazy Deer Slippers Pattern

Crazy Deer Slippers Pattern
4.6β˜… Rating
5-7 Hours Time Needed
4.1K Made This
βœ‚οΈ

Intermediate Level

Ideal for those with basic crochet experience, featuring slightly more advanced stitches and techniques to expand your skills.

⏱️

Weekend Treat

Takes 5-7 hours, making it an enjoyable project to finish over a couple of days.

🏑

Cozy Accent

A warm touch for your space that transforms ordinary corners into inviting nooks filled with handmade charm.

About This Crazy Deer Slippers Pattern

This pattern creates a cozy pair of Crazy Deer slippers with a sculpted muzzle, plush nose, ears and horns for a playful look. It uses t-shirt and velvet cords along with plush yarn for tactile details. The instructions include step-by-step photos and clear shaping notes to guide you through the process. Ideal for crocheters who enjoy working with bulky cords and textured stitches.

Crazy Deer Slippers Pattern crochet pattern - detailed view of completed project

You will learn to crochet the sole trim on a wooden bottom, build the muzzle with cluster shaping, and add charming facial details. The pattern includes materials, abbreviations and assembly tips for a polished finish.

Why You'll Love This Crazy Deer Slippers Pattern

I absolutely love this pattern because it turns simple materials into an adorable, functional slipper full of personality. I enjoy how the plush yarn nose and T-shirt yarn eyes give such a fun character with minimal sewing required. The mix of techniques β€” working into holes of a wooden sole, clusters and shaping β€” keeps the work interesting without being overwhelming. Making a pair feels like crafting a little companion, and I always smile when I see them finished.

Crazy Deer Slippers Pattern step 1 - construction progress Crazy Deer Slippers Pattern step 2 - assembly progress Crazy Deer Slippers Pattern step 3 - details and accessories Crazy Deer Slippers Pattern step 4 - final assembly and finishing

Switch Things Up

I love experimenting with color schemes for these slippers; I often swap the beige and brown for gray and cream to create a softer, neutral pair.

I sometimes use bright or patterned t-shirt yarn for the trim to give a pop of color along the sole edge for a playful twist.

You can change the size by using a thicker cord and larger hook for a chunkier, roomier slipper or a thinner cord for a tighter, smaller slipper.

I recommend adding non-slip dots or a rubber sole if you plan to wear these on smooth floors for extra safety and durability.

I enjoy making mini versions as ornaments or keychains by using thinner yarn and a smaller wooden base; they become delightful gifts or decorations.

I also like to swap the plush nose color to make different charactersβ€”try pastel pink for a cute look or red for a festive version.

For a long-lasting pair, consider lining the inside with a soft fleece or felt to add comfort and hide internal seams.

I often embellish brows or facial details with embroidery to change expressionsβ€”small changes to eye placement create very different personalities.

If you want posable ears or horns, insert thin wire into the ear or horn pieces before closing for gentle shaping and flexibility.

I sometimes add small crocheted bows, bells or tiny scarves as accessories to theme them for holidays or to match outfits, which makes each pair uniquely mine.

Common Mistakes & How to Fix Them

βœ— Skipping stitch markers while marking the toe center causes misaligned decreases and awkward shaping; place markers at the points indicated and move them as instructed to keep symmetry. βœ— Using inconsistent tension with bulky t-shirt or velvet cord will produce uneven rows and wrong sizing; maintain steady, slightly loose tension and measure against the wooden bottom frequently. βœ— Not leaving long sewing tails when finishing the nose or muzzle makes attachment difficult; leave the specified long ends (for example 27 inches/70 cm for the nose) for secure sewing and finishing. βœ— Forgetting to steam and shape the muzzle can result in a floppy nose area; steam through a damp cloth and insert a small towel to add stable volume as directed. βœ— Cutting threads too short after finishing rounds will make hiding ends and reinforcing seams harder; always leave the recommended lengths and hide ends on the wrong side after tying knots.

Crazy Deer Slippers Pattern

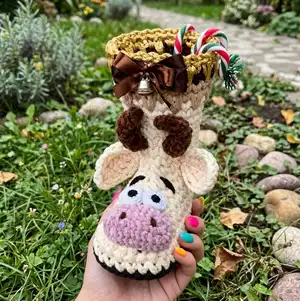
Make a pair of whimsical Crazy Deer slippers that bring cozy charm to your home. This pattern guides you step-by-step through crocheting the base, muzzle, nose, ears, horns and decorative eyes. You will enjoy the tactile plush yarn and simple shaping to create a playful slipper with personality. Perfect for gifting or keeping warm on chilly mornings.

Intermediate 5-7 Hours

Materials Needed for Crazy Deer Slippers Pattern

β€” Main Fabric

  • 01
    Beige cord 4-5 mm, approximately 77 yards (70 m)
  • 02
    Brown cord 4-5 mm, approximately 55 yards (50 m)
  • 03
    T-shirt metallic yarn 4-5 mm, about 4.4 yards (4 m)
  • 04
    White fur yarn (for accents) about 3.3 yards (3 m), e.g. YarnArt mink
  • 05
    T-shirt yarn white color for eyes, 24 inches (60 cm)
  • 06
    Plush yarn pink color for nose (120 m/100 g), about 3.3 yards (3 m), e.g. Himalaya Dolphin Baby or YarnArt Dolce Baby
  • 07
    Piece of felt or leather for pupils, 10 x 20 mm
  • 08
    Little soft stuffing for nose and muzzle
  • 09
    Wooden bottom with 37 holes, 8 inches (20 cm)

β€” Tools Required

  • 01
    Crochet hook size 5.5 mm
  • 02
    Crochet hook size 4 mm
  • 03
    Glue gun
  • 04
    Scissors
  • 05
    Plastic with large eyelet (plastic needle)
  • 06
    2 stitch markers
  • 07
    Yarn needle for sewing and hiding ends
  • 08
    Small towel for shaping muzzle when steaming
  • 09
    Steam iron (for shaping muzzle)
  • 10
    Optional: pins for assembly and positioning

Progress Tracker

0% Complete

β€” Materials and tools :

Infos :

Any cord, 4-5 mm, 77 yards (70 m) beige color and 55 yards (50 m) brown color. In my example, I used velvet cord Shikimiki AVE; T-shirt metallic yarn, 4-5 mm, about 4.4 yards (4 m); Any fur yarn white color, 3.3 yards (3 m). For example, YarnArt mink; T-shirt yarn white color for eyes, 24 inches (60 cm); Piece of felt or leather for pupil, 10*20 mm; Plush yarn pink color for nose 120m/100 gr, 3.3 yards (3 m). For example, Himalaya Dolphin Baby, YarnArt Dolce Baby; Little soft stuffing; Wooden bottom with 37 holes, 8 inches (20 cm); Hook 5.5 mm and 4 mm; Glue gun; Plastic with large eyelet, scissors, 2 markers. Finished boot from the specified materials: height- 8 1/2 inches (21 cm). Gauge: 10 rows and 9-10 stitches = 4*4 inches (10*10 cm).

Infos :

Link to the video of the process (1 hour 5 minutes): https://youtu.be/VJzNVBXI5pY

β€” Abbreviations :

Infos :

CH - chain stitch, SlSt - slip stitch, YO SlSt - yarn over slip stitch, SC - single crochet, HDC - half double crochet, DC - double crochet, Inc - increase (2 SC in 1), Dec - decrease (2 SC together)

β€” Crochet the horns(*2) :

Info :

Take the brown cord and 5.5 mm hook.

Round 1 :

Crochet 12 CH.

Round 2 :

5 SlSt from the 2nd loop from the hook.

Round 3 :

6 CH, 5 SlSt from the 2nd loop from the hook.

Round 4 :

6 YO SlSt, cut the thread, pull out the end.

Info :

Similarly crochet the 2nd horn.

β€” Crochet the ears(*2) :

Info :

Take the beige cord and 5.5 mm hook.

Info :

Leave the end of the thread 16 inches (40 cm) long. Crochet the chain of 6 CH with two threads. For that: chain knot, yarn over with end, yarn over, pull through all 2; yarn over with end, yarn over, pull through all 2, continue so on...

Round 1 :

Next crochet from the 2nd loop from the hook: SC, HDC, DC, HDC, (SC, 3 CH, SC) in 1, HDC, DC, HDC, SC, SlSt in the 1st loop. Cut the thread, pull out the end.

Info :

Similarly crochet the 2nd ear.

β€” Crochet the nose :

Info :

Take the pink plush yarn and 4 mm hook.

Round 1 :

Crochet 2 CH.

Round 2 :

1 row. 6 SC in the 2nd loop from the hook, SlSt, CH.

Round 3 :

2 row. 6 Inc (=12), SlSt, CH.

Round 4 :

3 row. (SC, 1 Inc)*6 (=18), SlSt, CH.

Round 5 :

4 row. 18 SC, SlSt. Leave the end for sewing the nose 27 inches (70 cm) long. Cut the thread, pull out the end.

Info :

Add little soft stuffing.

β€” Crochet the trim of the bottom :

Info :

Take the brown cord and 5.5 mm hook. Leave the end of the thread 8 inches (20 cm) long.

Round 1 :

Insert the hook in the hole, pull the loop, CH.

Round 2 :

Crochet SC in the each hole. Make increases in the holes marked on the picture.

Round 3 :

Crochet the last SC with the end of the thread, pull out the end, close the row with the end (=46).

Round 4 :

1 row. Insert the hook on the back loop and the jumper only.

Round 5 :

Pull the loop, CH.

Round 6 :

45 SC on the back loop and the jumper only. Cut the thread, pull out the end, close the row (=46). Tie the knot and hide the ends on the wrong side.

Info :

You may have a different number of the loops, depending on the size of the bottom. Crochet similarly, making the necessary number of increases and decreases in the places indicated in this pattern.

β€” Crochet the muzzle :

Info :

Take the beige cord and 5.5 mm hook. Leave the end of the thread 39 inches (1 m) long.

Round 1 :

2 row. Insert the hook under the last SC of the previous row. Pull the loop, CH.

Round 2 :

45 SC, crochet the last SC with the end of the thread, and the each subsequent row. Pull out the end, close the row with the end (=46).

Round 3 :

3 row. Insert the hook under the last SC of the previous row. Pull the loop, CH, 45 SC, close the row with the end (=46).

Info :

Count 16 loops in the middle of the toe. Place the markers in the 1st end the 16th loops.

Round 4 :

4 row. Insert the hook under the last SC of the previous row. Pull the loop, CH, 22 SC to the 1st marker, 8 DC together (clusters), 7 SC, close the row with the end (=38).

Info :

Rearrange the markers in the 1st and the 8th clusters.

Round 5 :

5 row. Insert the hook under the last SC of the previous row. Pull the loop, CH, 22 SC to the 1st marker, 4 clusters with 2 DC together (insert the hook from front to back to front around the cluster of the previous row), 7 SC, close the row with the end (=34).

Info :

Rearrange the markers in the 1st and the 4th clusters.

Round 6 :

6 row. Insert the hook under the last SC of the previous row. Pull the loop, CH, 6 SC, Dec, 14 SC to the 1st marker, 2 clusters with 2 DC together (insert the hook from front to back to front around the cluster of the previous row), 7 SC, close the row with the end (=31).

Info :

Rearrange the markers in the 1st and the 2nd clusters.

Round 7 :

7 row. Insert the hook under the last SC of the previous row. Pull the loop, CH, 6 SC, Dec, 10 SC, 4 Dec three loops before the 1st marker, 4 SC, close the row with the end (=26).

Info :

Rearrange the markers in the 2nd and the 3rd decreases.

Round 8 :

8 row. Insert the hook under the last SC of the previous row. Pull the loop, CH, 18 SC to the 1st marker, Dec, 5 SC, close the row with the end (=25).

Info :

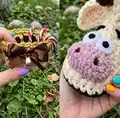
Steam the muzzle with an iron through a damp cloth. Put a small towel in the middle to add volume.
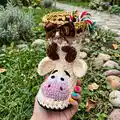
β€” Decorate the muzzle :

Info :

Sew on the nose with the plastic needle above the 3rd row in the middle of the toe.

Info :

Take two pieces of the white T-shirt yarn 12 inches (30 cm) long. Roll into a roller, glue with the glue gun.

Info :

Cut off two circles (pupils) with a diameter 7-8 mm and glue on in the middle of the eyes. Glue on the eyes above the nose.

Info :

Embroidery the eyebrows with the brown cord.

Info :

Fasten the ears in the 8th row at a distance of 6 SC from each other. Strengthen and hide the ends on the wrong side.

Round 9 :

9 row. Insert the hook under the last SC of the previous row. Pull the loop, CH, 24 SC, close the row with the end (=25).

Round 10 :

10 row. Insert the hook under the last SC of the previous row. Pull the loop, CH, 24 SC, close the row with the end (=25).

Round 11 :

11 row. Insert the hook under the last SC of the previous row. Pull the loop, CH, 6 SC, Inc, 17 SC, close the row with the end (=26).

Assembly Instructions

  • Sew the pink plush nose to the muzzle above the 3rd row in the middle of the toe, using the long tail left for sewing and the plastic needle for neat stitches.
  • Glue the rolled white T-shirt yarn eyes above the nose, then glue small felt pupils (7-8 mm) in the center of each eye; reinforce with a little glue gun as needed.
  • Fasten the ears to the 8th row of the muzzle at a distance of 6 SC from each other, strengthen the attachment with additional sewing stitches, and hide ends on the wrong side.
  • Attach the horn pieces to the top of the slipper head securely (position symmetrically), and hide and knot ends inside the slipper for a clean finish.
  • Weave in all ends, tie knots and hide them on the wrong side; steam-shape the muzzle through a damp cloth with a small towel inside to set volume and shape.

Important Notes

  • πŸ’‘Use stitch markers to mark the center and cluster positions; moving them as instructed prevents shaping mistakes and keeps symmetry.
  • πŸ’‘Maintain consistent tension when working with bulky t-shirt or velvet cords; inconsistent tension affects stitch count and final fit.
  • πŸ’‘Leave the recommended long tails for sewing details (nose, muzzle and eye rolls) to allow secure attachment and hidden finishes.
  • πŸ’‘Steam the muzzle through a damp cloth and add a small towel to the inside to add volume and make shaping easier.
  • πŸ’‘Hide knots and ends on the wrong side after tying to ensure a neat, professional-looking finish.

This Crazy Deer slippers pattern brings handmade warmth and whimsical charm to chilly mornings. Create plush features and textured trim for a unique cozy accent. Whether you gift them or keep them, these slippers are sure to bring smiles and comfort. 🧢✨

You ask,

we answer.

FAQs

What size will the finished piece be?

The finished boot from the specified materials measures approximately 8 1/2 inches (21 cm) in height as noted in the materials section.

Can I use different yarn weights for this pattern?

Yes, you can substitute yarn, but changing yarn weight and hook size will affect final size; test gauge and compare to the wooden bottom or desired measurements.

Do I need prior crochet experience for this pattern?

This pattern is rated intermediate and uses techniques like clusters, working into back loops and shaping; basic crochet knowledge and experience with bulky cord is recommended.

How long does this project typically take to complete?

Most crocheters complete this project in 5-7 hours, though time may vary based on experience level, yarn choice and assembly time.

What tools do I need for the sole and trim?

You will need a wooden bottom with holes (37 holes), a 5.5 mm hook for the trim, a 4 mm hook for details, and a glue gun for the eyes and rolled details.