🧶 Beautiful ✨ Detailed 💝 Adorable

Crochet Cocoon Cardigan Pattern

Crochet Cocoon Cardigan Pattern
4.0★ Rating
8-10 Hours Time Needed
2.1K Made This
✂️

Beginner Friendly Level

Perfect for those just starting their crochet journey, with clear instructions and simple techniques

⏱️

All-Day Adventure

Requires 8-10 hours, ideal for a full day of immersive crocheting.

🧥

Layered Comfort

Perfect for cozy, stylish layering through changing seasons with versatile, mix-and-match potential.

About This Crochet Cocoon Cardigan Pattern

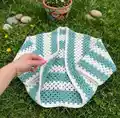
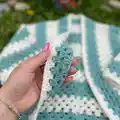
This pattern creates a relaxed cocoon-style cardigan worked flat in a repeat stripe pattern. It uses Bernat Forever Fleece super bulky yarn for quick progress and a plush hand. The design features simple double crochet clusters and easy finishing techniques for neat edges and armholes.

Crochet Cocoon Cardigan Pattern crochet pattern - detailed view of completed project

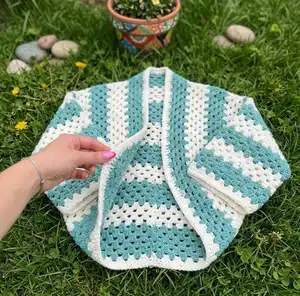
Detailed step-by-step photos guide you through the stitch pattern and finishing. Sized for XS/S/M, L/XL/2XL and 3/4/5XL with color and yardage notes for each size.

Why You'll Love This Crochet Cocoon Cardigan Pattern

I absolutely love this pattern because it transforms chunky yarn into a cozy, wearable piece with surprisingly simple stitches. I enjoy how quickly the fabric grows using the Bernat Forever Fleece, letting you see progress fast. I also love the striped texture — it looks designer-made while staying beginner-friendly. The assembly and edging techniques give a polished finish that I am proud to wear and gift.

Crochet Cocoon Cardigan Pattern step 1 - construction progress Crochet Cocoon Cardigan Pattern step 2 - assembly progress Crochet Cocoon Cardigan Pattern step 3 - details and accessories Crochet Cocoon Cardigan Pattern step 4 - final assembly and finishing

Switch Things Up

I love customizing this pattern by switching the stripe sequence; try 4 rows of A and 2 rows of B for a different rhythm.

I often change the color palette to rich jewel tones for a dressier option or pastels for a soft, feminine look.

I sometimes use a slightly larger hook for an even airier drape—just remember to make a new gauge swatch to adjust yardage.

For a shorter, jacket-style version, stop the stripe repeats a few inches earlier and finish the edging the same way.

Want pockets? Crochet two small rectangles in the pattern stitch and seam them to the inside front panels before edging.

I recommend adding a decorative button or pin at the front if you want the cardigan to close slightly; choose a large, lightweight button to match the chunky yarn.

Try adding a contrasting color along the sleeve hems for a modern detail that helps frame the arms.

If you prefer more structure, block the piece gently before seaming to even out stitches and help alignment of seams.

I also like to embroider a small motif on one front corner using leftover yarn for a personal touch.

For travel-friendly versions, make a mini mock-up in worsted weight to test proportions quickly before committing to the full garment.

Common Mistakes & How to Fix Them

✗ Not checking gauge before beginning will result in a cardigan that does not fit as intended; make the 4" (10 cm) gauge swatch and adjust hook size as needed. ✗ Skipping the stitch count when chaining can throw off the stripe pattern and stitch placement; count your starting chains carefully and repeat the written repeats exactly. ✗ Changing colors incorrectly can leave loose loops or messy joins; work to the last two loops of the old color, yarn over with the new color and complete the stitch to secure the change. ✗ Sewing side seams too tightly will distort the cocoon shape and shrink armholes; use a flat seam and keep tension even while seaming to preserve drape.

Crochet Cocoon Cardigan Pattern

Make a cozy oversized cocoon cardigan with easy-to-follow instructions using Bernat Forever Fleece. This beginner-friendly pattern features a simple stripe stitch pattern, clear photos, and step-by-step finishing directions so you can create a polished layering piece. Perfect for gifting or keeping, the relaxed silhouette layers beautifully over any outfit.

Beginner Friendly 8-10 Hours

Materials Needed for Crochet Cocoon Cardigan Pattern

— Main Fabric

  • 01
    Bernat Forever Fleece (Super Bulky 6) 9.9 oz / 280 g; 194 yds / 177 m per ball
  • 02
    Contrast A: Blue Teal (61026) - XS/S/M: 2 balls (approx 378/345 yds/meters), L/XL/2XL: 3 balls (approx 407/372), 3/4/5XL: 3 balls (approx 436/398)
  • 03
    Contrast B: White Noise (61004) - XS/S/M: 2 balls (approx 376/343), L/XL/2XL: 3 balls (approx 404/369), 3/4/5XL: 3 balls (approx 434/396)

— Tools Required

  • 01
    Crochet hook size U.S. M/13 (9 mm) Susan Bates® Silvalume® crochet hook or size needed to obtain gauge
  • 02
    Susan Bates® stitch markers
  • 03
    Susan Bates® yarn needle
  • 04
    Tape measure

Progress Tracker

0% Complete

— Stripe Pattern :

Infos :

Stripe Pattern (Pat) With A work 3 rows. With B work 3 rows. This 6 rows form Stripe Pat.

— Cardigan Body :

Info :

With A, make a slip knot and place it on hook. Slip knot Make a loop with yarn and fold it on itself to make a pretzel shape. Then draw through to make slip knot.

Chain :

Ch 99 (108-114) [multiple of 3 ch + 6]. *Yarn over hook (Yoh), draw through loop – 1 chain made. Repeat (Rep) from * 98 (107-113) times more – 99 (108-114) chains made.

1st row :

[1 double crochet (dc). Ch 1. 1 dc] all in 6th ch from hook (skipped 5 ch counts as: 1 dc and 2 ch). *Skip next 2 ch. (1 dc. Ch 1. 1 dc) all in next ch. Rep from * to last 3 ch. Skip next 2 ch. 1 dc in last ch. Turn.

Info :

Step by Step of 1st row: Double crochet Yoh and insert hook into 5th ch from hook. Yoh and draw up a loop – 3 loops on hook. Yoh and draw through first 2 loops on hook. Yoh and draw through remaining (rem) loops on hook – 1 dc made. Ch 1 then rep above steps in same chain. (1 dc. Ch 1. 1 dc) made. Rep above to last 3 ch. Skip next 2 ch. 1 dc in last ch. Turn.

2nd row :

Ch 3 (counts as dc). *(1 dc. Ch 1. 1 dc) in next ch-1 space (sp). Rep from * to end of row. 1 dc in last dc. Turn.

Info :

Rep last row for pat, keeping continuity (cont) of Stripe Pat, until piece measures approx 39 (42-45)" [99 (106.5-114.5) cm] long, ending on either 3 rows of A or 3 rows of B. Fasten off.

Change Color :

To change colors, work to last 2 loops on hook of first color. Yoh with new color and proceed.

Fasten off :

To fasten off the yarn, cut yarn leaving a long tail. Draw end through loop on hook and pull gently to tighten.

— Assembly :

Info :

Following diagram, fold work in half, Wrong Side (WS) together (tog) with first and last rows aligned.

Info :

Assembly Diagram shows fold, armhole openings and front opening. Refer to diagram for seam and fold placement.

Round 1 :

Place markers (PM) 8" [20.5 cm] down from fold at each side to mark armhole openings.

Info :

With A, sew side seams from marker to bottom using a flat seam. Keep marker in place.

— Finishing :

Body Edging :

With Right Side (RS) facing, join B with slip stitch (sl st) to Front Opening at side seam (see diagram on page 7).

1st round :

Ch 1. 1 single crochet (sc) in same space (sp) as join. 1 sc in each ch and dc around. Join with slip stitch (sl st) to first sc. Do not turn. 192 (210-222) sc total.

2nd rnd :

Ch 1. 1 sc in each sc around. Join with sl st to first sc. Fasten off.

— Armhole Edging :

Info :

With RS facing, join B with sl st to Armhole Opening at marker.

1st rnd :

Ch 1. Working 2 sc around post of each dc, work sc evenly around. Join with sl st to first sc.

2nd rnd :

Ch 1. 1 sc in each sc around. Join with sl st to first sc. Fasten off.

Info :

Weave in all yarn ends.

Assembly Instructions

  • Fold the completed rectangle in half with Wrong Sides (WS) together so that first and last rows align, following the assembly diagram for orientation.
  • Place stitch markers (PM) 8" [20.5 cm] down from the fold at each side to mark the beginning of the armhole openings.
  • With Color A, sew the side seams from each marker down to the bottom edge using a flat seam, keeping markers in place to ensure accurate armhole size.
  • For body edging, with Right Side (RS) facing, join Color B with a slip stitch to the front opening at the side seam and single crochet evenly around the opening as directed.
  • For armhole edging, join Color B with a slip stitch at each armhole marker, work 2 sc around each dc post for first round, then work even single crochet round and fasten off.
  • Weave in all yarn ends neatly on the wrong side so there are no loose tails visible on the finished cardigan.

Important Notes

  • 💡Chain 3 at the beginning (beg) of row counts as double crochet (dc); treat it as the first dc of that row.
  • 💡To change colors, work to the last 2 loops on the hook of the first color, yarn over with new color and complete the stitch to secure the change.
  • 💡Work a gauge swatch of 10 sts and 4.5 rows = 4" [10 cm] in pattern to match the recommended tension before beginning.
  • 💡Keep continuity of the Stripe Pattern by working 3 rows of A then 3 rows of B until the piece reaches the specified length.

This cozy cocoon cardigan uses super bulky Bernat Forever Fleece to create a plush, striped layering piece you will reach for again and again. The relaxed shape works beautifully over knitwear and tees, giving instant style with minimal effort. Make it in classic neutrals or bold contrasts to match your wardrobe. 🧶🧥

You ask,

we answer.

FAQs

What size will the finished piece be?

Finished square measures 39" [99 cm] for XS/S/M, 42" [106.5 cm] for L/XL/2XL, and 45" [114.5 cm] for 3/4/5XL before assembly; the cardigan fits a range of chest sizes as listed in the measurements table.

Can I use different yarn weights for this pattern?

You can substitute yarn weights, but this will change the finished size and drape significantly; choose an appropriate hook and re-check gauge to compensate.

Do I need prior crochet experience for this pattern?

This pattern is beginner friendly and uses basic stitches like chains, double crochet and single crochet; basic knowledge of reading rows and simple seaming is helpful.

How long does this project typically take to complete?

Most crocheters complete this project in 8-10 hours, though time will vary depending on size, pace, and experience.