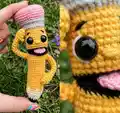
About This Bobby The Pencil Amigurumi Pattern
This charming pattern creates Bobby the Pencil, a small amigurumi toy with a lively expression and posable arms. Youll crochet the pencil body, a sewn-in mouth detail, a tiny tongue, and cute eraser top. The pattern uses cotton or semi-cotton yarn and includes clear rounds and photo guidance.
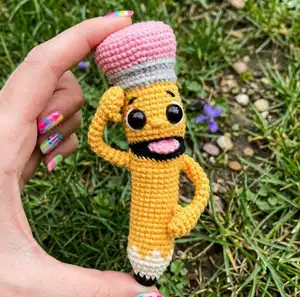
Perfect as a handmade gift or desk companion, Bobby is quick to make and highly customizable. The instructions cover color changes, assembly, and simple embroidery for facial details.
Why You'll Love This Bobby The Pencil Amigurumi Pattern
I absolutely love this pattern because it combines playful character design with straightforward crochet techniques that deliver a big personality in a small toy. I enjoy the clever mouth construction that creates a 3D smile and the way small details like the tongue and eraser top bring Bobby to life. Making Bobby is satisfying because he works up quickly yet still offers opportunities for customization. I also love that the pattern teaches a few slightly advanced techniques like back-post stitches and strategic color changes without being overwhelming.
Switch Things Up
I love experimenting with color schemes to give Bobby a new personality — try pastel colors for a soft, nursery-friendly version or neon shades for a quirky gift.
I often change yarn weight and hook size to make minis or larger plush versions; using a thicker yarn with a larger hook creates a chunky, cuddlier Bobby.
I sometimes replace safety eyes with embroidered eyes for baby-safe toys or use smaller/larger plastic eyes to alter his expression.
I add tiny accessories like a crocheted bow, a little pencil cap, or a felt tag for personalization and themed gifts.
To make Bobby a keychain, use thinner yarn and a 1.5 mm hook or adjust to create a much smaller version, then add a keyring to the top.
You can skip the wire for fully soft arms if you prefer a non-posable toy; simply sew the arms directly to the body instead.
Try embroidering different mouth shapes or eyebrows to change Bobby's mood — playful, surprised, sleepy, or cheeky all work well.
Add surface details like tiny stitched freckles or a school logo on the body to tell a story about your pencil character.
I also like to mix yarn textures, such as pairing cotton for the body with a softer blend for the eraser, to add tactile contrast.
For a sturdier arm connection, reinforce the sewn area with a few extra rounds or an inner felt disk before sewing; this helps when gifting to children.
Common Mistakes & How to Fix Them
✗ Forgetting to change colors exactly as instructed can create jagged or uneven color transitions; follow the round-by-round color change notes and carry or cut threads neatly to keep edges clean.
✗ Skipping counting stitches during increases and decreases leads to incorrect stitch counts and shaping problems; count your stitches each round and use stitch markers at the start of rounds to stay accurate.
✗ Overstuffing the body makes the toy stiff and can push out sewn details like the mouth; stuff gradually and adjust stuffing after sewing inner mouth to maintain shape.
✗ Not isolating and covering wire ends can create sharp points that puncture yarn or injure hands; bend wire ends and wrap them with band-aid or tape before inserting into the body.
✗ Placing eyes too low or too close causes an odd facial expression; measure four rounds higher than the mouth upper line and space eyes 6 SC apart as instructed for balanced placement.