This festive collection brings easy, stash-busting holiday crochet projects to your home. Youll find step-by-step photo tutorials for a tree, stockings, and a gift bag that are perfect for scrap yarn and creative play. These projects use mostly simple stitches so you can relax and enjoy making unique seasonal decor. Make one piece or the whole set to fill your holidays with handmade charm.
Progress Tracker
0% Complete
— Materials :
Info :
Assorted. I have written most of these patterns with "stash busting" in mind. I have a huge assortment of old yarn and odds and ends yarns from a vast collection of mostly thrifted bags of yarn. Most all of what I am using is 4-ply worsted weight yarns like Red Heart Super Saver. I will note any changes and give you the best idea I can on what to use to make each pattern. Gauge isnt important for most of these patterns.
Info :
I will have a full list of all products used for each pattern at the start of that pattern. Hooks : Hook sizes will vary greatly for all of these patterns. I will note at the start of each pattern the hook/hooks that I have used.
— Stitch Glossary :
Infos :
Chain: Ch. Single Crochet: SC. Inc Sc: make two single crochet stitches in the same stitch as indicated. Invisible Decrease: inv. dec. - this is an invisible single crochet decrease. Hdc: Half double crochet. Dc: double crochet. Tr: treble crochet. Slip Stitch: sl st. FO: finish off.
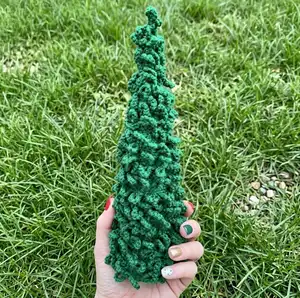
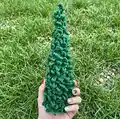
— "Oh, Christmas tree, Oh, Christmas tree": Tree #1 :
Info :
Tree 1: Beginner Crochet. Only chain stitches and slip stitches used.
Info :
For this first tree you will need 2 strands of green yarn. I have held two strands together for this example and used my K/6.5mm hook.
Info :
One of the skeins of yarn was Red Heart Classic 3.5 oz/100g. This old skein must have been made before they started putting yardage on the rolls. I paired another strand of green that had no wrapper and used the full skein of the 3/5oz RH yarn. It is a small skein. Do not be afraid on this pattern of running out of yarn because the last step with the loops is easily adjusted.
Info :
Ive also used 23" cardboard tree cone form from Hobby Lobby. These are typically expensive at about $9.99 each, but I bought my stash AFTER the holidays last year and got them 50% off - so, tip: buy in January for next Christmas.
Info :
You will also need your hot glue gun and maybe some liquid glue. You can use only your hot glue gun, but I found it went a bit quicker if I did one row in hot glue and let it dry and then squirted on a bunch of liquid glue for several rows and wound them on and then set those rows in place by securing my work with more hot glue - this way every few rows you will have liquid glue drying between the rows of set up hot glue.
Info :
An embroider needle might be helpful as well.
Info :
Okay, lets get started on your first tree:
Info :
With your two strands of yarn and K hook, chain, chain, chain and keep on chaining....chain, chain, chain. I did not start attaching my chain to the tree form until was sure it would reach at least half way - YOU WILL NOT CUT YOUR YARN AT ALL SO, when you get to the place where you want to start adhering the chain to your form just pull up your loop so you have plenty of spare and go back to chaining when you get ready.
Info :
Attach the beginning of your starting chain to the very bottom of the form. I used my two starting tails to tie the bottom row together after I made sure it was snug.
Info :
After this first row was secure, I streamed a bit of liquid glue above that starting line and ran some more rows around. You want to work slow enough that you keep your chain positioned right side up and pull nice and firm, but not over tight as you go around. If you are using liquid glue with hot glue as I have, put your finger over the work after a few rows and hold tight while you run a stream of hot glue and secure the next bit of green chain to hold it all tight. If you dont do this your chain may "bounce back" as it dries and be loose.
Info :
So, do a few rows in liquid glue, hold firm with finger, do a row in hot glue to set and secure and repeat. Alternatively, you can just hot glue all the way around. Just make sure to work in small sections and hold your chain so that the right-side stays facing out and doesnt twist. Pull firm, but not over tight.
Info :
WooHOOO! Now, you have the base of your first Christmas tree. Now, you may decide to stop here. You might like how this looks just find and honestly if you use two very different colors of green or a green and metallic yarn or even add a strand of fun fur this might be decorative enough for you and you can stop here.
Info :
You can even stop here and wind a strand of small led/battery operated lights on this. You can even stop here and add some beaded garland, ornaments, words, "snow" etc. The possibilities from this "base" tree are endless!! So, now. Stay here or move on to the loops. If you choose to stop here just cut your yarn and hide those tails.
Info :
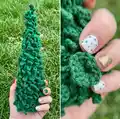
But, if you are moving on to the loops DO NOT CUT. After you have done all the way up around the top start with a chain 10. Slip stitch at the base of your chain 10 and repeat. Chain 10. Slip stitch at the base of the chain 10 and repeat - repeat - repeat - it will seem like you will repeat forever! I kept on going until I ran out of yarn. You can choose to end early and have wide spaces between the loops. This is all up to you. You may even decide that you want bigger or smaller chains than a chain 10. Play with it and see what you like.
Info :
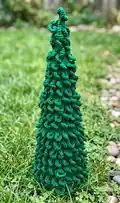
After you get done with all your loops start winding. I wound at first a bit loose so I could space out and then tighten my loops evenly. After getting them all on my tree I started at the top and pull them snug all the way around and repositioned them evenly. I didnt need to secure this loop chain with any sort of adhesive - the loop chain was pulled tight enough that it stuck just fine to the other yarn underneath.
Info :
The last step for me was to give the whole tree a good steam bath. Steaming my work is a personal preference, but what it does for 4-ply yarn - especially old 4-ply yarn is freshen it up and soften it a bit. It helps relax the fibers a little and it just looks so much nicer. If you have never steamed your work before with an acrylic yarn you will be so surprised at the difference.
Info :
And that is it! You have your first tree complete. Now, to make a tree farm.....
— "...and the stockings were hung by the chimney with care": Christmas Stocking :
Info :
Stocking: Beginner Friendly Crochet with full photo tutorial and easy stitches used. You will use single crochet (sc), half double crochet (hdc), double crochet (dc) and at the end you will be doing some front post and back post double crochet. If you are unfamiliar with this please search online for a good video tutorial.
Info :
This is a nice size, big stocking. My two examples are approximately 10" wide by 25" long. I have held two strands of yarn together for the entire stocking and used my K/6.5 mm hook. The work starts on the bottom/toe and works its way up the stocking. I have used different colors for the toe, heel and top, but you can also just work this piece without making those changes and you can also decide to make it more colorful by doing some stripe work. And wouldnt a monogram or initial be cute? I have a whole set of Crochet Alphabet letters that you can do to add a personal touch to the stockings.
Info :
I have used scrap yarns - about 10 leftover skeins/balls (5 per each stocking) - I have used mostly Red Heart Super Saver type yarns. Some of my yarn was newer (Red Heart with Love in Dusty Grape) but some was older and vintage-like with no labels or old labels but all were 4-ply worsted weight yarns. If you are buying yarn for these stockings you will need probably most of a small skein for the main body and just some scraps for the toe and heel. You can do the top in the main body color or switch like I did.
Info :
I work in mostly all spiral crochet most of the time and rarely ever join and chain up. This keeps my work from having joining seams and also "flows" for me where I can get into a nice rhythm. You can choose to count each round and join and chain if you prefer, but some parts of my pattern are not written that way. You will see what I mean - this stocking is a "flow" piece. I worked the main body straight up until I ran out of yarn. I didnt count rows or have a "stop" for that main upper part, but rather worked until I was mostly out of yarn and changed color on the back of my stocking. I have more about this in my pattern, but if you are a stickler for absolute row counts and equal stitches you may want to use a stitch marker and start counting in rows after you work the heel and start on the upper piece.
Info :
Okay, so, lets get started.
Round 1 :
Chain 2: In your 1st chain (the second from your hook) make 8 hdc.
Info :
Count back 8 if you need and find your first stitch to start the next round. **you will work over the tails from the beginning to tighten the middle of your work. Crochet over the tails all the way around this round and then pull them tight (see photos)
Info :
In this first stitch only make 1sc and then 1 hdc (this first sc is just to keep there from being such a big "jog" up in height. Working in the spiral it wont matter in the end and is the method I use) Now, make 2hdc in all the rest of the stitches around for a total of 16 stitches.
Info :
Continue to work in the spiral. If you fear losing count, youll want to move your stitch marker to the last stitch of each round so you know when you get to the end.
Round 3 :
Photo above. (Make 1 hdc in next stitch, make 2 hdc in the next stitch) repeat around (24)
Round 4 :
(Make 1 hdc in next 2 stitches, make 2 hdc in the next stitch) repeat around (32)
Round 5 :
(Make 1 hdc in next 3 stitches, make 2 hdc in the next stitch) repeat around (40)
Round 6 :
(Make 1 hdc in next 4 stitches, make 2 hdc in the next stitch) repeat around (48) - after doing the last hdc make about 3-4 sc for the same reason we did at the beginning. It helps eliminate your "jog" down and then join your main color on this last stitch. Make the first part of the stitch in the toe color and then pull through the last part of the stitch with your new color. Tie ends in back of work to secure and then continue to crochet over the tails.
Round 7 :
Single crochet in Back Loop Only (see photo above) (48)
Rounds 8-~20 :
Hdc around. See photos below. (That is about 13 rows or 624 stitches if you are working in the spiral.) TIP: what I do is open the calculator on my phone and enter 624 and then start subtracting as I go. I usually count up about 40-70 stitches and then subtract from my total. That keeps me on tract without worrying about moving stitch counters or what round I am on. I just "flow" and subtract until I am done.
Info :
After all of those stitches are finished make 3-4 single crochet in the next 3-4 hdc stitches and DROP but DO NOT CUT your main color. You will come back and pick it up after you do the heel.
Info :
You are now going to work in rows for a bit.
Info :
So, now, attach your toe/heel color when you make your last stitch from the toe - pull the new color through to finish the last stitch and then slip stitch in the next stitch. Work 21 sc across the round and slip stitch in the next stitch.
Info :
Do NOT chain, but turn your work and skip the slip stitch and single crochet together (sctog) over the next two stitches and then work all the way across (17) until you get to the last two sc and then sctog those two last stitches. *the below photo shows the slip stitch that you skip over and sctog the next two - my hook is under the slip stitch. Miss that when you start the sctog. (19 sc)
Info :
If you are unsure how to single crochet 2 stitches together you will find plenty of videos online but basically you insert hook into the space, pull up a loop, insert hook into the next space, pull up a loop (3 loops on the hook - above left photo) and pull through all 3 loops.
Info :
Chain 1 and turn. (right photo above), [sctog, sc across the heel until you reach the last two stitches, sctog] repeat what is in brackets until you are left with only 8 sc.
Info :
The last two rows of the heel before you break off your yarn are increase rows.
Info :
Chain 1 and turn. Make 2 sc in the first stitch, sc in the next 6 crochet and then make 2 sc in the last stitch (10)
Info :
Chain 1 and turn. Make 2 sc in the first stitch, sc in the next 8 crochet and then make 2 sc in the last stitch (12)
Info :
Cut your tails and move over to the other side of the heel.
Info :
Now, this is what your work should resemble.
Info :
Attach your heel color/colors to the bottom of the heel right next to where you dropped your main color yarn from earlier.
Info :
You are going to sc evenly around the entire heel piece. After I was finished with this I had made 32 sc around the heel section. If you dont have these exact numbers that is fine - you can adjust them later. (bottom left photo is what you should have now) - finish off that yarn. I just crochet over all my tails so there is no need to weave them in on this piece.
Info :
Go back and pick up the MAIN color yarn that you dropped from earlier (bottom right photo).
Info :
The next step is to crochet around the entire piece in your main color. You can choose either sc or hdc - this is largely up to you. I think I did sc one round on my blue stocking and then hdc for the rest and 2 rounds of sc and then hdc on my pink stocking.
Info :
BUT when you get to the upper corner on the HEEL piece (see photo to the left - the next 3 stitches after my hook) you will be either sc3tog (single crochet 3 together) or hdc3tog (half double crochet 3 together) on the upper 3 stitches on BOTH sides of the heel. This will "gather" them in a little for shaping.
Info :
You will single crochet around the entire piece with a 3 sctog on both sides of the heel. See below photos for my sc3tog and the 3 stitches on the left side of the heel. (I had 53 stitches after this)
Info :
For this next round, you are either going to sc or hdc around again, but this time you will be making a sc3tog in the spaces where the heel meets the toe. You can see in the photos above where I am making my next sc3tog. In the right-side photo above my single spaces to the left of my hook are the 3 that are going to get sc3tog - the first photo above on the left is one side and the last photo is the other side. This helps again with shaping. See photo to the right -> you can see my 3sctog and how it makes a nice curve.
Info :
Since I was still working in a continuous spiral, my first decrease leg of this stitch on this round was actually the last stitch from the round before. It will really help your shaping if you can get exactly the 3 stitches in the center of where the heel and toe meet to be the ones that you decrease.
Info :
So, work in either sc or hdc around, but make those other two sc3tog in the area where the toe and heel meet. After this round I had 49 stitches. You need to count your stitches after this round so you can get kind of with my stitch count now.
Info :
So, if you are not at 49 stitches now, this next round is where you will adjust for that. You want to have 48 stitches around when you finish this round. For my examples, I did one decrease on the back of the heel, but if you need to decrease more than that just do it evenly around the piece so you dont get any puckering. The reason for the 48 stitches is the top rows/border - so, if you are not doing the post stitches to end the 48 isnt really important.
Info :
You are doing great!
Info :
Okay, now this is the part of the pattern that I mentioned above where I just go...just crochet around and around and around - you can free flow this. There really is not any reason to worry about what round you are one or what number you are on or anything! Just put on a good show, audiobook or whatever and go...crochet, crochet, crochet. Keep on going around and around and around until the leg part of your stocking is the length that you want it to be. The length of my examples from the heel section was about 12 inches. But, if you are going to be changing colors like I did for a top section dont forget to think about that extra length. Whether you are making a top section or just going to finish off you want to be at the back side of the stocking - up from the heel - and if you are going to make a hanger chain some to make a hanger on the back side. I crocheted around until I almost ran out of yarn and made sure to be in the back of my work before I joined my other two colors back ***remember what I usually do when working in hdc - make about 3-4 sc before you change colors or finish off to blend in that jog.
Info :
If you are adding a top border/section in your other color change color and continue.
Round :
For the top section of my examples, I chained up 2 (not a stitch) and then did one double crochet border around.
Info :
Join and chain up 2 (not a stitch) and in the next round I alternated 4 front post double crochet and then 4 back post double crochet around (this is the reason you needed to have 48 stitches from above)
Info :
Repeat the round above for as many rounds as you want. On the blue stocking I did two, but on the pink stocking I ran out of yarn and ended after just one alternating front post/back post rounds.
Info :
If you find this difficult, just do a few rows of double crochet - your stocking will still be fabulous!
Info :
And dont forget to chain a length of chain at the back to hang if you are doing that. My chain was about 15.
— "Every wish, one and all, waiting under the tree": Gift Bag #1 :
Info :
Gift Sack/Bag 1: Beginner Crochet. I have used only half double crochet (hdc) and double crochet (dc) and some chain stitches for this bag. For the tie I have used chains and my pompom maker.
Info :
For this first gift bag, you will need 3 strands of yarn. I have held three strands together for this example and used my N/10mm hook. *you can use this same pattern and single or double strand with a small hook to make a smaller bag. My gift sack ended up about 16"x16"
Info :
One of the skeins of yarn was Red Heart Super Saver 8oz/225g. I used most of this skein (about 3/4) so you can plan your 3 skeins of yarn. This is a great scrap yarn project - if you run out just grab another ball of yarn. These are the 3 skeins of yarn that I used:
Info :
If you need more photos to help with the start, please see the stocking pattern above this one - we are going to start this exactly the same.
Round 1 :
Chain 2: In your 1st chain (the second from your hook) make 8 hdc. Count back 8 if you need and find your first stitch to start the next round. **you will work over the tails from the beginning to tighten the middle of your work. Crochet over the tails all the way around this round and then pull them tight (see photos if you need above in the stocking pattern)
Info :
In this first stitch only make 1sc and then 1 hdc (this first sc is just to keep there from being such a big "jog" up in height. Working in the spiral it wont matter in the end and is the method I use) Now, make 2hdc in all the rest of the stitches around for a total of 16 stitches.
Info :
Continue to work in the spiral. If you fear losing count, youll want to move your stitch marker to the last stitch of each round so you know when you get to the end.
Round 3 :
(Make 1 hdc in next stitch, make 2 hdc in the next stitch) repeat around (24)
Round 4 :
(Make 1 hdc in next 2 stitches, make 2 hdc in the next stitch) repeat around (32)
Round 5 :
(Make 1 hdc in next 3 stitches, make 2 hdc in the next stitch) repeat around (40)
Round 6 :
(Make 1 hdc in next 4 stitches, make 2 hdc in the next stitch) repeat around (48)
Round 7 :
(Make 1 hdc in next 5 stitches, make 2 hdc in the next stitch) repeat around (56)
Round 8 :
(Make 1 hdc in next 6 stitches, make 2 hdc in the next stitch) repeat around (64)
Info :
After you complete the entire round in either sc or hdc this is what it should look like.
Info :
Continue increasing rounds similarly as your project and yarn size dictate until you reach desired bag base size then work even rounds up the sides until bag height desired. (See photos for reference and spacing.)
This holiday collection is perfect for using up stash yarn and making heartfelt gifts for friends and family. The projects are approachable, photo-guided, and full of options for personalization. Make a tree, stockings, and a gift bag to create a cozy, handmade holiday display. 🎄🧶