🧢 Beautiful ✨ Detailed πŸ’ Adorable

Crochet Bunny Pumpkin Amigurumi Pattern

Crochet Bunny Pumpkin Amigurumi Pattern
4.3β˜… Rating
5-7 Hours Time Needed
1.9K Made This
βœ‚οΈ

Intermediate Level

Ideal for those with basic crochet experience, featuring slightly more advanced stitches and techniques to expand your skills.

⏱️

Weekend Treat

Takes 5-7 hours, making it an enjoyable project to finish over a couple of days.

🧸

Cute Companion

An adorable friend to cherish, handcrafted with love to bring comfort and joy for years to come.

About This Crochet Bunny Pumpkin Amigurumi Pattern

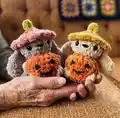
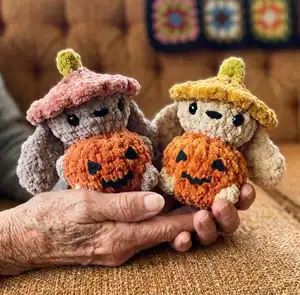
This pattern guides you to crochet a charming bunny designed as a pumpkin, using plush chenille yarn for soft texture. You will make a pumpkin-shaped body, floppy ears, a leafy stem, and a playful hat. The pattern uses bobble stitches and front/back loop techniques to create the pumpkin texture and shaping.

Crochet Bunny Pumpkin Amigurumi Pattern crochet pattern - detailed view of completed project

Perfect for seasonal decor or sweet handmade gifts, the pattern includes clear rounds and assembly notes. Recommended hook size is 5mm and it's ideal for crocheters familiar with basic amigurumi techniques.

Why You'll Love This Crochet Bunny Pumpkin Amigurumi Pattern

I absolutely love this pattern because it combines playful design with cozy textures that make every piece feel extra special. The pumpkin-shaped body and floppy-eared bunny create a whimsical silhouette that always brings smiles. I enjoy how the bobble/stitch texture gives the pumpkin a sculpted, tactile look without complicated shaping. Sewing the hat and stem lets me add personal touches, like embroidered faces or felt details, making each bunny unique and gift-ready.

Crochet Bunny Pumpkin Amigurumi Pattern step 1 - construction progress Crochet Bunny Pumpkin Amigurumi Pattern step 2 - assembly progress Crochet Bunny Pumpkin Amigurumi Pattern step 3 - details and accessories Crochet Bunny Pumpkin Amigurumi Pattern step 4 - final assembly and finishing

Switch Things Up

I love how easy it is to customize this pattern by changing colors; try pastels for a soft spring bunny or classic orange and brown for Halloween charm.

You can resize the toy by switching yarn weight and hook size: bulky yarn with a larger hook gives a chunky cuddle buddy, while thinner yarn makes a tiny keychain-friendly version.

I often add embroidered brows or a tiny felt bow to change the expression and personality of each bunny I make.

Try making a set in coordinating colors to display as seasonal decor or gift a matching pair to friends and family.

Swap the bobble stitch for simple single crochet in the pumpkin panels if you prefer a smoother surface for applique or painting.

If you like posable toys, consider adding thin wire inside the limbs and stem to gently pose the bunny for photos or displays.

For a baby-safe version, replace safety eyes with embroidered eyes and secure all small parts with extra stitching.

Experiment with tiny accessories like a crocheted scarf, mini hat, or felt leaves glued to the stem for extra detail and personality.

I sometimes add a light scent sachet inside the stuffing for a gentle aromatic giftβ€”just be sure the recipient is okay with scented items.

Don’t be afraid to mix texturesβ€”use a smooth yarn for the inner ear or pumpkin face to create contrast with the chenille body.

Common Mistakes & How to Fix Them

βœ— Skipping use of a stitch marker during rounds can lead to losing track of the start; place a marker at the first stitch of every round to maintain accurate counts. βœ— Forgetting to change colors exactly where instructed will create visible joins and misaligned pumpkin panels; change colors at the end of the round and weave in ends neatly. βœ— Not stretching your work when instructed causes the pumpkin shape to remain flat; gently stretch the stitches to the sides to make the body rounder before stuffing. βœ— Stuffing too early or too much will prevent proper shaping and seam closure; stuff gradually after shaping rounds and compress stuffing as you close to control the final silhouette.

Crochet Bunny Pumpkin Amigurumi Pattern

Create an adorable bunny shaped like a pumpkin with this cozy chenille amigurumi pattern. You'll enjoy the playful hat, pumpkin body, and sweet facial details that make this toy unique. Clear step-by-step rounds and simple assembly make it a delightful weekend project for makers. Perfect for seasonal gifts, decor, or a charming addition to your amigurumi collection.

Intermediate 5-7 Hours

Materials Needed for Crochet Bunny Pumpkin Amigurumi Pattern

β€” Main Fabric

  • 01
    Chenille yarn - Color A: Orange (used for pumpkin body and hat)
  • 02
    Chenille yarn - Color B: Brown (used for body details and limbs)
  • 03
    Chenille yarn - Color C: Green (used for stem)
  • 04
    Note: Exact yarn quantities are not specified in the pattern; use small amounts of each color sufficient for one small amigurumi (roughly 20-50g per main color depending on size).

β€” Tools Required

  • 01
    Crochet hook size 5mm
  • 02
    Yarn needle
  • 03
    Scissors
  • 04
    Polyester stuffing
  • 05
    Plastic safety eyes
  • 06
    Stitch markers (recommended)
  • 07
    Pins for assembly (optional)

Progress Tracker

0% Complete

β€” Head and Body :

Info :

*start with Color A

Round R1 :

4sc in MR (4)

Round R2 :

4inc (8)

Round R3 :

BLO (sc, inc)x4 (12)

Round R4 :

(2sc, inc ) x4 (16)

Round R5 :

Do the BO in Color B: 4sc, BO, 4sc, BO, 6sc (16)

Round R6 :

(3sc, inc) x4 (20)

Round R7 :

sc around (20)

Round R8 :

Do the BO in Color B: 4sc, BO, 10 sc, BO, 4sc (20)

Info :

* Stretch your work to the sides make it rounder

Round R9 :

(2sc, dec) X5 (15)

Round R10 :

(sc, dec) x5 (10)

Info :

*Stretch, stuff change to Color B.

Round R11 :

BLO (sc, inc) x5 (15)

Round R12 :

(2sc, inc) x5 (20)

Round R13 :

sc around (2 rounds) (20)

Round R13-R14 change :

change to Color A: sc around (20) *safety eyes between R13-R14 4sc apart, stretch

Round :

BLO (2sc, dec) x5 (15)

Info :

Stretch your work, stuff

Round :

(sc, dec) x5 (10)

Round :

5dec (5)

Info :

FO, sew shut. *squish to make it chubbier *embroider the nose between eyes.

β€” Hat :

Info :

*use Color A

Info :

*insert your hook in the front loops of R16

Round R1 :

(sc, ch, 2dc in 1 sc, ch) do this all around R16.

β€” EARS 2x :

Round R1 :

6sc in MR (6)

Round R2 :

(2inc, sc) x2 (10)

Round R3 :

sc, 2inc, 3sc, 2inc, 2sc (14)

Round R4 :

sc, 2dec, 3sc, 2dec, 2sc (10)

Round R5 :

sc around (10)

Round R6 :

(dec, 3sc) x2 (8)

Info :

*4sc to close, chain 1, turn, 4sc, Fo leave a long tail and sew under the hat however you think looks best.

β€” Pumpkin stem :

Info :

*Insert the hook on the top of the head.

Instruction :

Chain 3, start in the second chain from hook 2 hdc, slst in hat.

Info :

*You can make a cute/spooky face out of felt and glue it on the pumpkin or embroider it.

Info :

And you're done!

Assembly Instructions

  • Place safety eyes between rounds R13-R14, spaced 4 single crochet stitches apart, then secure backs before stuffing further.
  • After stuffing the head/body, close the final rounds and sew shut, squishing slightly to make the body chubbier for the pumpkin look.
  • Sew the ears under the hat using the long tail left after FO; position them symmetrically under the hat brim where they visually balance the face.
  • Attach the hat by aligning the hat brim over round 16 front loops and sew in place; insert and sew the pumpkin stem at the top center of the hat.
  • Embroider the nose between the eyes and add a felt or embroidered face to the pumpkin, gluing or stitching details securely for small children.

Important Notes

  • πŸ’‘Use a stitch marker to mark the beginning of each round to keep accurate stitch counts throughout the pattern.
  • πŸ’‘Work with chenille yarn gently and check tension often because this plush yarn can hide missed or extra stitches.
  • πŸ’‘Stuff the body gradually while shaping and stretching the work as instructed to achieve the round pumpkin silhouette.
  • πŸ’‘When changing colors, fasten off and weave in ends or carry yarn neatly to avoid visible lumps on the chenille surface.

This sweet Bunny Pumpkin amigurumi brings seasonal charm and a cuddly touch to your handmade collection. Grab your chenille yarn and a 5mm hook to create a plush, tactile pumpkin companion. Perfect for gifts, autumn decor, or a cozy, crafty afternoon making something adorable. πŸŽƒπŸ§Ά

You ask,

we answer.

FAQs

What size will the finished piece be?

The finished amigurumi size will vary by yarn and tension, but using recommended chenille yarn and a 5mm hook produces a small hand-sized bunny approximately 10-15 cm tall.

Can I use different yarn weights for this pattern?

Yes, you can substitute yarn weights, but changing weight will alter the final size; adjust your hook accordingly and test gauge on a small sample before proceeding.

Do I need prior crochet experience for this pattern?

This pattern is rated intermediate and uses bobble stitches, front/back loop work, increases and decreases; basic amigurumi experience is recommended.

How long does this project typically take to complete?

Most crocheters complete this project in 5-7 hours, depending on experience, customization, and how quickly you work with chenille yarn.