🧶 Beautiful ✨ Detailed 💝 Adorable

Stitch Amigurumi Pattern

Stitch Amigurumi Pattern
4.7★ Rating
5-7 Hours Time Needed
2.9K Made This
✂️

Intermediate Level

Ideal for those with basic crochet experience, featuring slightly more advanced stitches and techniques to expand your skills.

⏱️

Weekend Treat

Takes 5-7 hours, making it an enjoyable project to finish over a couple of days.

🧸

Cute Companion

An adorable friend to cherish, handcrafted with love to bring comfort and joy for years to come.

About This Stitch Amigurumi Pattern

This pattern creates a small, plush Stitch-inspired amigurumi with color changes and shaped limbs. It uses basic amigurumi techniques and photo guides to help you place eyes, ears and limbs precisely. The design includes felt eyes, a small crocheted nose, and curled claws for character.

Stitch Amigurumi Pattern crochet pattern - detailed view of completed project

Detailed round-by-round instructions and assembly notes are included for accurate shaping. Helpful photos show placement and finishing so your finished toy looks just like the sample.

Why You'll Love This Stitch Amigurumi Pattern

I absolutely love this pattern because it captures the cute proportions of Stitch while remaining approachable for crocheters with some experience. I enjoyed designing the color transitions between medium and light blue to create a soft tummy contrast. Sewing the ears and adding the felt eyes gives this toy a lot of personality, which makes finishing so satisfying. I also appreciate how the small claws and curled limb edges add charming details without being complicated. You will find this project rewarding from start to finish and great for gifting or decorating.

Stitch Amigurumi Pattern step 1 - construction progress Stitch Amigurumi Pattern step 2 - assembly progress Stitch Amigurumi Pattern step 3 - details and accessories Stitch Amigurumi Pattern step 4 - final assembly and finishing

Switch Things Up

I love customizing this pattern by changing colors to create different characters; swapping blues for pastels makes a sweet baby version.

I often experiment with yarn weight — bulky yarn and a larger hook will give you a chunkier, cuddly toy while thin yarn produces a tiny keychain-sized stitch.

I like to add embroidered eyebrows or tiny felt accessories to change the expression or personality of the toy.

I sometimes replace felt eyes with safety eyes for a glossier look, but I always secure them well for safety around kids.

I recommend trying different ear sizes or shapes to create unique characters; slightly longer ears change the silhouette a lot.

I sometimes give the amigurumi a little blush using pastel chalks for a softer face detail that photographs well.

I enjoy making outfit variations — a tiny crocheted scarf or vest adds charm and personalization.

I occasionally add thin wire inside the limbs for subtle posability, which is lovely for display pieces.

I like to experiment with stitch textures like alternating BLO or FLO rows for a striped or ribbed effect on the body or limbs.

I encourage you to add small props like a tiny crochet flower or a felt heart to make each toy unique and gift-ready.

Common Mistakes & How to Fix Them

✗ Skipping stitch markers at the start of the round can make it hard to track increases and decreases; place a marker at the first stitch of each round to maintain correct counts. ✗ Not stuffing the head and body evenly may produce lumps or a flat shape; stuff gradually and add small amounts of filling while shaping for a smooth finish. ✗ Pulling yarn too tight during color changes will distort the fabric and make sewing parts together difficult; keep consistent, moderate tension and weave in ends neatly. ✗ Forgetting to count stitches after rows of increases or decreases causes mismatched rounds and uneven shaping; count your stitches frequently, especially after shaping rounds. ✗ Attaching limbs without pinning can lead to asymmetry and crooked placement; pin or mark positions and check alignment with photos before sewing the pieces down.

Stitch Amigurumi Pattern

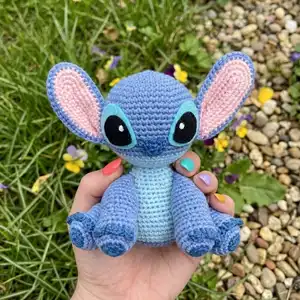
Make your own adorable Stitch amigurumi with this clear, photo-supported pattern. You will learn simple shaping, color changes, and assembly techniques to create a cuddly toy. Suitable for crocheters who want a fun intermediate project with detailed instructions and helpful photos. Follow each round and sew the parts together to bring this cute alien character to life.

Intermediate 5-7 Hours

Materials Needed for Stitch Amigurumi Pattern

— Main Fabric

  • 01
    Medium blue yarn (mittelblau) - main color, 100-150 g
  • 02
    Dark blue yarn (dunkelblau) - accent, less than 50 g
  • 03
    Light blue yarn (hellblau) - tummy and details, less than 50 g
  • 04
    Pink yarn (rosa) - inner ears, less than 50 g
  • 05
    Yarn weight: 50 g / 133 m per skein (approximate)

— Tools Required

  • 01
    Crochet hook 2.5 mm
  • 02
    Tapestry needle / darning needle
  • 03
    Sewing needle
  • 04
    Pins (stecknadeln)
  • 05
    Stitch markers (maschenmarkierer)
  • 06
    Scissors
  • 07
    Polyester stuffing (filling / füllwatte)
  • 08
    Felt pieces (light blue or white and black) for eyes
  • 09
    Sewing thread (light blue, white or embroidery thread for white dot, black)
  • 10
    Optional: embroidery needle

Progress Tracker

0% Complete

— Kopf :

Round 1 :

6 FM in den MR (6)

Round 2 :

2 FM in jede Masche (12)

Round 3 :

(1 FM, Zun.) x6 (18)

Round 4 :

(2 FM, Zun.) x6 (24)

Round 5 :

(3 FM, Zun.) x6 (30)

Round 6 :

(4 FM, Zun.) x6 (36)

Round 7 :

(5 FM, Zun.) x6 (42)

Round 8 :

(6 FM, Zun.) x6 (48)

Round 9 :

(7 FM, Zun.) x6 (54)

Round 10-19 :

1 FM in jede Masche (54)

Info :

Farbwechsel zu Hellblau.

Round 20 :

(7 FM, uns. Abn.) x6 (48)

Round 21 :

(6 FM, uns. Abn.) x6 (42)

Round 22 :

(5 FM, uns. Abn.) x6 (36)

Round 23 :

(4 FM, uns. Abn.) x6 (30)

Info :

Den Kopf fest füllen, ggf. am Ende noch etwas mehr Füllung hinzufügen.

Round 24 :

(3 FM, uns. Abn.) x6 (24)

Round 25 :

(2 FM, uns. Abn.) x6 (18)

Info :

Garn abschneiden, dabei ein langes Ende stehen lassen um später den Kopf an den Körper zu nähen.

— Ohren (4x) :

Info :

in der Runde, ohne Wenden. 2 in mittelblau 2 in rosa. Zuerst die rosa inneren Ohren häkeln. Garn abschneiden und Fadenende vernähen. Bei den blauen äußeren Ohren ein langes Fadenende stehen lassen.

Info :

15 LM, von der 2. LM von der Nadel:

Round 1 :

13 FM, 5 FM in letzte M, 13 FM (31)

Round 2 :

1 LM (wird nicht gezählt), 12 FM, (Zun.) x5, 13 FM (35) Die LM überspringen oder mit einem KM Runde beenden.

Round 3 :

1LM++, 12 FM, (1 FM, Zun.) x5, 13 FM (40)

Round 4 :

1 LM, 40 FM (40)

Info :

Am Ende die die beiden Ohrenteile zusammenhäkeln. Dabei sollte die richtige Seite der Ohren nach außen zeigen. Siehe Foto.

— Körper :

Round 1 :

6 FM in MR (6)

Round 2 :

2 FM in jede M (12)

Round 3 :

(1 FM, Zun.) x6 (18)

Round 4 :

(2 FM, Zun.) x6 (24)

Round 5 :

(3 FM, Zun.) x6 (30)

Round 6 :

(4 FM, Zun.) x6 (36)

Round 7 :

(5 FM, Zun.) x6 (42)

Round 8 :

(6 FM, Zun.) x6 (48)

Round 9 :

1 FM in 46 Maschen, 47. Masche mit mittelblau aufnehmen und mit hellblau abschliessen. 1 FM in hellblau (48)

Info :

Nach jedem Farbwechsel den Faden abschneiden und die Fadenenden zusammenknoten.

Round 10-15 :

in hellblau: 15 FM. 16. Masche mit mittelblau abschliessen. 30 FM mit mittelblau häkeln, die 31. Masche mit hellblau abschliessen und die letzte Masche in hellblau häkeln. (48)

Round 16 :

in hellblau: (3 FM, uns. Abn.), 6 FM, uns. Abn., 2 FM, Farbwechsel (1 FM). in mittelblau: 3 FM, uns. Abn, (6 FM, uns. Abn) x3, 1 FM, Farbwechsel, 1 FM (42)

Round 17-18 :

in hellblau: 14 FM, 15. Masche mit mittelblau abschliessen. in mittelblau: FM in jede M, letzte FM mit hellblau abschliessen (42)

Round 19 :

in hellblau: (5 FM, uns. Abn) x2, (Masche aufnehmen, mit mittelblau abschliessen) (1 FM), in mittelblau: 4 FM, uns. Abn, (5 FM, uns. Abn) x2, 5 FM, fuer Abnahme Masche mit hellblau aufnehmen und abschliessen (36)

Round 20 :

in hellblau: 12 FM, Farbwechsel zu mittelblau (1 FM) in mittelblau: 22 FM, Farbwechsel zu hellblau (1 FM) (36)

Round 21 :

in hellblau: 13 FM, Farbwechsel, (1 FM), 21 FM, Farbwechsel (1 FM) (36)

Round 22 :

in hellblau: (4 FM, uns. Abn) x2, 1 FM, Farbwechsel (1 FM). in mittelblau: 2 FM, uns. Abn., (4 FM, uns. Abn) x2, 4 FM, uns. Abn, uns. Abn mit hellblau abschliessen (30)

Round 23 :

1 FM in jede M (Farbwechsel machen) (30)

Info :

Körper füllen und am Ende nachfüllen.

Round 24 :

in hellblau: (3 FM, uns. Abn) x2, 1 FM, Farbwechsel (1 FM). in mittelblau: 1 FM, uns. Abn, (3 FM, uns. Abn) x2, 3 FM, durch zwei Maschen mit mittelblau Masche aufnehmen, mit hellblau beenden (24)

Round 25 :

FM in jede M (Farbwechsel machen) (24)

Round 26 :

(2 FM, uns. Abn.) x2, 1 FM, Farbwechsel (1 FM), uns. Abn, (2 FM, uns. Abn) x3 (18)

Info :

Garn abschneiden und vernähen.

Info :

Kopf und Körper mit dem Matratzenstich zusammennähen.
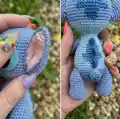
— Beine (2x) :

Info :

in dunkelblau:

Round 1 :

6 FM in MR (6)

Round 2 :

2 FM in jede M (12)

Info :

Farbwechsel zu mittelblau:

Round 3 :

(1 FM, Zun.) x6 (18)

Round 4 :

(2 FM, Zun.) x6 (24)

Round 5-7 :

1 FM in jede M (24)

Round 8 :

(2 FM, uns. Abn.) x6 (18)

Round 9 :

1 FM in jede M (18)

Round 10 :

(2 FM, Zun.) x6 (24)

Round 11-14 :

1 FM in jede M (24)

Round 15 :

(2 FM, uns. Abn.) x6 (18)

Round 16-17 :

1 FM in jede M (18)

Info :

Bein füllen den Rand zusammenhalten und entlang häkeln um ihn zu schliessen. Garn abschneiden und Fadenende zum Nähen stehen lassen.

Info :

Jetzt werden wir zwischen Runde 4 und 5 also auf der 5. Masche entlang häkeln. Es ist wichtig, dass sich die Krallen dort befinden, wo sich das Ende des zugehäkelten Randes befindet. So zeigen sie nach oben, wenn wir die Beine annähen. Garn entsprechend anbringen. Siehe Fotos.

Item Name (Kralle 1) :

1 LM, in nächste M: 1 Stb, 1 LM, in nächste M 1 FM

Item Name (Kralle 2) :

in nächste M 1 KM und 2 LM, in nächste M: 1 Stb, 1 LM, FM in nächste M

Item Name (Kralle 3) :

KM in nächste M, 2 LM, 1 Stb, 1 LM, KM

Info :

Garn abschneiden und vernähen.

— Arme (x2) :

Info :

in dunkelblau

Round 1 :

6 FM in MR (6)

Round 2 :

2 FM in jede M (12)

Info :

Farbwechsel zu mittelblau.

Round 3 :

(1 FM, Zun.) x6 (18)

Round 4 :

(2 FM, Zun.) x6 (24)

Round 5-7 :

1 FM in jede M (24)

Round 8 :

(2 FM, uns. Abn.) x6 (18)

Round 9 :

1 FM in jede M (18)

Round 10 :

(2 FM, Zun.) x6 (24)

Round 11-15 :

1 FM in jede M (24)

Round 16 :

(2 FM, uns. Abn.) x6 (18)

Round 17-18 :

1 FM in jede M (18)

Info :

Bein füllen.

Round 19 :

(1 FM, uns. Abn.) x6 (12)

Round 20 :

1 FM in jede M (12)

Info :

Entlang der Kante häkeln um sie zu schliessen.

Info :

Diesmal enden die Krallen in einer Linie zum Ende der zugehäkelten letzten Reihe. Damit sie in die richtige Richtung zeigen, wenn wir die Arme annähen. Garn entsprechend anbringen. Siehe Fotos.

Info :

Die Krallen werden genauso gehäkelt wie bei den Beinen.

— Schwänzchen :

Round 1 :

6 FM in MR

Round 2 :

2 FM in jede M (12)

Round 3 :

1 FM in jede M (12)

Round 4 :

(1 FM, Zun.) x6 (18)

Round 5 :

(1 FM, uns. Abn.) x6 (12)

Info :

Garn abschneiden und ein Ende zum Nähen lassen.

— Arme und Beine annähen :

Info :

Den oberen Teil der Arme zwischen Runde 23 und 24, eine Masche ins hellblau hinein annähen.

Info :

Den unteren Teil zwischen Runde 19 und 20, ca 1-3 Maschen vom hellblauen Bereich entfernt annähen. Die Unterseite der Beine beginnt ca. zwischen Runde 7 und 8 und die Oberseite zwischen Runde 15 und 16. Die Beine sind 3 Maschen vom hellblauen Bereich entfernt.
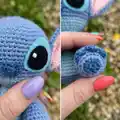
— Augen :

Info :

Augen so ausschneiden wie auf den Fotos zu sehen ist. Mit schwarzem Garn den schwarzen Teil auf den hellblauen Teil aufnähen. Mit weißem Näh- oder Stickgarn einen kleinen Punkt auf das Schwarze sticken.

Info :

Die Augen an den Kopf pinnen. So positionieren wie auf den Fotos. Mit der unteren Kante eine Runde oberhalb des Farbwechsels. Mit der unteren Kante zwischen Runde 10 und 11 des Kopfes. Die Außenseiten sollten in einer Linie mit dem oberen Ende der Arme sein. Zwischen den Augen ca. 5 Maschen Abstand lassen. Die Ohren an den Kopf stecken um zu prüfen, ob alles passt.

— Nase :

Info :

Mit dunkelblau. Langes Fadenende am Anfang stehen lassen.

Info :

5 LM, 1 Wendeluftmasche.

Info :

KM in nächste LM. HStb in die nächste LM. 2 Stb in nächste LM. HStb in nächste LM. 1 LM, KM in letzte LM. Garn abschneiden und vernähen.

Info :

Die Nase zwischen die Augen nähen, dabei zeigt die gewölbte Seite nach unten. Augen mit hellblauem Nähgarn annähen.

Assembly Instructions

  • Sew the head to the body using mattress stitch, aligning the neck opening and using the long tail left from the head to sew securely.
  • Attach the upper part of each arm between rounds 23 and 24, stitching one stitch into the light blue area as indicated in the pattern.
  • Attach the lower part of each leg between rounds 19 and 20, approximately 1-3 stitches away from the light blue area; position the leg underside between rounds 7 and 8 and the top between rounds 15 and 16.
  • Pin the ears to the head so the top edge ends between rounds 11 and 12 and the lower edge sits one round above the color change, then sew with the correct side of the ear facing outward.
  • Sew the tail to the body with the lower edge positioned between rounds 5 and 6 of the body and stuff before closing.
  • Position the felt eyes with the lower edge one round above the color change and leave about 5 stitches between the eyes, then sew with light blue thread and add the white highlight with embroidery thread.

Important Notes

  • 💡Work in continuous rounds without turning unless specifically instructed to change; use a stitch marker to mark the first stitch of each round.
  • 💡After every color change, cut the yarn and knot the ends to secure the color transition before continuing.
  • 💡Stuff the head and body firmly but not too tightly; add small amounts of stuffing gradually for the best shape.
  • 💡Pin parts in place and check against the photos before sewing; this helps ensure correct symmetry and placement.

Create your own adorable Stitch amigurumi with this complete crochet pattern and photo guide. 🧶 This pattern includes full round-by-round instructions, materials list, and assembly tips to make finishing easy. ✂️ Share your creation and tag the designer to show off your cute handmade friend! 🧵

You ask,

we answer.

FAQs

What size will the finished piece be?

The finished amigurumi measures approximately 18 cm tall when using the recommended yarn weight and a 2.5 mm hook.

Can I use a different yarn weight or hook?

Yes, you can change yarn weight and hook size, but this will alter the final size and may require adjustments to stuffing and placement; use a smaller hook for a tighter fabric or a larger hook for a bigger, softer toy.

Is this pattern suitable for beginners?

This pattern is rated intermediate due to shaping, invisible decreases, and assembly; beginners with basic crochet knowledge may still follow it with patience and by referring to photos and tutorials.

How long does this project usually take to complete?

Most crocheters complete this project in about 5-7 hours, depending on experience and how carefully you sew and finish details.