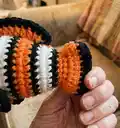
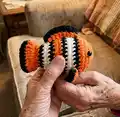
About This Clownfish (Nemo) Amigurumi Pattern
This pattern creates a sweet Clownfish (Nemo) amigurumi crocheted from the body up to the tail with no sewing required for the main body. It features clear round-by-round instructions, color changes for the stripes, and separate dorsal fin pieces for detail. The finished fish is playful, tactile, and makes a lovely handmade gift or shelf decoration.
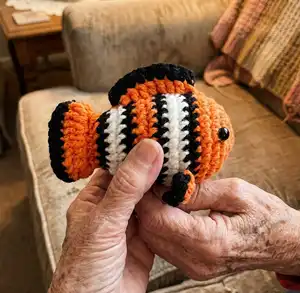
You will work with super bulky yarn and a 3.5mm hook to achieve a plush, squishy texture. The pattern includes full instructions for body shaping, tail joining, fin construction, and eye placement.
Why You'll Love This Clownfish (Nemo) Amigurumi Pattern
I absolutely love this pattern because it brings a classic clownfish design to life with simple, satisfying stitches. I enjoy the clean stripe changes that make the fish instantly recognizable and charming. The construction avoids bulky sewing for the body, so it feels quick and neat as you progress. I also love how the separate fin pieces let me add tiny details that give the fish personality and character.
Switch Things Up
I love how easy it is to customize this pattern with color changes; try pastel orange and cream for a softer look.
If you want a keychain version I use thinner yarn and a smaller hook to make a tiny pocket-sized fish.
I sometimes add embroidered smile lines or tiny blush spots with pink yarn to give more personality.
Use safety eyes of different sizes to change the expression — larger eyes make it cuter while smaller eyes look more realistic.
Try substituting a fluffy chenille yarn for a plush, tactile toy that little ones will love to cuddle.
To make a mobile or hanging decoration, sew a small loop at the top of the body and hang multiple fish at different lengths.
I also experiment with adding tiny crocheted accessories like a bow or a tiny seaweed piece glued to the base for a scene.
For a more advanced twist I add wired fins to make them poseable; insert thin floral wire and cover with stitches for stability.
Change the stripe counts or spacing to create different clownfish species or an original design with your own color palette.
When making multiples I keep a small card with the exact stitch counts for each row so each fish matches in size and stripe placement.
Common Mistakes & How to Fix Them
✗ Skipping stitch markers during rounds with color changes can cause you to lose your starting point; always place a stitch marker at the start of each round and move it up as you progress.
✗ Forgetting to stuff as you go results in lumps or holes when closing the piece; stuff gradually, especially after decreases, and add small amounts to maintain even shaping.
✗ Changing colors without securing tails can cause loose loops or unraveling later; weave in or secure color changes carefully and leave short tails to tuck in and weave under nearby stitches.
✗ Not counting stitches after increases or decreases can make your shape go off; count your stitches at the end of each round, particularly after any INC or DEC rounds, to ensure correct stitch counts.