🧢 Beautiful ✨ Detailed πŸ’ Adorable

Caron Crochet Hair Bandana Pattern

Caron Crochet Hair Bandana Pattern
4.3β˜… Rating
2-3 Hours Time Needed
4.1K Made This
βœ‚οΈ

Beginner Friendly Level

Perfect for those just starting their crochet journey, with clear instructions and simple techniques

⏱️

Bite-Sized Project

Finishes in 2-4 hoursβ€”perfect for an afternoon of creative relaxation.

🧣

Snug Essential

Everyday comfort with practical charm, designed for both functionality and style through changing seasons.

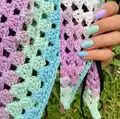
About This Caron Crochet Hair Bandana Pattern

This pattern makes a classic triangle hair bandana worked in granny-style clusters for a lacy, lightweight finish. It uses Caron Skinny Cakes yarn to create soft color transitions without changing yarns. The design includes a clear diagram and simple written rows so you can follow along easily. Ideal for casual wear or as a quick handmade gift.

Caron Crochet Hair Bandana Pattern crochet pattern - detailed view of completed project

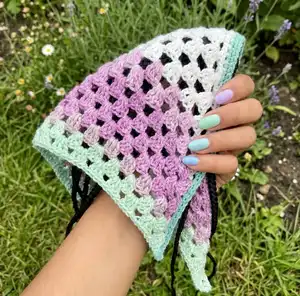
Worked from the centre top out to a wide base, the bandana includes ties worked across the bottom edge for easy wear. The pattern is rated easy and uses basic stitches for a relaxed, lacy look.

Why You'll Love This Caron Crochet Hair Bandana Pattern

I absolutely love this pattern because it turns a single ball of variegated yarn into a beautiful, wearable accessory that feels more complex than it actually is. I enjoy how quickly the triangle grows and how forgiving the granny-style clusters are for learning tension and shaping. The finished bandana is lightweight and comfortable, perfect for warmer days or layering under a hat. Making these as gifts is rewarding because one ball of yarn makes multiple bandanas and each one comes out uniquely due to the color changes.

Caron Crochet Hair Bandana Pattern step 1 - construction progress Caron Crochet Hair Bandana Pattern step 2 - assembly progress Caron Crochet Hair Bandana Pattern step 3 - details and accessories Caron Crochet Hair Bandana Pattern step 4 - final assembly and finishing

Switch Things Up

I love changing the color placement to make each bandana feel unique; try starting with the same yarn but stopping at different rows for a color-blocked look.

I sometimes use a solid contrasting yarn for the final round to create a neat border that frames the triangle beautifully.

If you want a larger bandana, I change to a thicker yarn and a larger hook; this gives a chunkier, warmer accessory perfect for cooler weather.

To make a mini keychain version, use a thinner yarn and a smaller hook and stop after fewer rows so the triangle is much smaller.

I often add a decorative button or small crochet flower at the corner for a feminine touch and extra charm.

Try blocking the finished piece for a more professional drape and to open up the stitch pattern if you prefer a flatter look.

I also experiment with different stitch patterns in the same triangle shape, like substituting clusters with shell stitches for a different texture.

For a boho look I add tassels to the tips instead of long ties; they add movement and a fun finish to the bandana.

I sometimes braid the ties from leftover yarn for a sturdier tie that stays knotted better when worn.

Mixing fibers can produce interesting results; a cotton blend will be cooler and crisper while an acrylic gives softer stretch and ease of care.

Don’t be afraid to personalize the size by trying on the bandana as you reach the width you likeβ€”crocheting a few more rows is quick and lets you tailor the fit.

Common Mistakes & How to Fix Them

βœ— Skipping the join after chaining 5 can create an uneven starting point; always join with a slip stitch to the first chain to form a neat ring before beginning the first row. βœ— Forgetting that ch-3 counts as a dc may change your stitch count; treat every beginning ch-3 as the first dc for the row to keep edges straight and corners square. βœ— Not counting dc groups and ch-spaces will lead to uneven triangle shaping; count after each row and ensure corner ch-2 spaces and side ch-1 spaces are correct. βœ— Working with inconsistent tension makes the bandana ripple or sag; maintain steady, moderate tension and check your gauge before committing to the project.

Caron Crochet Hair Bandana Pattern

Make a lightweight, stylish triangle hair bandana using Caron Skinny Cakes yarn. This easy pattern creates a versatile accessory you can wear as a headscarf or hair tie. Clear row-by-row instructions and a diagram make it simple to follow. Perfect for gifting or adding a handmade touch to your wardrobe.

Beginner Friendly 2-3 Hours

Materials Needed for Caron Crochet Hair Bandana Pattern

β€” Main Fabric

  • 01
    Caron Skinny Cakes (8.8 oz/250 g; 795 yds/727 m) - Cupcake (18072) - 1 ball (Note: 1 ball will make 6 Hair Bandanas)

β€” Tools Required

  • 01
    Crochet hook size U.S. H/8 (5 mm) Susan Bates Silvalume crochet hook or size needed to obtain gauge
  • 02
    Susan Bates yarn needle

Progress Tracker

0% Complete

β€” Bandana :

Info :

See diagram on page 2. Ch 5. Join with sl st to first ch to form ring.

Round 1 :

(RS). Ch 3 (counts as dc here and throughout). (2 dc. Ch 2. 3 dc) in ring. Turn.

Round 2 :

Ch 3. 2 dc in first dc. Ch 1. (3 dc. Ch 2. 3 dc) in next ch-2 sp (corner). Ch 1. 3 dc in last dc. Turn.

Round 3 :

Ch 3. 2 dc in first dc. Ch 1. 3 dc in next ch-1 sp. Ch 1. (3 dc. Ch 2. 3 dc) in corner ch-2 sp. Ch 1. 3 dc in next ch-1 sp. 3 dc in top of beg ch. Turn.

Round 4 :

Ch 3. 2 dc in first dc. (Ch 1. 3 dc in next ch-1 sp) to corner ch-2 sp. Ch 1. (3 dc. Ch 2. 3 dc) in corner ch-2 sp. Ch 1. 3 dc in next ch-1 sp. 3 dc in top of beg ch. Turn.

Info :

Rep last row for pat until piece measures approx 22" [56 cm] along bottom edge. Fasten off.

β€” Ties :

Info :

Ch 50. With RS facing, work 1 row of sc evenly across bottom edge of Bandana. Ch 51. Turn.

Round 1 :

1 sc in 2nd ch from hook. 1 sc in each of next 49 ch. 1 sc in each sc across bottom edge of Bandana. 1 sc in each of next 50 ch. Fasten off.

β€” Stitch Key :

Info :

o = chain (ch). β€’ = slip stitch (sl st). | = double crochet (dc).

Assembly Instructions

  • Work ties after completing the triangle: chain 50, then with RS facing work 1 row of single crochet evenly across the bottom edge of the bandana to join and create ties.
  • When adding the closing row for ties, ensure the single crochet across the bottom edge is distributed evenly so the ties are balanced on each side.
  • Fasten off and weave in all ends securely using the Susan Bates yarn needle so that no tails are visible on the right side of the bandana.
  • Block lightly if desired to open the clusters and shape the triangle evenly before wearing or gifting to achieve a neat finished look.

Important Notes

  • πŸ’‘Use the recommended hook size or adjust to obtain the gauge of 5 dc-groups and 9 rows = 4" [10 cm] in pattern for consistent size and drape.
  • πŸ’‘Place the ch-2 corner space at the center top and at the point of increases to maintain the triangular shape as you work each row.
  • πŸ’‘Rep the last row until the bottom edge measures approx 22" [56 cm] before fastening off so the bandana will have the correct width.

This simple triangle bandana is perfect for adding color and style to any outfit, worked from a single ball of Caron Skinny Cakes. It makes a quick, satisfying make that is uniquely beautiful thanks to the yarn's color transitions. Gift-ready and wearable, this bandana is a delightful mix of easy stitches and lovely results. 🧢✨

You ask,

we answer.

FAQs

What size will the finished piece be?

Approx 11" [28 cm] deep x 22" [56 cm] long, excluding ties when using the recommended yarn and hook size.

Can I use different yarn weights for this pattern?

Yes, you can use different yarn weights, but the finished size and drape will change; adjust your hook size to obtain the given gauge for best results.

Do I need prior crochet experience for this pattern?

This pattern is rated beginner friendly and uses basic stitches (ch, dc, sc), so beginners with knowledge of these stitches should be comfortable following it.

How long does this project typically take to complete?

Most crocheters can finish this bandana in about 2-3 hours, though time may vary depending on experience and pace.