🧢 Beautiful ✨ Detailed πŸ’ Adorable

Calico Cat Amigurumi Pattern

Calico Cat Amigurumi Pattern
4.2β˜… Rating
5-7 Hours Time Needed
2.4K Made This
βœ‚οΈ

Intermediate Level

Ideal for those with basic crochet experience, featuring slightly more advanced stitches and techniques to expand your skills.

⏱️

Weekend Treat

Takes 5-7 hours, making it an enjoyable project to finish over a couple of days.

🧸

Cute Companion

An adorable friend to cherish, handcrafted with love to bring comfort and joy for years to come.

About This Calico Cat Amigurumi Pattern

This pattern creates a small calico cat amigurumi with bobble paws, a removable collar and embroidered facial details. It uses continuous rounds and color changes to achieve the friendly rounded shape and patching. The instructions include special stitch notes, finishing tips and visual cues to make assembly simple.

Calico Cat Amigurumi Pattern crochet pattern - detailed view of completed project

Designed as a small collectible or gift, the pattern includes separate pieces for ears, muzzle, legs, paws, tail and an optional base. Techniques include surface slip stitch, invisible finish and bobble stitch construction.

Why You'll Love This Calico Cat Amigurumi Pattern

I absolutely love this pattern because it takes simple amigurumi techniques and turns them into a character full of personality. The color-change rounds and bobble paws give the cat a handcrafted charm I find irresistible. I enjoy how compact the pattern is β€” it is perfect for using scraps of yarn and making small gifts. The finishing steps, like the invisible finish and surface slip stitch collar, really elevate the final look and make me proud to gift each one.

Calico Cat Amigurumi Pattern step 1 - construction progress Calico Cat Amigurumi Pattern step 2 - assembly progress Calico Cat Amigurumi Pattern step 3 - details and accessories Calico Cat Amigurumi Pattern step 4 - final assembly and finishing

Switch Things Up

I love how easy it is to customize this pattern by changing colors β€” try pastel shades for a soft nursery friend or high-contrast patches for a playful calico look.

Want a bigger or smaller cat? Change your yarn weight and hook size; bulky yarn with a larger hook will make a cuddly larger toy while thin yarn makes a tiny keychain-sized cat.

I often add tiny accessories like crocheted bows, tiny scarves, or a little fish to personalize each cat and add a story to the character.

Experiment with different paw pad colors and embroider unique expressions using placement of the eyes and mouth to give each cat its own personality.

Try adding a circular stiffened base to make a freestanding figure, or leave the base open to join two cats together as a reversible toy as described in the notes.

Use safety eyes for a different look, or keep the embroidered eyes for a softer, child-safe toy.

Swap the bobble paw for a flat paw if you prefer a simpler finish β€” adjust the rounds and embroidery accordingly.

I also enjoy making matching mini sets β€” a cat and a tiny fish or a yarn ball prop make lovely gift sets that show off color coordination skills.

If you like a more textured look, work a few rounds in BLO or FLO to create subtle ridges that catch the light differently.

For collectors, try a theme series β€” make seasonal cats (spring pastels, autumn earth tones) or character-inspired colorways to build a charming shelf of tiny friends.

Common Mistakes & How to Fix Them

βœ— Skipping stitch markers when working continuous spiral rounds causes you to lose the start of the round; always mark the first stitch to keep track of rounds. βœ— Changing colors with tapestry technique tightens the fabric and distorts shaping; cut and start a new yarn at each color change for reversible amigurumi. βœ— Not stuffing gradually causes lumps and uneven shape; add small amounts of stuffing as you go and shape the piece while filling. βœ— Forgetting to count stitches after increases and decreases results in incorrect stitch counts; pause and count at the end of each round, especially after shaping rounds.

Calico Cat Amigurumi Pattern

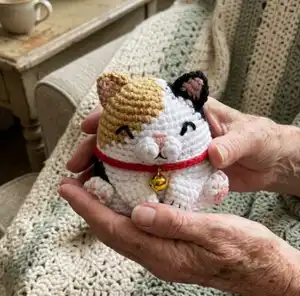
Make a charming calico cat amigurumi with clear step-by-step instructions and helpful photos. This pattern uses small stitch counts and shaping so you can create a lovable pocket-sized companion. You will learn color changes, bobble paws, surface slip stitch detail and finishing techniques to make a polished toy.

Intermediate 5-7 Hours

Materials Needed for Calico Cat Amigurumi Pattern

β€” Main Fabric

  • 01
    4 ply cotton blend yarn (recommended) in assorted colors
  • 02
    Main colors used in examples: white - small amount
  • 03
    Tan / light beige - small amount for patches
  • 04
    Black - small amount for patches and details
  • 05
    Peach / pink - small amount for paw pads and muzzle accents
  • 06
    Grey - alternative main body color (example variant)
  • 07
    Brown / dark brown - additional variant colors
  • 08
    Red / orange - small amount for collar detail
  • 09
    Small golden bell, diameter 7 mm

β€” Tools Required

  • 01
    Crochet hook size 2.0 mm (or size suitable for your yarn)
  • 02
    Tapestry needle, embroidery needle
  • 03
    Scissors
  • 04
    Stitch markers
  • 05
    Polyester stuffing (fiberfill)
  • 06
    Small golden bell (7 mm diameter)
  • 07
    Cardboard or rigid plastic circle to fit base (optional for single toy base)

Progress Tracker

0% Complete

β€” Head and Body :

Round 1 :

6sc in MR (6)

Round 2 :

6inc (12)

Round 3 :

[sc, inc]x6 (18)

Round 4 :

[sc, inc, sc]x6 (24)

Round 5 :

[3sc, inc]x6 (30)

Round 6 :

[2sc, inc, 2sc]x6 (36)

Round 7 :

[5sc, inc]x6 (42)

Round 8 :

42sc (42)

Round 9 :

[3sc, inc, 3sc]x6 (48)

Round 10-13 :

48sc (48)

Round 14 :

[7sc, inc]x6 (54)

Round 15 :

BLO 54sc (54)

Round 16-19 :

54sc (54)

Round 20 :

[4sc, inc, 4sc]x6 (60)

Round 21-22 :

60sc (60)

Info :

Fasten off, cut the yarn and do invisible finish. Note: If you are going to make a reversible amigurumi, you may need to leave a long yarn tail, about 50 cm (20"). If making a single cat amigurumi you do not need a long starting tail.

Info :

Hold the body upside down. With red yarn (or your collar color), make a loop between R14-15, right above the FL left of R14, then make surface slip stitches all the way around.

β€” Ears (make 2) :

Info :

We will crochet ears using black and peach (or grey and white for variants) color alternately. Start with the darker color.

Round 1 :

6sc in MR (6)

Round 2 :

sc, inc, sc, inc, sc, inc (9)

Round 3 :

2sc, inc, sc, sc, inc, 2sc, inc (12)

Round 4 :

3sc, inc, sc, 2sc, inc, 3sc (13), leave the last st unworked

Info :

Fasten off. Leave a long tail for sewing. Do invisible finish. Make the other ear in the alternate color.

β€” Muzzle :

Info :

Start with white (or light color). Make 6sc in MR, tighten the MR, sl st to the first st. Fasten off and cut the yarn.

Info :

With a new piece of white yarn, make another 6sc in MR, tighten the MR, sl st to the first st. Do not fasten off. Continue your work by joining it to the first circle with a sc. Work 5 more sc at the first circle. And continue with 6sc at the second circle. Fasten off. Leave a long tail for sewing. Do the invisible finish.

β€” Front Legs (make 2) :

Info :

Start with white. Work in joined rounds for the small front legs.

Round 1 :

8sc in MR (8)

Round 2 :

8sc (8)

Round 3 :

8sc (8)

Round 4 :

3sc, inc, 4sc (9)

Round 5 :

4sc, inc, 4sc (10)

Info :

No need to stuff. Last round: flatten and work through both stitches 5sc (5). Fasten off, leaving a long tail for sewing.

β€” Paws (make 2) :

Info :

Start with peach (paw pad color). Work in joined rounds.

Round 1 :

6sc in MR (6), join to the first sc with a sl st. Change to white. Cut the peach yarn leaving about 20 cm long tail.

Round 2 :

BLO, loosely 6sl st (6), join to the first st with a sl st. Make 1ch.

Round 3 :

3inc, loosely 3sl st (9), join to the first sc with a sl st.

Round 4 :

[bobble st, sl st]x3 (6), leave remaining stitches unworked.

Info :

Fasten off, leave a long tail for sewing, do invisible finish. Using the peach tail, embroider paws on every bobble st.

β€” Tail :

Info :

Start with black (or dark color). Work every sl st below a little bit loosely.

Round 1 :

5sc in MR (5)

Round 2-3 :

5sc (5)

Round 4 :

2sl st, 3sc (5)

Round 5 :

5sc (5)

Change :

Change to tan.

Round 6 :

2sl st, 3sc (5)

Round 7 :

5sc (5)

Round 8 :

2sl st, 3sc (5)

Change :

Change to black.

Round 9-10 :

5sc (5)

Change :

Change to tan.

Round 11-12 :

5sc (5)

Round 13 :

sl st, 3sc, sl st (5)

Round 14 :

5sc (5)

Round 15 :

sl st, 3sc, sl st (5)

Info :

Fasten off, leave a long tail for sewing. Do invisible finish.

β€” Fish (small accessory) :

Info :

Start with peach yarn. Work the fish's body first: Make 5ch. Start from the second loop from the hook: sc (Later, this st will be called "the first st*"), hdc, dc, inc3 at the last ch. Continue at the other side of the ch: dc, hdc, sc, then sl st at the first st*.

Info :

Then, continue to work the tail: [3ch, start from the second loop from the hook: sc, sl st]x2, then sl st to the first st*. Fasten off. Leave a long tail for sewing. Using black yarn (1 ply only) and embroidery needle, embroider the eye.

β€” Single Toy Base (optional) :

Round 1 :

6sc in MR (6)

Round 2 :

6inc (12)

Round 3 :

[sc, inc]x6 (18)

Round 4 :

[sc, inc, sc]x6 (24)

Round 5 :

[3sc, inc]x6 (30)

Round 6 :

[2sc, inc, 2sc]x6 (36)

Round 7 :

[5sc, inc]x6 (42)

Round 8 :

[3sc, inc, 3sc]x6 (48)

Round 9 :

[7sc, inc]x6 (54)

Round 10 :

[4sc, inc, 4sc]x6 (60)

Info :

Fasten off. Leave a long tail for sewing. Stuff the body with fiberfill (you can continue stuffing while sewing the base). Prepare a circular piece of cardboard or rigid plastic to fit inside the bottom of the body. Place the cardboard/rigid plastic to the bottom, and sew the base to the BL of the last round of the body.

β€” Finishing and Embroidery :

Info :

Embroider the lines of toes on the front legs with black yarn (1 ply only). Embroider the eyes using black yarn at R10, 1 st apart from the muzzle, 3st wide. Embroider the nose on the muzzle using peach yarn. Embroider a mouth on the muzzle using black yarn (1 ply only, use embroidery needle). Optional: embroider the cat whiskers on the muzzle and the face using black yarn (1 ply only).

β€” Assembly :

Item :

Attach the muzzle on the head between R11-13, 5st wide. No need to stuff the muzzle.

Item :

Attach the ears on the head between R4-8.

Item :

Attach the front legs on the body between R16-22 with a slightly tilted position.

Item :

Attach the paws on the body between R18-22, right beside the front legs.

Item :

Attach the fish to the bottom of the muzzle and also to one of the front leg to fix the position.

Item :

Attach the tail at the back of the body, at R21.

Item :

Attach the bell on the middle front of the collar.

Info :

Pin all parts in place before sewing to ensure correct positioning and symmetry. Weave in ends as you go for a neat finish.

Assembly Instructions

  • Attach the muzzle on the head between R11-13, 5st wide. No need to stuff the muzzle; sew with the long tail using a whipstitch and weave in the tail.
  • Attach the ears on the head between R4-8, spacing symmetrically and sewing through the base of the ear with the long tail to secure.
  • Attach the front legs on the body between R16-22 with a slightly tilted position, sewing firmly through several stitches to secure for play.
  • Attach the paws on the body between R18-22, right beside the front legs and use the peach tails to embroider paw pads on the bobble stitches.
  • Attach the tail at the back of the body at R21, sewing through the base and reinforcing for durability.
  • Attach the bell on the middle front of the collar by threading the collar yarn through the bell loop and securing the ends inside the body.

Important Notes

  • πŸ’‘Use stitch markers to keep track of your rounds, especially during color changes and shaping sections.
  • πŸ’‘Stuff firmly but not too tightly for the best shape and structure - overstuffing can distort your work.
  • πŸ’‘Pin all parts in place before sewing to ensure correct positioning and symmetry.
  • πŸ’‘Weave in ends as you go to avoid a tedious finishing session at the end.
  • πŸ’‘Work with consistent tension throughout for even, professional-looking results.

This calico cat amigurumi pattern is perfect for creating a tiny companion full of personality and charm. It features color-change rounds, bobble paws, and a neat invisible finish that makes every piece look polished and gift-ready. Whether you make one as a keepsake or craft a whole collection of different color variations, these little cats make delightful presents and shelf decor. 🧢🐾🎁

You ask,

we answer.

FAQs

What size will the finished piece be?

The finished amigurumi measures approximately 6 cm tall when using the recommended 4 ply cotton blend yarn and a 2.0 mm hook.

Can I use different yarn weights for this pattern?

Yes, you can use different yarn weights, but your finished size will change. Use an appropriate hook for your yarn and be aware that thicker yarn creates a chunkier version while thinner yarn creates a smaller mini.

Do I need prior crochet experience for this pattern?

This pattern is rated intermediate. Basic knowledge of single crochet, increases, decreases, magic ring, and bobble stitch is recommended for best results.

How long does this project typically take to complete?

Most crocheters complete this project in 5-7 hours, though time may vary based on experience level and how many color changes and finishing steps you add.