🧢 Beautiful ✨ Detailed πŸ’ Adorable

By Your Side Basket Bag Pattern

By Your Side Basket Bag Pattern
4.8β˜… Rating
5-7 Hours Time Needed
2.1K Made This
βœ‚οΈ

Intermediate Level

Ideal for those with basic crochet experience, featuring slightly more advanced stitches and techniques to expand your skills.

⏱️

Weekend Treat

Takes 5-7 hours, making it an enjoyable project to finish over a couple of days.

✨

Stylish Touch

An elegant detail to elevate any look, combining traditional techniques with contemporary design sensibilities.

About This By Your Side Basket Bag Pattern

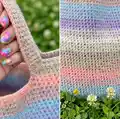
This pattern creates a roomy, striped basket tote worked in Paintbox Recycled Crafty Pots yarn. The bag features a rounded base, simple construction and comfortable handles making it ideal for shopping or everyday use. It uses US terminology and includes notes for stitch placement and marker positioning.

By Your Side Basket Bag Pattern crochet pattern - detailed view of completed project

Worked in the round from the base up, the bag is shaped with increases and a handled opening. The pattern is written for intermediate crocheters and includes full round-by-round instructions.

Why You'll Love This By Your Side Basket Bag Pattern

I absolutely love this pattern because it combines eco-friendly yarn with a practical, everyday design that is both beautiful and useful. I enjoy how the simple striped colour changes create a charming, soft look without complicated colourwork. The construction is satisfying β€” working from the base up gives a great sense of progress as the bag grows. I also love that it makes a durable tote with comfy handles that you can actually use for markets, beach days, or errands. It always feels great to make something stylish and useful that reduces waste by using recycled yarn.

By Your Side Basket Bag Pattern step 1 - construction progress By Your Side Basket Bag Pattern step 2 - assembly progress By Your Side Basket Bag Pattern step 3 - details and accessories By Your Side Basket Bag Pattern step 4 - final assembly and finishing

Switch Things Up

I love changing the stripe layout to create a fresh look each time; try wider blocks of colour or more frequent changes for a playful effect.

To make the bag bigger or smaller I change the foundation chain and increase rounds proportionally; a larger hook and bulkier yarn gives a chunkier tote.

I sometimes line the bag with fabric to increase durability and prevent small items from slipping through the stitches; pick a cotton fabric and sew it in before adding handles.

If you prefer shorter handles, adjust the chain for each handle opening (ch 50 in this pattern) to a smaller number and test for comfortable reach.

I like adding a zipper or button closure for security; sew a button and elastic loop or stitch in a zipper before finishing the top rounds.

For a more structured bag I use a heavier-weight yarn at the base or add a circular cardboard insert covered in fabric to help it stand upright.

I sometimes embroider a small motif on one side or add tassels at the handles for a personalised touch and extra charm.

Swap colours to create seasonal versions β€” pastels for spring, bright brights for summer, or neutrals for a classic everyday tote.

If you want a crossbody version, make longer handle chains or attach a crocheted strap with secure reinforced stitching at the join points.

I recommend testing the handle placement before closing the handle edges; pin the handles in place and try on the bag to ensure comfortable positioning.

Common Mistakes & How to Fix Them

βœ— Skipping stitch markers during the shaping rounds can cause misplacement of increases; place and move markers as instructed to keep the seam and increases even. βœ— Not checking your gauge will alter the finished bag size and stitch counts; make a gauge swatch of 14 sts and 15 rows to 4in/10cm before starting. βœ— Pulling the yarn too tightly when working the foundation chain and first round can distort the base shape; work with an even, relaxed tension and adjust hook if necessary. βœ— Failing to remove markers when instructed may lead to extra stitches or missed shaping steps; remove markers exactly where the pattern directs to maintain stitch counts. βœ— Not securing the yarn ends after breaking yarn can cause unraveling over time; weave in ends securely and block the bag to shape before use.

By Your Side Basket Bag Pattern

Make a stylish, striped market tote using recycled Paintbox Yarns. This intermediate-level basket bag is perfect for everyday use and gifting. The pattern includes a sturdy rounded base, comfortable handles and clear, step-by-step rounds so you can follow along with confidence. Create a colorful, eco-friendly bag you will love to carry.

Intermediate 5-7 Hours

Materials Needed for By Your Side Basket Bag Pattern

β€” Main Fabric

  • 01
    Paintbox Yarns Recycled Crafty Pots - 8ΒΎoz/250g balls, 2 balls in Neapolitan
  • 02
    Assorted colours are provided within the Neapolitan recycled pot to create the striped effect

β€” Tools Required

  • 01
    Crochet hook H-8 (5mm)
  • 02
    Darning needle
  • 03
    2 lockable stitch markers
  • 04
    3 buttons size 1/2in (1.5cm)

Progress Tracker

0% Complete

β€” Sizes :

Infos :

Height 12Β½in/32cm. Width at widest point 17ΒΎin/45cm.

β€” You Will Need :

Infos :

Paintbox Yarns is exclusively available at lovecrafts.com. 8ΒΎoz/250g balls of Paintbox Yarns Recycled Crafty Pots: 2 balls in Neapolitan. 3 buttons size Β½in/1.5cm. H-8 (5mm) crochet hook. Darning needle. 2 lockable stitch markers.

β€” Gauge (Tension) :

Info :

14 sts and 15 rows to 4in/10cm in single (double) crochet stitch using H-8 (5mm) crochet hook.

β€” Good To Know :

Infos :

Paintbox Yarns cannot accept responsibility for the finished item if any yarn other than the recommended yarn is used. Yarn quantities are based on average requirements and are therefore approximate. Instructions are written using US terminology with UK terminology given in italics in round brackets ( ) afterwards. Where the figure 0 appears, no stitches, times or rows are worked for this size. Stripes may vary from those shown.

β€” Abbreviations :

Infos :

cm centimetres. ch chain. flo front loop only. g grams. in inches. mm millimetres. oz ounces. PM place marker. rep repeat. sc(dc) single (double) crochet. sl st slip stitch. st/s stitch/es.

β€” Base :

Info :

Using H-8 (5mm) hook ch 13.

Round 1 :

1st round 1 sc(dc) in second ch from hook, and in each ch to last ch, 3 sc(dc) in last ch (PM in second of these 3 sts), turn, work back along other side of foundation chain, working 11 sc(dc), 3 sc(dc) in last ch (PM in second of the 3 sts), sl st to join. | 26 sts.

Round 2 :

2nd round Ch 1 (does not count as a st), *1 sc(dc) in every st to 1 st before marker, 2 sc(dc) in next st, 3 sc(dc) in marked st, 2 sc(dc) in next st, PM in centre st of three-st increase; rep from * to complete the increases, 1 sc(dc) in each st to end of round seam, sl st to join. | 34 sts.

Round 3-9 :

Rep 2nd round a further 7 times, increasing 8 sts per round. | 90 sts.

Round 10 :

10th round Ch 1, 1 sc(dc) flo in each st around, keeping markers in place, sl st to join.

Round 11th - 18th rounds :

11th - 18th rounds Ch 1, sc(dc) around, move markers up in place each round, sl st to join.

Round 19 :

19th round Ch 1, *sc(dc) to 1 st before marker, 2 sc(dc) in this st, 1 sc(dc) in marked st, PM in new st, 2 sc(dc) in st after marker; rep from * once more, sc(dc) to end of round seam, sl st to join. | 94 sts.

Round 20th – 22nd rounds :

20th – 22nd rounds Ch 1, sc(dc) around, move markers up in place each round, sl st to join. Rep 19th – 22nd rounds 7 more times, increasing 4 sts in every repeat. | 122 sts.

Round Next :

Next round Ch 1, *sc(dc) to 1 st before marker, 2 sc(dc) in this st, 1 sc(dc) in marked st, PM in this new st, 2 sc(dc) in st after marker; rep from * once more, sc(dc) to end of round seam, sl st to join. | 126 sts.

Round Next :

Next round Ch 1, sc(dc) around, move markers up in place each round, sl st to join.

Info :

'Seam' should now be 26 sts away from closest marker.

Round Next :

Next round Turn, sl st in next 10 sts, turn, ch 50, skip next 29 sts, 1 sc(dc) in following st and all sts to marker, remove marker, 18 sc(dc), ch 50, skip next 29 sts, 1 sc(dc) in following st and next 34 sts, removing markers as you go, sl st at bottom of original handle to join. | 168 sts.

Round Next 4 rounds :

Next 4 rounds Ch 1, sc(dc) around, sl st to join at seam. Break yarn and secure.

β€” To Finish :

Info :

Weave in all loose ends and block bag to shape to finish.

Assembly Instructions

  • Place and move lockable stitch markers as instructed around the base and body to track increases and maintain the seam placement.
  • When creating the handle openings follow the instruction to 'Turn, sl st in next 10 sts, turn, ch 50, skip next 29 sts' and work the stitches to form each handle, removing markers as you go.
  • Join the base to the body and close the handle openings by slip stitching at the bottom of the original handle as directed to secure the handle edges.
  • Work the final 4 rounds around the bag and slip stitch to join at the seam, then break yarn and secure the ends thoroughly.
  • Weave in all loose ends neatly with a darning needle and block the bag to shape to give a professional finish.

Important Notes

  • πŸ’‘Use lockable stitch markers to keep track of marker positions as these are used repeatedly during shaping and handle placement.
  • πŸ’‘Check your gauge before starting; achieving 14 sts and 15 rows to 4in/10cm is important for the finished measurements to match.
  • πŸ’‘Weave in ends and block the bag to shape after finishing to ensure the bag sits and stretches correctly.
  • πŸ’‘Yarn quantities are approximate and may vary; keep extra yarn available if you want to match stripe placement exactly.

Create a colourful, eco-friendly tote with this striped By Your Side Basket Bag pattern. The design is practical, stylish and made using recycled Paintbox yarns for a greener craft. Whether for shopping or a sunny day out, this bag is a joy to make and use. 🧢✨

You ask,

we answer.

FAQs

What size will the finished piece be?

The finished bag measures approximately 12Β½in (32cm) tall and 17ΒΎin (45cm) wide at the widest point using the recommended yarn and hook.

Can I use different yarn weights for this pattern?

Yes, you can use different yarn weights but this will change the finished size and stitch counts; check your gauge and adjust hook size and stitch counts accordingly.

Do I need prior crochet experience for this pattern?

This pattern is rated intermediate, so you should be comfortable with single/double crochet, working in the round, increases and following round-by-round shaping instructions.

How long does this project typically take to complete?

Most crocheters complete this project in 5-7 hours, though time may vary depending on experience, tension and how quickly you work through the rounds.