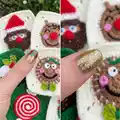
Create a collection of festive granny squares perfect for blankets, cushions, or holiday decorations. This pattern walks you through cheerful motifs like lights, baubles, peppermint swirls, candy canes, trees and wreaths. Youll use simple rounds, surface crochet and small appliques to build each detailed square. Clear step-by-step instructions and photos help you bring seasonal charm to your crochet projects.
Progress Tracker
0% Complete
— General Info :
Info :
Materials: 4-mm (G/6 USA, 8 UK) hook and 3.5-mm (E/4 USA, 9 UK) hook. Paintbox Yarns Simply DK. Tapestry needle.
Infos :
Gauge: Using your 4-mm crochet hook, make a MC. Round 1. Ch 2, hdc 11 in the MC. Join the round with a sl st into the first hdc. (11 sts). Round 2. Ch 1, hdc inc 11. Sl st to join. (22 sts). Round 3. Ch 1, (hdc inc 1, hdc 1) 11 times. Sl st to join. (33 sts). The three rounds should measure 2.25" (5.5 cm).
Info :
Size: Each square measures 5.5" (14 cm). Pattern Notes: Join each round with a sl st between the last and first st of the round (not on top of the initial chains). The initial chains are not included in the stitch count. See page 3 for how to change colors.
— Christmas Lights Granny Square :
Round 1 :
[CA] Ch 2, hdc 11 in the MC. (11 sts)
Round 2 :
[CA] Ch 1, hdc inc 11. (22 sts)
Round 3 :
[CA] Ch 1, (hdc inc 1, hdc 1) 11 times. (33 sts)
Round 4 :
[CA] Ch 1, hdc 1, hdc inc 1, (hdc 2, hdc inc 1) 10 times, 1 hdc. (44 sts)
Round 5 :
[CA] Ch 1, sc 2, hdc 2, dc 1, dc inc 1, ch 2, dc inc 1. (dc 1, hdc 2, sc 3, hdc 2, dc 1, dc inc 1, ch 2, dc inc 1) three times. Dc 1, hdc 2, sc 1. (13 sts on each side and ch-2 at the corners)
Round 6 :
[CA] Ch 2, dc 7. (In the ch-2 corner, [dc 1, ch 2, dc 1]. On the next side, dc 13) three times. [dc 1, ch 2, dc 1] into the last corner, dc 6. (15 sts on each side and ch-2 at the corners)
Round 7 :
[CA] Ch 2, dc 8. (In the ch-2 corner, [dc 2, ch 1, dc 2]. On the next side, dc 15) three times. [Dc 2, ch 1, dc 2] into the last corner, dc 7. (19 sts on each side and ch-1 at the corners)
Round 8 :
[CA] Ch 1, sc 10. (In the ch-1 corner, [sc 1, ch 1, sc 1]. On the next side, sc 19) three times. [Sc 1, ch 1, sc 1] into the last corner, sc 9. (21 sts on each side and ch-1 at the corners)
Info :
Fasten off and weave in all your ends.
Light Applique (Make 7) :
With your 3.5-mm crochet hook and color of your choice, make a MC. Round 1. Ch 1, dc 1, hdc 5, ch 1, hdc 5, dc 1. Join the round with a sl st into the first dc. (12 sts). Fasten off leaving a long tail for sewing.
Applique Join :
(Right Side facing) With your 3.5-mm hook, join grey yarn in the last dc of round 1 of the applique. Row 1. Sc 2. (2 sts). Fasten off leaving a short tail for sewing the 2 grey sts.
Finishing :
Draw a line crossing the granny square and to which you will attach the light appliques. You can choose your favorite shape, and you can either embroider it or use surface crochet on the wrong side. For the latter option, turn your granny square to the wrong side. Using your 4-mm hook, join grey yarn in one of the sts on one side and surface crochet a line. Attach the light appliques all around the line. Weave in all your ends. Your Christmas Lights Granny Square is ready!
— Bauble Granny Square :
Round 1 :
With your 4-mm hook and CC, make a MC. [CC] Ch 2, hdc 11 in the MC. (11 sts)
Round 2 :
[CC] Ch 1, hdc inc 11. (22 sts)
Round 3 :
[CC] Ch 1, (hdc inc 1, hdc 1) 11 times. (33 sts)
Round 4 :
[CC] Ch 1, hdc 1, hdc inc 1, (hdc 2, hdc inc 1) 10 times, 1 hdc. Close the last st with CA. (44 sts)
Round 5 :
[CA] Ch 1, sc 2, hdc 2, dc 1, dc inc 1, ch 2, dc inc 1. (dc 1, hdc 2, sc 3, hdc 2, dc 1, dc inc 1, ch 2, dc inc 1) three times. Dc 1, hdc 2, sc 1. (13 sts on each side and ch-2 at the corners)
Round 6 :
[CA] Ch 2, dc 7. (In the ch-2 corner, [dc 1, ch 2, dc 1]. On the next side, dc 13) three times. [dc 1, ch 2, dc 1] into the last corner, dc 6. (15 sts on each side and ch-2 at the corners)
Round 7 :
[CA] Ch 2, dc 8. (In the ch-2 corner, [dc 2, ch 1, dc 2]. On the next side, dc 15) three times. [Dc 2, ch 1, dc 2] into the last corner, dc 7. (19 sts on each side and ch-1 at the corners)
Round 8 :
[CA] Ch 1, sc 10. (In the ch-1 corner, [sc 1, ch 1, sc 1]. On the next side, sc 19) three times. [Sc 1, ch 1, sc 1] into the last corner, sc 9. (21 sts on each side and ch-1 at the corners)
Info :
Fasten off and weave in all your ends.
Bauble Cap Applique :
With your 3.5-mm hook and grey yarn, ch 4. Row 1. Sc in the second ch from your hook, Sc 2. (3 sts) Row 2-4. Ch 1, turn. Sc 3 in the BLO. Fasten off leaving a long tail for sewing.
Finishing :
With a length of CA, embroider a snowflake or your favorite Christmas decor motif between round 1-4 of the granny square. Attach the cap on top of the Christmas bauble and embroider a hanger. Weave in all your ends. Your Christmas Bauble Granny Square is ready!
— Ho Ho Ho Granny Square :
Round 1 :
With your 4-mm hook and CB, make a MC. [CB] Ch 2, hdc 11 in the MC. (11 sts)
Round 2 :
[CB] Ch 1, hdc inc 11. Close the last st with CA. (22 sts)
Round 3 :
[CA] Ch 1, (hdc inc 1, hdc 1) 11 times. (33 sts)
Round 4 :
[CA] Ch 1, hdc 1, hdc inc 1, (hdc 2, hdc inc 1) 10 times, 1 hdc. Close the last st with CA. (44 sts)
Round 5 :
[CA] Ch 1, sc 2, hdc 2, dc 1, dc inc 1, ch 2, dc inc 1. (dc 1, hdc 2, sc 3, hdc 2, dc 1, dc inc 1, ch 2, dc inc 1) three times. Dc 1, hdc 2, sc 1. (13 sts on each side and ch-2 at the corners)
Round 6 :
[CA] Ch 2, dc 7. (In the ch-2 corner, [dc 1, ch 2, dc 1]. On the next side, dc 13) three times. [dc 1, ch 2, dc 1] into the last corner, dc 6. (15 sts on each side and ch-2 at the corners)
Round 7 :
[CA] Ch 2, dc 8. (In the ch-2 corner, [dc 2, ch 1, dc 2]. On the next side, dc 15) three times. [Dc 2, ch 1, dc 2] into the last corner, dc 7. (19 sts on each side and ch-1 at the corners)
Round 8 :
[CA] Ch 1, sc 10. (In the ch-1 corner, [sc 1, ch 1, sc 1]. On the next side, sc 19) three times. [Sc 1, ch 1, sc 1] into the last corner, sc 9. (21 sts on each side and ch-1 at the corners)
Info :
Fasten off and weave in all your ends.
Letter O / Bauble Applique :
(Make one with CC and one with CD) With your 3.5-mm crochet hook, make a MC. Round 1. Ch 2, hdc 11 in the MC. (11 sts) Round 2. Ch 1, hdc inc 11. (22 sts). Fasten off leaving a long tail for sewing.
Bauble Cap Applique (Make 3) :
With your 3.5-mm hook and yellow yarn, ch 3. Row 1. Sl st in the second ch from your hook and in the next. (2 sts) Row 2. Ch 1, turn. Sl st 2 in the FLO. Row 3. Ch 1, turn. Sl st 2 in the BLO. Weave in all your ends.
Letter H Applique :
Make one with CC, one with CD, and one with CB. Using your 3.5-mm hook, ch 10. Row 1. Hdc 1 in the third ch from your hook. Hdc 3. Ch 8. Hdc 1 in the third ch from your hook, hdc 3. Ch 6. Hdc 1 in the third ch from your hook. Hdc 3. Sl st into the base of the hdc in front of your hook. Sc 2, sl st into the front loop of the fourth hdc that you made in the first step. Hdc 4 in the remaining 4 ch of the initial ch, ch 2, sl st into the first st of the initial ch. Fasten off leaving a long tail for sewing.
Finishing :
Attach the O and H appliques as shown in the picture on the previous page. Attach a bauble cap just above each O applique and above round 2 of the granny square. Using some CA, embroider a shiny point on the top, left side of each O applique and of round 2 of the granny square. Fasten off and weave in all your ends. Your Ho Ho Ho Granny Square is ready!
— Peppermint Granny Square :
Note :
With your 4-mm hook and CA, make a MC. *Work rounds 1-3 in the round, so do not join with a sl st! All other rounds are closed with a sl st at the end!
Round 1* :
[CA] Ch 2, hdc 11 in the MC. (11 sts)
Round 2* :
[CA] Ch 1, hdc inc 11. (22 sts)
Round 3* :
[CA] Ch 1, (hdc inc 1, hdc 1) 11 times. (33 sts)
Round 4 :
[CA] Ch 1, hdc 1, hdc inc 1, (hdc 2, hdc inc 1) 10 times, 1 hdc. Close the last st with CC. Sl st into the first hdc of the round to close. (44 sts)
Round 5 :
[CC] Ch 1, sc 2, hdc 2, dc 1, dc inc 1, ch 2, dc inc 1. (dc 1, hdc 2, sc 3, hdc 2, dc 1, dc inc 1, ch 2, dc inc 1) three times. Dc 1, hdc 2, sc 1. (13 sts on each side and ch-2 at the corners)
Round 6 :
[CC] Ch 2, dc 7. (In the ch-2 corner, [dc 1, ch 2, dc 1]. On the next side, dc 13) three times. [dc 1, ch 2, dc 1] into the last corner, dc 6. (15 sts on each side and ch-2 at the corners)
Round 7 :
[CC] Ch 2, dc 8. (In the ch-2 corner, [dc 2, ch 1, dc 2]. On the next side, dc 15) three times. [Dc 2, ch 1, dc 2] into the last corner, dc 7. (19 sts on each side and ch-1 at the corners)
Round 8 :
[CC] Ch 1, sc 10. (In the ch-1 corner, [sc 1, ch 1, sc 1]. On the next side, sc 19) three times. [Sc 1, ch 1, sc 1] into the last corner, sc 9. (21 sts on each side and ch-1 at the corners)
Info :
Fasten off. Spiral: With your 4-mm hook and CB, surface crochet following the spaces between rounds 1-2, 2-3, 3-4, and 4-5 of the granny square. See the "How to..." section for a step-by-step tutorial on how to surface crochet. Fasten off and weave in all your ends.
Option 1 - Candy Wrap Applique (Make Two) :
With your 4-mm hook and CA, ch 5. Row 1. [CA] Ch 1, sc in second ch from your hook and in each st across. (4 sts) Row 2. [CA] Ch 2 (does not count as a st) and turn, [dc 2] in each st across, ch 2, sl st in the last st. (8 sts). Fasten off CA leaving a long tail for sewing. Join CB in the first st of Row 2. Row 3. [CB] Sc in each st across. (8 sts). Fasten off CB and weave in your ends.
Finishing 1 :
Attach the two candy wraps on the opposite sides of the peppermint. Your Peppermint Candy Granny Square is ready!
Option 2 - Lollipop Stick :
With your 3.5-mm hook and CA, ch 7. Row 1. [CA] Sc 1 in the second ch from your hook, sc 1 in each remaining ch. (6 sts). Fasten off leaving a long tail for sewing.
Little Ribbon Applique :
With your 3.5-mm hook and yellow yarn, ch 30. Fasten off.
Finishing 2 :
Attach the stick just below round 4 going out toward the edge of your granny square. Assemble a little ribbon and attach it just below round 4 of the granny square. Your Peppermint Lollipop Granny Square is ready!
— Candy Cane Granny Square :
Round 1 :
With your 4-mm hook and CC, make a MC. [CC] Ch 2, hdc 11 in the MC. (11 sts)
Round 2 :
[CC] Ch 1, hdc inc 11. (22 sts)
Round 3 :
[CC] Ch 1, (hdc inc 1, hdc 1) 11 times. (33 sts)
Round 4 :
[CC] Ch 1, hdc 1, hdc inc 1, (hdc 2, hdc inc 1) 10 times, 1 hdc. (44 sts)
Round 5 :
[CC] Ch 1, sc 2, hdc 2, dc 1, dc inc 1, ch 2, dc inc 1. (dc 1, hdc 2, sc 3, hdc 2, dc 1, dc inc 1, ch 2, dc inc 1) three times. Dc 1, hdc 2, sc 1. (13 sts on each side and ch-2 at the corners)
Round 6 :
[CC] Ch 2, dc 7. (In the ch-2 corner, [dc 1, ch 2, dc 1]. On the next side, dc 13) three times. [dc 1, ch 2, dc 1] into the last corner, dc 6. (15 sts on each side and ch-2 at the corners)
Round 7 :
[CC] Ch 2, dc 8. (In the ch-2 corner, [dc 2, ch 1, dc 2]. On the next side, dc 15) three times. [Dc 2, ch 1, dc 2] into the last corner, dc 7. (19 sts on each side and ch-1 at the corners)
Round 8 :
[CC] Ch 1, sc 10. (In the ch-1 corner, [sc 1, ch 1, sc 1]. On the next side, sc 19) three times. [Sc 1, ch 1, sc 1] into the last corner, sc 9. (21 sts on each side and ch-1 at the corners)
Info :
Fasten off and weave in all your ends.
Candy Cane Applique :
With your 3.5-mm hook and CA, ch 31. Row 1. Sc in the second ch from your hook. Sc 4, sc inc 1, sc 4, sc inc 1, sc 19. (32 sts) Row 2. Ch 1, turn. Sc 21, sc inc 1, sc 1, sc inc 1, sc 8, sc inc 1, sc 1, sc inc 1, sc 6. (45 sts) Row 5. Ch 1, turn. (Sc 10, sc inc 1) twice, sc 23. (47 sts) Without turning, sc 5 along the bottom side of the candy cane applique. Fasten off leaving a long tail for sewing.
Candy Cane Stripes :
With your 3.5-mm hook and CB, surface crochet the stripes on your candy cane applique. Weave in all your ends before sewing in the candy cane on the granny square.
Holly Leaf Applique (Make 2) :
With your 3.5-mm hook and CD, ch 6. Round 1. (Sl st 2, mini picot) twice. Sl st 1, ch 1. Start working on the other loops of the initial chain. Sl st 1, (mini picot, sl st 2) twice. Fasten off leaving a long tail for sewing.
Holly Drupe Applique (Make 3) :
With your 3.5-mm hook and CB, make a MC. Round 1. Sc 3 in the MC. (3 sts) Fasten off and join the round using a tapestry needle. Cut your yarn leaving a long tail for sewing.
Ribbon Applique :
With your 3.5-mm hook and yellow yarn, ch 9. Row 1. Sc 1 in the second ch from your hook and in each remaining ch. (8 sts) Fasten off leaving a long tail for sewing.
Finishing :
Attach the candy cane applique on your granny square. Attach the ribbon applique in the middle of the longer half. Optional: Make a little ribbon with the tails of yellow yarn. Attach the holly leaves and drupes. Your Candy Cane Granny Square is ready!
— Christmas Tree Granny Square :
Round 1 :
With your 4-mm hook and CA, make a MC. [CA] Ch 2, hdc 11 in the MC. (11 sts)
Round 2 :
[CA] Ch 1, hdc inc 11. (22 sts)
Round 3 :
[CA] Ch 1, (hdc inc 1, hdc 1) 11 times. (33 sts)
Round 4 :
[CA] Ch 1, hdc 1, hdc inc 1, (hdc 2, hdc inc 1) 10 times, 1 hdc. (44 sts)
Round 5 :
[CA] Ch 1, sc 2, hdc 2, dc 1, dc inc 1, ch 2, dc inc 1. (dc 1, hdc 2, sc 3, hdc 2, dc 1, dc inc 1, ch 2, dc inc 1) three times. Dc 1, hdc 2, sc 1. (13 sts on each side and ch-2 at the corners)
Round 6 :
[CA] Ch 2, dc 7. (In the ch-2 corner, [dc 1, ch 2, dc 1]. On the next side, dc 13) three times. [dc 1, ch 2, dc 1] into the last corner, dc 6. (15 sts on each side and ch-2 at the corners)
Round 7 :
[CA] Ch 2, dc 8. (In the ch-2 corner, [dc 2, ch 1, dc 2]. On the next side, dc 15) three times. [Dc 2, ch 1, dc 2] into the last corner, dc 7. (19 sts on each side and ch-1 at the corners)
Round 8 :
[CA] Ch 1, sc 10. (In the ch-1 corner, [sc 1, ch 1, sc 1]. On the next side, sc 19) three times. [Sc 1, ch 1, sc 1] into the last corner, sc 9. (21 sts on each side and ch-1 at the corners)
Info :
Fasten off and weave in all your ends.
Ornament Applique :
With color of choice and your 3.5-mm crochet hook, make a MC. Round 1. Sc 6 in the MC, join the round with a sl st into the first st. (6 sts) Fasten off leaving a long tail for sewing.
Tiny Star Applique :
With CB and your 3.5-mm crochet hook, make a MC. Round 1. In MC, (sc 1, picot) five times. Join the round with a sl st into the first sc. Fasten off leaving a long tail to sew the star on your granny square.
Fir Tree Applique :
With CD and your 3.5-mm crochet hook, ch 2. Row 1. Sc 1 in the first ch. (1 st) Row 2. Ch 1, turn. Sc inc 1. (2 sts) Row 3. Ch 1, turn. Sc inc 2. (4 sts) Row 4. Ch 1, turn. Sc inc 1, sc 2, sc inc 1. (6 sts) Row 5. Ch 1, turn. Sc inc 1, sc 4, sc inc 1. (8 sts) Tie off and weave in the ends. Join yarn in the third st from either end. Row 6. Ch 1, turn. Sc 4. (4 sts) Row 7. Ch 1, turn. Sc inc 4. (8 sts) Row 8. Ch 1, turn. Sc inc 1, sc 6, sc inc 1. (10 sts) Row 9. Ch 1, turn. Sc inc 1, sc 8, sc inc 1. (12 sts) Row 10. Ch 1, turn. Sc inc 1, sc 10, sc inc 1. (14 sts) Tie off and weave in the ends. Join yarn in the fifth st from either end. Row 11. Ch 1, turn. Sc 7. (7 sts) Row 12. Ch 1, turn. (Sc inc 1, sc 1) three times, sc inc 1. (11 sts) Row 13. Ch 1, turn. Sc inc 1, sc 9, sc inc 1. (13 sts) Row 14. Ch 1, turn. Sc inc 1, sc 11, sc inc 1. (15 sts) Row 15. Ch 1, turn. Sc inc 1, sc 13, sc inc 1. (17 sts) Tie off and weave in the ends. Join yarn in the fifth st from either end. Row 16. Ch 1, turn. Sc 9. (9 sts) Row 17. Ch 1, turn. (Sc inc 1, sc 1) four times, sc inc 1. (14 sts) Row 18. Ch 1, turn. Sc inc 1, sc 12, sc inc 1. (16 sts) Row 19. Ch 1, turn. Sc inc 1, sc 14, sc inc 1. (18 sts) Row 20. Ch 1, turn. Sc inc 1, sc 16, sc inc 1. (20 sts) Row 21. Ch 1, turn. Sc inc 1, sc 18, sc inc 1. (22 sts) Bind off leaving a long tail for sewing.
Vase Applique (Optional) :
With your 3.5-mm crochet hook and CE, ch 4. Row 1. Sc in the second ch from your hook, sc 2. (3 sts) Row 2. Ch 1, turn. Sc inc 1, sc 2. (4 sts) Row 3. Ch 1, turn. Sc inc 1, sc 3. (5 sts) Row 4. Ch 1, turn. Sc inc 1, sc 4. (6 sts) Crochet a border as follow: Row 5. Ch 1, do not turn your work. Place 4 sts along the left side (or right side if you are left-handed). Ch 1, sc 3 on the bottom of the vase. Ch 1, sc 4 along the next side. Fasten off leaving a long tail for sewing.
Finishing :
Attach your fir tree applique and if you decided to make one, attach your vase applique just below the fir tree. With a length of grey yarn, embroider the trunk of the tree. Decorate your Christmas tree by attaching the tiny star applique and a number of ornaments of your choice. Weave in all your ends. Your Christmas Tree Granny Square is ready!
— Wreath Granny Square :
Round 1 :
With your 4-mm hook and CA, make a MC. [CA] Ch 2, hdc 11 in the MC. (11 sts)
Round 2 :
[CA] Ch 1, hdc inc 11. Close the last st with CC. (22 sts)
Round 3 :
[CC] Ch 1, puff 1, ch 1, puff 1) 11 times. (33 sts)
Round 4 :
[CC] Ch 1, puff 1 in the space between the initial ch-1 and the first puff of round 3, ch 1. (puff 1 in the space between two puffs from the previous round, ch 1) 21 times. Close the last st with CA. (44 sts)
Round 5 :
[CA] Ch 1, sc 2, hdc 2, dc 1, dc inc 1, ch 2, dc inc 1. (dc 1, hdc 2, sc 3, hdc 2, dc 1, dc inc 1, ch 2, dc inc 1) three times. Dc 1, hdc 2, sc 1. (13 sts on each side and ch-2 at the corners)
Round 6 :
[CA] Ch 2, dc 7. (In the ch-2 corner, [dc 1, ch 2, dc 1]. On the next side, dc 13) three times. [dc 1, ch 2, dc 1] into the last corner, dc 6. (15 sts on each side and ch-2 at the corners)
Round 7 :
[CA] Ch 2, dc 8. (In the ch-2 corner, [dc 2, ch 1, dc 2]. On the next side, dc 15) three times. [Dc 2, ch 1, dc 2] into the last corner, dc 7. (19 sts on each side and ch-1 at the corners)
Round 8 :
[CA] Ch 1, sc 10. (In the ch-1 corner, [sc 1, ch 1, sc 1]. On the next side, sc 19) three times. [Sc 1, ch 1, sc 1] into the last corner, sc 9. (21 sts on each side and ch-1 at the corners)
Info :
Fasten off and weave in all your ends.
Ribbon Applique :
With your 3.5-mm hook and CB, ch 52. Row 1. Dc 1 in the third ch from your hook, dc 1, hdc 1, sc 2, sl st 5, sc 2, hdc 2, dc 2, tr 4, dc 3, hdc 1, sc 2, hdc 1, dc 3, tr 4, dc 2, hdc 2, sc 2, sl st 5, sc 2, hdc 1, dc 2. Ch 2, sl st into the initial ch. Fasten off leaving a long tail for sewing.
Holly Drupe Applique :
(Make 6 with CB and 5 with CD) With your 3.5-mm hook, make a MC. Round 1. Sc 3 in the MC. (3 sts) Fasten off and join the round using a tapestry needle. Cut your yarn leaving a long tail for sewing.
Finishing :
Assemble the ribbon. Place it with the right side facing up and fold the two sides toward the center. Cut a length of CB yarn, fold it in two, and pass it through the center of the ribbon to block it. Attach your ribbon on top of the wreath. Sew in the holly drupe appliques. Weave in all your ends. Your Wreath Granny Square is ready!
— Wreath Rounds 3-4 Step-by-Step :
Round 3 :
Ch 1. Make a puff st in the first st. To make the puff: (yo, insert your hook into the indicated st, yo, and pull up a loop) three times. Yo and draw yarn through all 7 loops on your hook. Ch 1. Make the next puff in the next st and continue around as shown in the photo tutorial.
Round 4 :
Ch 1, make the first puff in the space between the initial ch-1 and the first puff from round 3. Close the puff and ch 1. Make the next puff st in the space between the first and second puffs from round 3. Repeat (Puff 1, ch 1) all around. Join the round using CA. When working round 5, make sure not to skip any st. Both puff sts and ch 1 count as sts!
This Christmas Granny Squares collection brings bright, handmade joy to your home this season. Mix and match squares to create blankets, cushions or garland for the holidays 🎄. Each square is designed to be approachable yet full of festive detail so you can craft beautiful gifts and decorations with ease 🧶.