🧶 Beautiful ✨ Detailed 💝 Adorable

Bunny Bag Pattern

Bunny Bag Pattern
4.0★ Rating
2-4 Hours Time Needed
3.0K Made This
✂️

Beginner Friendly Level

Perfect for those just starting their crochet journey, with clear instructions and simple techniques

⏱️

Bite-Sized Project

Finishes in 2-4 hours—perfect for an afternoon of creative relaxation.

Stylish Touch

An elegant detail to elevate any look, combining traditional techniques with contemporary design sensibilities.

About This Bunny Bag Pattern

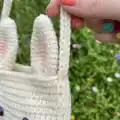
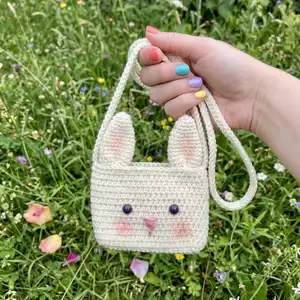
This pattern makes a small, charming bunny bag with a flap and long strap, perfect for kids or as a cute accessory. It uses half double crochet shaping and simple assembly so you can finish quickly. Photos and a video link are provided to help with the cord technique and assembly.

Bunny Bag Pattern crochet pattern - detailed view of completed project

Includes clear materials and abbreviations, plus exact round-by-round instructions for body, ears, eyes, nose and strap. Suitable for crocheters new to amigurumi-style flat pieces and sewn-on details.

Why You'll Love This Bunny Bag Pattern

I absolutely love this pattern because it turns basic stitches into an irresistibly cute accessory that anyone can make. I designed it to be compact and satisfying to finish in a single afternoon. The assembly steps are straightforward, and I included photos and a video link so you can follow along easily. Making the strap with the cord technique gives a neat professional finish I enjoy every time.

Bunny Bag Pattern step 1 - construction progress Bunny Bag Pattern step 2 - assembly progress Bunny Bag Pattern step 3 - details and accessories Bunny Bag Pattern step 4 - final assembly and finishing

Switch Things Up

I love customizing the color palette; try soft pastels for a sweet look or bold brights for a playful statement.

I often change yarn weight and hook to make a mini or oversized version—use thinner yarn and smaller hooks for a tiny keychain bag and bulkier yarn for a chunky tote-style version.

I sometimes add a lining by sewing a small fabric pocket inside to protect the bag contents and make it more durable.

You can replace the wooden button with a snap or magnetic clasp for a cleaner closure that is easier for kids to use.

I enjoy swapping the embroidered nose for a tiny crocheted triangle to add texture and dimension to the face.

Try making the ears shorter or longer to change the character of the bag—from long rabbit ears to cute rounded ears for a different animal look.

I like to embellish with tiny bows, patches, or small crocheted flowers to match seasonal outfits or create gift-themed bags.

Consider using variegated yarn for a subtle, playful color transition across the bag surface without extra color changes.

I sometimes add a length-adjustable strap by attaching metal hardware and creating a shorter shoulder strap for older kids or adults.

Embroider different facial expressions—tilt the eyes or change the mouth placement—to give each bag its own personality and charm.

Common Mistakes & How to Fix Them

✗ Skipping the chain turning instructions can distort the bag shape; always follow the ch2 and turning directions at the start of each round. ✗ Not counting stitches after the first round will lead to mismatched edges and an uneven bag; count your hdc after R1 and at each increase round. ✗ Sewing ears too tightly or in the wrong loops can make them flip inward; attach the ear back to the back loop and the front to the front loop and check placement before fastening. ✗ Using inconsistent tension for the strap can change the length and look of the cord; maintain consistent tension and measure as you work to reach 85cm before finishing. ✗ Forgetting to leave long tails when fastening off small pieces makes sewing difficult; always leave a long yarn tail for sewing and weaving in later.

Bunny Bag Pattern

Create an adorable bunny-shaped crossbody bag with this step-by-step crochet pattern. You will learn simple half-double crochet shaping, make cute ears, sew features, and create a braided cord strap. The pattern is small and satisfying — perfect for gifts or a fun accessory. Follow clear photos and an optional video link to guide you through every stitch.

Beginner Friendly 2-4 Hours

Materials Needed for Bunny Bag Pattern

— Main Fabric

  • 01
    Alize Cotton Gold Pratica yarn - Color 63 Cream - 220m/100g (main yarn)
  • 02
    Small amount of Catania brand pink yarn for nose (approx 5-10g)
  • 03
    Small amount of Catania brand brown yarn for eyes (approx 5-10g)
  • 04
    Optional accent colors for mouth or inner ear (small amounts as needed)

— Tools Required

  • 01
    Crochet hook size 3.0mm (for body, ears)
  • 02
    Crochet hook size 3.5mm (for strap cord)
  • 03
    Crochet hook size 2.2mm (for eyes and small details)
  • 04
    Wooden button (for flap closure)
  • 05
    Needle for sewing (yarn needle)
  • 06
    Scissors
  • 07
    Stitch markers (optional, helpful to mark beginning of round)
  • 08
    Powder crayon or powder blush for cheek and ear coloring (optional)
  • 09
    Measuring tape or ruler

Progress Tracker

0% Complete

— Bunny Body :

Info :

-- Make a slst at the end of each round and begin with ch2 at the beginnings new round. With cream color yarn and 3mm hook;

Round 1 :

-- Ch22, turn back and starting from 3rd; 1- 19hdc, into same st; 4hdc, Continue with otherside 18hdc, into last st; 3hdc (44)

Round 2 :

2- (20hdc, 2hdcinc)*2 (48)

Round 3-14 :

3-14 (12 rounds) 48hdc (48)

Info :

-- Fasten off and cut the yarn.

— Closure Piece :

Info :

-- Now we're going to crochet a tiny closure piece for the bag.

Info :

-- Make a slst at the end of each round and begin with ch2 at the beginnings new round.

Info :

-- Count back at the finishing point and add yarn to the 15th stitch.

Round 1-6 :

1-6 (6 rounds) 8hdc

Round 7 :

7- 2hdc, ch3 (skip 3sts) starting from 4th; 3hdc.

Info :

-- Now sew a wooden button on the back. Now you can close your bag whenever you want ☺

— Bunny Ears :

Info :

-- Make 2 of them. With cream color yarn and 3mm hook;

Info :

-- Make a slst at the end of each round and begin with ch2 at the beginnings new round.

Round 1 :

1- Into MR 6hdc (6)

Round 2 :

2- (2hdc,1hdcinc)*2 (8)

Round 3 :

3- (3hdc,1hdcinc)*2 (10)

Round 4 :

4- (1hdc,1hdcinc)*5 (15)

Round 5-10 :

5-10 (6 rounds) 15hdc (15)

Info :

-- Fasten off with a slst and cut the yarn long for sewing.

Info :

-- Fasten the ears to the 7 loops on both sides of the tiny flap in the middle of the bag. Sew the back of the ear to the back loop and the front to the front loop. You can get support from the photos.

— Bag Strap :

Info :

-- With cream color yarn and 3.5mm hook;

Info :

I crocheted with the cord technique -> When starting, leave enough yarn for sewing. Ch2, skip first st and crochet 1sc. Rotate the cord and crochet 1sc into the loop I showed in the photo. Turn it again and from two loops insert your hook under them, crochet 1sc. We will do the same until we reach 85cm in length.

Info :

-- You can get support from photos.

Info :

-- My friend's youtube video will help you with this. Link is here. https://youtu.be/9VfL0iB7308

— Assembly :

Info :

-- Sew the strap just side the ears. Don't cut the yarn! Sew the strap with two rows of ears and fasten them together. This way the ears will not fall off.

— Bunny Eyes :

Info :

-- Make 2 of them. With brown color yarn and 2.2mm hook;

Round 1 :

1- Into MR 6sc

Info :

-- Fasten off and cut the yarn long for sewing. Count from top to bottom. Sew the eyes to the 7th row with a distance of 7hdc

— Nose :

Info :

-- Embroider a tiny nose as in the photo with pink yarn and needle.

Info :

-- Finally, you can color the cheeks and ears if you want. I used make-up blush because I didn't want it to be permanent.

Assembly Instructions

  • Fasten the ears to the 7 loops on both sides of the tiny flap in the middle of the bag, sewing the back of the ear to the back loop and the front to the front loop for secure attachment.
  • Sew the wooden button onto the back of the flap so the closure piece can be secured over the front of the bag.
  • Sew the strap to the bag just beside the ears, fastening the strap with two rows and the ear rows together so the ears will not fall off.
  • Sew the crocheted brown eyes to the 7th row of the bag, spacing them about 7hdc apart; use the top-to-bottom count for placement.
  • Embroider a tiny nose centered between the eyes with pink yarn and secure all ends neatly on the inside.

Important Notes

  • 💡Chains at the beginning of the rounds won't be counted as hdc, so always start shaping using the instruction provided.
  • 💡It can be useful to use a stitch marker or different colored yarn to see the beginning of the round and keep your stitch count accurate.
  • 💡The bag will be approximately 11cm (4.33 inch) length and 13cm (5.11 inch) width using the specified materials, excluding ears.
  • 💡Leave enough yarn when starting the strap for sewing and leave long tails when fasten off small pieces for easier assembly.

This little Bunny Bag is a delightful, quick project that makes a perfect gift or a cute personal accessory. 🐰🧶 The pattern is friendly and compact, designed to be finished in a few hours with clear photos and a helpful video link. ✨ Have fun customizing colors and small details to make it your own! 💖

You ask,

we answer.

FAQs

What size will the finished piece be?

The finished bag measures approximately 11cm (4.33 inches) long and 13cm (5.11 inches) wide when using the recommended yarn and hooks, excluding the ears.

Can I use different yarn weights for this pattern?

Yes, you can use different yarn weights but this will affect the final size and stitch counts; choose an appropriate hook size and expect the bag dimensions to change.

Do I need prior crochet experience for this pattern?

This pattern is rated beginner friendly; basic familiarity with half double crochet, single crochet, and simple increases is helpful for best results.

How long does this project typically take to complete?

Most crocheters finish this bag in 2-4 hours, depending on experience and how much time you spend on sewing and finishing details.