🧢 Beautiful ✨ Detailed πŸ’ Adorable

Bernat Pipsqueak Star Blanket Pattern

Bernat Pipsqueak Star Blanket Pattern
4.3β˜… Rating
5-7 Hours Time Needed
3.4K Made This
βœ‚οΈ

Intermediate Level

Ideal for those with basic crochet experience, featuring slightly more advanced stitches and techniques to expand your skills.

⏱️

Weekend Treat

Takes 5-7 hours, making it an enjoyable project to finish over a couple of days.

πŸ€—

Soft Hug

Gentle, plush, and full of warmth, creating a sense of comfort and coziness wherever they find a home.

About This Bernat Pipsqueak Star Blanket Pattern

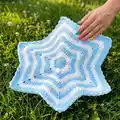
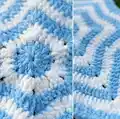
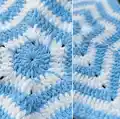
This pattern creates a plush star-shaped blanket worked from the center out using Bernat Pipsqueak yarn. It features textured double crochet rounds, chain-2 spaces, and gentle decreases for a star point shape. The blanket is worked in alternating colors for a soft striped look and finished with neat joins at each round.

Bernat Pipsqueak Star Blanket Pattern crochet pattern - detailed view of completed project

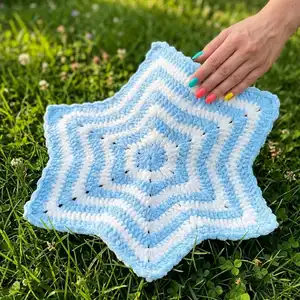
Designed for a cozy baby or nursery, the blanket measures approximately 40 inches from point to point. The pattern includes full round-by-round instructions and clear notes for color changes.

Why You'll Love This Bernat Pipsqueak Star Blanket Pattern

I absolutely love this pattern because it turns soft, plush Pipsqueak yarn into a whimsical star blanket that feels wonderful to the touch. The round-by-round structure is satisfying to work and shows visible progress quickly. I enjoy the simple color changes that create a gentle striped effect without complicated seaming. This blanket is both practical and beautiful, making it a lovely handmade gift for a new baby or a special nursery accent.

Bernat Pipsqueak Star Blanket Pattern step 1 - construction progress Bernat Pipsqueak Star Blanket Pattern step 2 - assembly progress Bernat Pipsqueak Star Blanket Pattern step 3 - details and accessories Bernat Pipsqueak Star Blanket Pattern step 4 - final assembly and finishing

Switch Things Up

I love customizing the colors in this blanket to fit a nursery theme; swapping Contrast A and B gives an instant new look.

I sometimes use three colors instead of two, alternating A/B/A across rounds for a striped effect that still shows the star shape.

To make the blanket larger, I continue the established sequence of rounds until the center-to-point measurement reaches your desired size.

If you prefer a smaller, portable version, use a lighter weight yarn and a smaller hook to create a mini star blanket perfect for gifting.

I often change the texture by substituting half double crochet for some dc rounds to create a squishier feel and different stitch definition.

For a neater edge, I add a simple single crochet border in a contrasting color after finishing the rounds and weaving in ends.

I sometimes add a small crocheted appliquon the center for personalization, like a letter or small heart, sewn in place securely.

To create a reversible look, try alternating the join method between rounds and carrying your yarn to the back to reduce ends to weave in.

I recommend swatching changes if you alter yarn or hook to confirm gauge and appearance before committing to the full blanket.

For gifting, I like to attach a handmade tag or crochet a small bow in matching yarn to tie around the finished blanket for a polished presentation.

Common Mistakes & How to Fix Them

βœ— Skipping the initial ring join step can create an uneven center; begin at the center with A, ch 5 and join with sl st to form the ring exactly as instructed. βœ— Not counting stitches after each round leads to missed increases or decreases; always count your stitches after each round to ensure correct stitch counts. βœ— Pulling loops too tightly when making sc2tog or draw-up loops causes uneven texture; keep a relaxed, consistent tension and gently shape the loops. βœ— Changing colors without fastening or weaving tails can leave messy edges; fasten off and weave in ends or carry yarn neatly as you change from A to B.

Bernat Pipsqueak Star Blanket Pattern

Crochet a soft, cuddly star-shaped baby blanket using Bernat Pipsqueak yarn. This pattern guides you through textured rounds and playful color changes so you can create a cozy, snuggly blanket perfect for gifting or nursery decor. Clear round-by-round instructions make it easy to follow along and customize your colors.

Intermediate 5-7 Hours

Materials Needed for Bernat Pipsqueak Star Blanket Pattern

β€” Main Fabric

  • 01
    Bernat Pipsqueak (100 g/3.5 oz; 109 m/120 yds) - main quantity: 3 balls of A and 2 balls of B
  • 02
    Alternate yarn quantity option: (250 g/8.8 oz; 274 m/300 yds) - 1 ball each of A and B (alternative sizing noted in pattern)
  • 03
    Contrast A: 58730 or 59730 Silly Sea - 259 m / 283 yds
  • 04
    Contrast B: 58005 or 59005 Whitey White - 208 m / 227 yds

β€” Tools Required

  • 01
    Crochet hook size 6.5 mm (U.S. K or 10 or size needed to obtain gauge)

Progress Tracker

0% Complete

β€” Star Blanket :

Info :

Measurement: Approx 40 ins [101.5 cm] from point to point. Materials: Bernat Pipsqueak (100 g/3.5 oz; 109 m/120 yds). Use Contrast A and Contrast B as noted. Size 6.5 mm (U.S. K or 10) crochet hook or size needed to obtain gauge. Gauge: 10 dc and 6 rows = 4 ins [10 cm]. ABBREVIATIONS: www.bernat.com/abbreviations

Info :

Note: Ch 3 at beg of rnd counts as dc throughout. Beg at center, with A, ch 5. Join with sl st to form ring.

Round 1 :

Ch 2 (does not count as st). 12 hdc in ring. Join with sl st to first hdc. (12 hdc)

Round 2 :

Ch 1. 1 sc in same sp as last sl st. *3 dc in next hdc. 1 sc in next hdc. Rep from * around to last hdc. 3 hdc in last hdc. Join B with sl st to first sc.

Round 3 :

With B, sl st in next dc. Ch 3. (2 dc. Ch 2. 2 dc) in next dc. 1 dc in next dc. *Miss next sc. 1 dc in next dc. (2 dc. Ch 2. 2 dc) in next dc. 1 dc in next dc. Rep from * 4 times more. Join A with sl st to top of ch 3.

Round 4 :

With A, sl st in next dc. Ch 3. 1 dc in next dc. *(2 dc. Ch 2. 2 dc) in next ch-2 sp. 1 dc in each of next 2 dc.** Draw up a loop in each of next 2 dc. Yoh and draw through all loops on hook - sc2tog made. 1 dc in each of next 2 dc. Rep from * 4 times more, then from * to ** once. Sc2tog over last 2 sts. Join with sl st to top of ch 3.

Round 5 :

Ch 3. 1 dc in each of next 3 dc. *(2 dc. Ch 2. 2 dc) in next ch-2 sp. 1 dc in each of next 4 dc.** Miss next st. 1 dc in each of next 4 dc. Rep from * 4 times more, then from * to ** once. Miss last st. Join B with sl st to top of ch 3.

Round 6 :

With B, sl st in next dc. Ch 3. 1 dc in each of next 4 dc. *(2 dc. Ch 2. 2 dc) in next ch-2 sp. 1 dc in each of next 5 dc. Sc2tog over next 2 dc. 1 dc in each of next 5 dc. Rep from * 4 times more, then from * to ** once. Sc2tog over last 2 dc. Join A with sl st to top of ch 3.

Round 7 :

With A, ch 3. 1 dc in each of next 6 dc. *(2 dc. Ch 2. 2 dc) in next ch-2 sp. 1 dc in each of next 7 dc.** Miss next st. 1 dc in each of next 7 dc. Rep from * 4 times more, then from * to ** once. Miss last st. Join with sl st to top of ch 3.

Round 8 :

Sl st in next dc. Ch 3. 1 dc in each of next 7 dc. *(2 dc. Ch 2. 2 dc) in next ch-2 sp. 1 dc in each of next 8 dc.** Sc2tog over next 2 dc. 1 dc in each of next 8 dc. Rep from * 4 times more, then from * to ** once. Sc2tog over last 2 dc. Join B with sl st to top of ch 3.

Round 9 :

With B, ch 3. 1 dc in each of next 9 dc. *(2 dc. Ch 2. 2 dc) in next ch-2 sp. 1 dc in each of next 10 dc.** Miss next st. 1 dc in each of next 10 dc. Rep from * 4 times more, then from * to ** once. Miss last st. Join A with sl st to top of ch 3.

Round 10 :

With A, sl st in next dc. Ch 3. 1 dc in each of next 10 dc. *(2 dc. Ch 2. 2 dc) in next ch-2 sp. 1 dc in each of next 11 dc.** Sc2tog over next 2 dc. 1 dc in each of next 11 dc. Rep from * 4 times more, then from * to ** once. Sc2tog over last 2 dc. Join with sl st to top of ch 3.

Round 11 :

Ch 3. 1 dc in each of next 12 dc. *(2 dc. Ch 2. 2 dc) in next ch-2 sp. 1 dc in each of next 13 dc.** Miss next st. 1 dc in each of next 13 dc. Rep from * 4 times more, then from * to ** once. Miss last st. Join B with sl st to top of ch 3.

Info :

Cont as established, (working 1 rnd B; 2 rnds A throughout) until work from center to outer point measures approx 20 ins [51 cm] ending with 2 rnds A. Fasten off.

Assembly Instructions

  • Join each round as directed: when instructed to 'Join B with sl st to first sc' or 'Join A with sl st to top of ch 3', slip stitch to the specified stitch to secure the new color before continuing.
  • When the pattern notes to 'Miss next st' or 'Miss last st', carefully skip the stitch and continue the sequence to preserve the star point shaping and symmetry.
  • Work sc2tog and draw-up loop decreases (described in Round 4) evenly along each arm of the star to maintain consistent texture; keep counts equal across all points.
  • Finish by fastening off after the final rounds and weave in all ends on the wrong side of the blanket, trimming any excess yarn neatly.

Important Notes

  • πŸ’‘Use the note 'Ch 3 at beg of rnd counts as dc throughout' to keep consistent stitch height when beginning each round.
  • πŸ’‘Keep an even tension when working sc2tog and draw-up loops to avoid uneven points on the star arms.
  • πŸ’‘Measure from center to outer point periodically to ensure the blanket reaches approx 20 ins [51 cm] as you work before finishing.

Create a cozy, plush star blanket with soft Bernat Pipsqueak yarn that becomes a treasured nursery staple. This pattern makes a generous 40-inch star perfect for snuggles and photos. Personalize with your favorite colorways to make a heartfelt handmade gift. 🧢✨

You ask,

we answer.

FAQs

What size will the finished piece be?

The finished blanket measures approximately 40 inches (101.5 cm) from point to point when using the recommended yarn and hook size.

Can I use different yarn weights for this pattern?

Yes, you can use different yarn weights, but this will affect the final size and drape; adjust your hook size accordingly and check gauge.

Do I need prior crochet experience for this pattern?

This pattern is rated intermediate and uses double crochet, half double crochet, sc2tog, and draw-up loops, so basic crochet knowledge is recommended.

How long does this project typically take to complete?

Most crocheters complete this project in 5-7 hours, depending on experience level and how many rounds you work for your preferred size.