🧢 Beautiful ✨ Detailed πŸ’ Adorable

Zig-Zag Blanket Pattern

Zig-Zag Blanket Pattern
4.8β˜… Rating
5-7 Hours Time Needed
1.9K Made This
βœ‚οΈ

Beginner Friendly Level

Perfect for those just starting their crochet journey, with clear instructions and simple techniques

⏱️

Weekend Treat

Takes 5-7 hours, making it an enjoyable project to finish over a couple of days.

πŸ€—

Soft Hug

Gentle, plush, and full of warmth, creating a sense of comfort and coziness wherever they find a home.

About This Zig-Zag Blanket Pattern

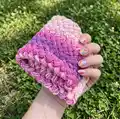
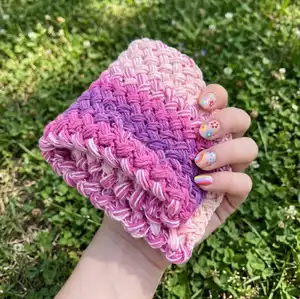
This Zig-Zag Blanket Pattern creates a soft textured blanket using sport weight yarn held double and a puff stitch zig-zag motif. You can make newborn, crib, or full throw sizes by following the starting chain and row counts. The pattern includes a color placement chart and clear step-by-step photos to guide color changes and finishing.

Zig-Zag Blanket Pattern crochet pattern - detailed view of completed project

Perfect for beginner crocheters who want a striking, textured result without complex stitches. Uses simple double crochet and puff stitches with an easy yarn change method for multi-color stripes.

Why You'll Love This Zig-Zag Blanket Pattern

I absolutely love this pattern because the puff stitch creates a wonderfully squishy texture that feels luxurious to the touch. I enjoy how easy it is to change colors using the replace-one-thread-at-a-time method, which makes striping neat and manageable. The pattern scales beautifully from newborn to throw sizes, so I can make gifts for all ages. Working this blanket is relaxing and satisfying β€” the repetitive rhythm is perfect for casual crocheting while watching a show or chatting with friends.

Zig-Zag Blanket Pattern step 1 - construction progress Zig-Zag Blanket Pattern step 2 - assembly progress Zig-Zag Blanket Pattern step 3 - details and accessories Zig-Zag Blanket Pattern step 4 - final assembly and finishing

Switch Things Up

I love customizing this pattern by swapping the color order and seeing how the stripes shift across the zig-zag rows.

I sometimes hold two different colors for a marled effect instead of single colors to get soft blends between sections.

If I want a chunkier blanket, I use bulkier yarn and a larger hook and then reduce the starting chain for a similar-sized result.

I also enjoy making mini versions by using fingering weight yarn with a fine hook to create tiny loveys perfect for keychain or doll accessories.

For a neat edge I add a simple single crochet border around the finished blanket, or try a crab stitch for a decorative reverse SC edge.

I sometimes add tassels or pom-poms to the corners for a playful finishβ€”use matching or contrasting colors to change the mood.

If I want more texture, I substitute alternate rows with a different textured stitch and observe how the puff stitches frame those rows.

For a polished gift, I block the blanket gently after weaving in ends to even out the stitches and flatten any slightly uneven edges.

I recommend experimenting with holding one strand of a self-striping yarn and one solid color to create subtle, graduated stripes.

Don’t be afraid to mix fibersβ€”cotton blends will produce a cooler drape while wool blends will be warmer and loftier.

Common Mistakes & How to Fix Them

βœ— Holding yarn single instead of double will make your stitches too small and the texture weak; hold two strands together throughout the project to match gauge and achieve consistent puff stitches. βœ— Not counting chains when starting can make the blanket too narrow or too wide; recount your starting chain (83, 128, or 146) before beginning Row 1 to ensure correct width. βœ— Not securing yarn ends when changing colors can cause unraveling later; cut one thread and hold the new color with the uncut thread, then weave in both ends and knot close to the fabric as instructed. βœ— Skipping the ch-4 turning chain on Row 2 will throw off stitch height and alignment; always ch 4 and turn so the next row starts at the correct height for the puff stitches. βœ— Pulling puff stitch loops too tight makes the puff look small and uneven; pull loops through gently and then pull the ch-1 to tighten the top until it sits neatly with the other puffs.

Zig-Zag Blanket Pattern

Make a cozy, textured zig-zag blanket using puff stitches and a simple color-change chart. This pattern guides you step-by-step through chain counts, stitch placement, and yarn-changing technique so you can create baby, crib, or throw sizes. Perfect for using sport weight yarn and leftover skeins, it produces a soft, squishy fabric you'll love to cuddle.

Beginner Friendly 5-7 Hours

Materials Needed for Zig-Zag Blanket Pattern

β€” Main Fabric

  • 01
    Sport weight yarn (Knit Picks Brava Sport recommended) in 4 colors: Blush, Cream, Freesia, Lady Slipper
  • 02
    Newborn size total yarn: 1140 yards (1040 meters) approximately
  • 03
    Crib size total yarn: 2890 yards (2420 meters) approximately
  • 04
    Adult throw size total yarn: 6600 yards (6020 meters) approximately
  • 05
    Color placement uses 4 colors held single or double as charted for stripes and blended rows

β€” Tools Required

  • 01
    Crochet hook size 5.5 mm
  • 02
    Yarn needle for weaving in ends
  • 03
    Scissors
  • 04
    Measuring tape (for checking gauge and finished size)

Progress Tracker

0% Complete

β€” Zig-Zag Blanket :

Round 1 :

1. Hold yarn double. Ch 83 (128 for crib blanket, 146 for throw blanket).

Round 2 :

2. Row 1: Dc into 7th ch from hook

Round 3 :

3. Make a puff st in ch before dc (as pointed with arrow).

Round 4 :

4. To make a puff st: Yo, insert hook into the loop. Pull loop through.

Round 5 :

5. (Yo, insert hook into the loop. Pull loop through) 2 more times.

Round 6 :

6. Yo, pull loop through all loops on the hook. Puff st complete.

Round 7 :

7. Make ch 1 to tighten the top of the puff st.

Round 8 :

8. Sk 2 ch, dc into 3rd ch.

Round 9 :

9. Make a puff st into ch before dc.

Round 10 :

10. Repeat steps 8 and 9 until you reach the end of the row.

Round 11 :

11. Dc into last ch.

Round 12 :

12. Row 2: Ch 4, turn.

Round 13 :

13. Dc into next space between dc and puff st of the previous row.

Round 14 :

14. Make a puff st into the space under ch st of the previous row, as pointed with an arrow.

Round 15 :

15. (Puff st complete)

Round 16 :

16. Ch 1.

Round 17 :

17. Repeat steps 13-16 until you reach the end of the row.

Round 18 :

18. Dc into ch.

Round 19 :

19. Puff st into ch before dc of the previous row.

Round 20 :

20. Dc into ch.

Round 21 :

21. Repeat row 2 (steps 12-20) until you reach 38 (60, 120) rows for baby blanket (crib blanket, throw blanket).

Round 22 :

22. To change yarn color, you will replace one yarn thread at a time. Before you start a new row, cut one thread leaving long yarn end.

Round 23 :

23. Hold new color together with the one yarn thread left uncut, and start crocheting new row.

Round 24 :

24. Continue with usual pattern. At the beginning of the row you will have 2 yarn ends that will need to be weaved in.

Round 25 :

25. To weave in ends, find 2 yarn ends side by side. Make a few tight knots close to the fabric of the blanket, to secure. Use yarn needle to weave in both ends at a time.

Infos :

Hold yarn double. Ch 83 (128 for crib blanket, 146 for throw blanket).

Round 26 :

Row 1: Dc into 7th ch from hook, make a puff st in ch before dc, make ch 1 to tighten the top of the puff st. *Sk 2 ch, dc into 3rd ch. Make a puff st into ch before dc. Repeat from * until you reach the end of the row. Dc into last ch.

Round 27 :

Row 2: Ch 4, turn. *Dc into next space between dc and puff st of the previous row. Make a puff st into the space under ch st of the previous row. Ch 1. Repeat from * until you reach the end of the row. Dc into ch. Puff st into ch before dc of the previous row. Dc into ch.

Round 28 :

Repeat Row 2, until you reach 38 (60, 120) rows for baby blanket (crib blanket, throw blanket).

Assembly Instructions

  • Change yarn colors by replacing one yarn thread at a time; before starting a new row, cut one thread leaving a long yarn end and hold the new color together with the uncut thread to begin crocheting.
  • When you finish a color change, you will have two yarn ends at the beginning of the row; weave them in later together using a yarn needle.
  • To weave in ends securely, find two yarn ends side by side, tie a few tight knots close to the fabric to secure, then use a yarn needle to weave both ends into the blanket.
  • Check the color placement chart as you work so rows that require yarn held double are held correctly and your stripe pattern matches the visual chart.
  • Measure your blanket occasionally to make sure you reach the required number of rows for your chosen size (38 for newborn, 60 for crib, 120 for throw).

Important Notes

  • πŸ’‘This pattern is written in standard American terms; follow the abbreviations exactly for consistent results.
  • πŸ’‘Use stitch and row counts (starting chains and total rows) provided for the correct finished dimensions for each size.
  • πŸ’‘Hold yarn double when instructed to match the gauge of 5 puff stitches and 7 rows in a 4x4 inch square.

This Zig-Zag Blanket Pattern yields a soft, textured blanket you'll reach for again and again. 🧢 The puff stitch zig-zag makes a beautiful statement while staying delightfully simple to work. ✨ Perfect for gifts or snuggly nights, this pattern welcomes creative color play and cozy results. 😊

You ask,

we answer.

FAQs

What size will the finished piece be?

The pattern gives dimensions for three sizes: newborn 22x22 inches (56x56 cm), crib 35x35 inches (90x90 cm), and adult throw 70x40 inches (173x107 cm).

Can I use different yarn weights for this pattern?

Yes, you can use other yarn weights, but the finished size and gauge will change; if you change yarn weight, use an appropriate hook and check gauge, then adjust starting chain and rows as needed.

Do I need prior crochet experience for this pattern?

This pattern is beginner friendly, so basic knowledge of chaining, double crochet, and working puff stitches will help you complete the blanket comfortably.

How long does this project typically take to complete?

Most crocheters complete a baby or crib size in a few sessions; estimated time for a typical size is around 5-7 hours depending on experience and selected blanket size.