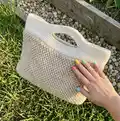
About This Spike Stitch Tote Bag Pattern
This pattern creates a textured spike stitch tote bag with options for pre-made or crocheted straps. The design combines a sturdy base with a soft upper band for a refined finish. Clear round-by-round instructions and a spike stitch tutorial are included to guide you through every step.
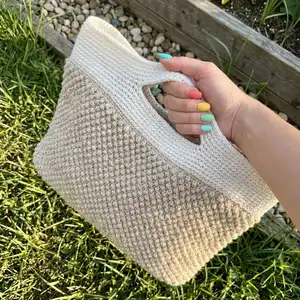
The bag is worked in the round using single crochet and spike stitch, with recommended yarn suggestions and strap placement details. You can make the bag in two-tone or a single color and choose between leather-style straps or crocheted handles.
Why You'll Love This Spike Stitch Tote Bag Pattern
I absolutely love this pattern because the spike stitch creates a beautiful, woven-like texture that elevates a simple tote into something special. I enjoy how quickly the base comes together, and how the stitch pattern adds interest without being fussy. The two strap options let me switch between a polished look with pre-made straps or a fully handmade version with crocheted handles. I always find this bag to be practical and stylish — it fits daily essentials while still feeling lightweight and elegant.
Switch Things Up
I love customizing the color blocking — try reversing the colors so the top band is beige and the body is cream for a subtle contrast.
You can change the size by altering the starting CH: increase or decrease the number of chains in multiples that match the stitch repeat to create a wider or narrower base.
Swap the 3.5mm hook for a 4.0mm and a bulkier worsted yarn to make a chunkier, roomier tote perfect for groceries or beach gear.
Make a mini version by using sport weight yarn and a smaller hook for a petite handbag or keychain-sized accessory.
Embellish the finished bag with pom-poms, tassels, or a small crocheted pocket sewn to the inside for added function and style.
Replace the faux leather straps with braided cords or macrame-style handles for a boho look that complements the textured body.
Try adding a fabric lining for extra durability and to prevent small items from slipping through the crochet stitches.
Experiment with stitch placement by adding a round of single crochet in contrasting color between body and band to create a crisp dividing line.
I often stitch a small loop and button closure at the top center to secure the bag; you can also add a zipper for a more secure option.
For a more structured bag, use a cotton-linen blend yarn and consider inserting a thin interfacing panel in the base after crocheting to help the bag keep its shape.
Common Mistakes & How to Fix Them
✗ Skipping the second strand recommendation when you need a firmer bag; work around a second strand of yarn from round 2 and check each round for bunching to prevent a floppy shape.
✗ Not marking strap placement before creating long chains; place stitch markers in the specified stitches (21st, 49th, 94th, 121st) to ensure even strap position and alignment.
✗ Twisting the long chain when forming handles causes the strap to sit awkwardly; always check the chain is not twisted before joining and attaching to the bag.
✗ Forgetting to skip the correct number of stitches when creating chain handles results in misaligned straps; count carefully and skip the exact number of stitches specified after each chain.
✗ Not weaving in ends securely can cause strap and top band failures; fasten off and weave in ends neatly and reinforce strap attachment points with rivets or extra stitching.