🧶 Beautiful ✨ Detailed 💝 Adorable

Woof the Dog Amigurumi Pattern

Woof the Dog Amigurumi Pattern
4.8★ Rating
5-7 Hours Time Needed
3.8K Made This
✂️

Intermediate Level

Ideal for those with basic crochet experience, featuring slightly more advanced stitches and techniques to expand your skills.

⏱️

Weekend Treat

Takes 5-7 hours, making it an enjoyable project to finish over a couple of days.

🧸

Cute Companion

An adorable friend to cherish, handcrafted with love to bring comfort and joy for years to come.

About This Woof the Dog Amigurumi Pattern

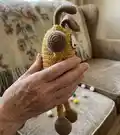
This pattern creates a stretchy dog toy with long, squeezable limbs and a soft rectangular body. The design uses simple single crochet shaping and modular parts for easy assembly. You will work small amigurumi pieces and sew them onto the square body for a playful final toy.

Woof the Dog Amigurumi Pattern crochet pattern - detailed view of completed project

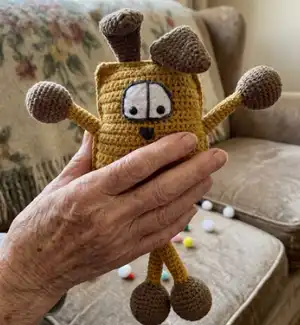
The limbs are constructed to stretch and retract, adding interactive play value. Detailed photos and step-by-step instructions guide you through assembly and decoration.

Why You'll Love This Woof the Dog Amigurumi Pattern

I absolutely love this pattern because it combines simple crochet techniques with a creative stretchy-limb design that kids adore. I enjoy how the rectangular body is worked flat and then joined to create a neat, square shape that makes assembly straightforward. The pattern allows for playful customization — you can change colors and facial expressions to give each Woof a personality. Sewing the parts together is satisfying and the finished toy is durable and fun to handle.

Woof the Dog Amigurumi Pattern step 1 - construction progress Woof the Dog Amigurumi Pattern step 2 - assembly progress Woof the Dog Amigurumi Pattern step 3 - details and accessories Woof the Dog Amigurumi Pattern step 4 - final assembly and finishing

Switch Things Up

I love changing the color palette to make each Woof unique; try soft pastels for a nursery-friendly friend or bold contrasts for a playful character.

I sometimes use a thicker yarn and a larger hook to create a chunkier, cuddlier Woof—just remember the final size will increase.

I also make mini versions by using finer yarn and a smaller hook to create keychain-sized Woofs that are great gifts.

I often replace safety eyes with embroidered eyes for baby-safe toys and add felt eye panels for a different face style.

I like to vary facial expressions by moving the nose and mouth placement slightly—this can change the whole personality of the toy.

I add wire inside the limbs when I want a posable version; be cautious and only use wire for adult toys, not for baby use.

I sometimes embroider little patches or add tiny crocheted accessories like scarves or hats to give Woof a seasonal look.

For a more tactile toy, experiment with yarn textures—cotton gives a neat finish while acrylic can be fluffier and softer to the touch.

I recommend trying different stuffing amounts to find the right balance between firmness and squishiness; less stuffing gives a softer, floppy look.

I enjoy making sets in coordinating colors and displaying them together as a collection, which is a lovely handmade gift idea.

Common Mistakes & How to Fix Them

✗ Skipping the turning chain at the end of rows for the eyes or body will change row height and cause misalignment; always make the 1 turning CH at the end of each row as instructed. ✗ Forgetting to change yarn color exactly where noted can create awkward color joins and visible seams; switch yarns at the specified round and weave in ends neatly to hide joins. ✗ Not stuffing the limb bulbs and body firmly enough results in floppy shapes that do not hold their form; stuff gradually and firmly where the pattern directs, especially the limb bulbs and body corners. ✗ Missing decreases or increases when counting rounds will change stitch counts and distort shaping; count stitches after each shaping round and use stitch markers to keep track. ✗ Attaching ears or eyes without carefully measuring rows will create asymmetry; mark the placement and compare both sides before sewing to ensure even placement.

Woof the Dog Amigurumi Pattern

Meet Woof the Dog, a stretchy, playful amigurumi designed to spark creative play and develop fine motor skills. You will enjoy the clever limb construction that lets the arms and legs stretch up and down. This charming plush is perfect for gifting or keeping as a cuddly companion.

Intermediate 5-7 Hours

Materials Needed for Woof the Dog Amigurumi Pattern

— Main Fabric

  • 01
    YarnArt Jeans 50 g / 160 m; 55% cotton, 45% acrylic - Shade 84 (gold) approximately 100 g for body
  • 02
    YarnArt Jeans 50 g / 160 m - Shade 40 (brown) approximately 30-50 g for limbs, ears, limb bulbs
  • 03
    YarnArt Jeans 50 g / 160 m - Shade 28 (black) small amount for mouth, eye contour and details
  • 04
    YarnArt Jeans 50 g / 160 m - Shade 03 (white) small amount for eye panels
  • 05
    Polyester fiber filler for stuffing body and limb bulbs

— Tools Required

  • 01
    Crochet hook size 2.0 mm
  • 02
    Crochet hook size 3.0 mm
  • 03
    8 mm safety eyes (2 pieces)
  • 04
    Scissors
  • 05
    Large eye yarn needle for sewing parts
  • 06
    Stitch markers
  • 07
    Polyester stuffing (fiber filler)
  • 08
    Pins for assembly (optional)

Progress Tracker

0% Complete

— Abbreviations :

Infos :

MR - magic/amigurumi ring. CH - (turning) chain. DEC - decrease. INC - increase. SC - single crochet. SL ST - slip stitch. (...) * n - repeat n times the sequence in brackets. (...) - number of stitches in a row/rnd.

Info :

The finished toy size from the recommended materials is 30 cm from ears to feet. Please note: this pattern does not contain crocheting lessons. You should master basic crocheting skills to create this toy.

— Eyes (make 2) :

Info :

Begin crocheting in white with 2 mm hook. Chain 10, and starting into the 2nd stitch from hook work 9 SC. Make 1 turning CH at the end of each row.

Round 1 - 3 :

3 rows straight: 9 SC

Round 4 :

1 SC, DEC, 3 SC, DEC, 1 SC (7)

Round 5 :

1 SC, DEC, 1 SC, DEC, 1 SC (5)

Info :

Install safety eyes between rows 2 and 3, 1 SC away from the left and right edges. Leave a long yarn tail for sewing.

— Arms and Legs (make 2) :

Info :

Arms and legs are crocheted in one piece. Begin crocheting in brown with 2 mm hook.

Round 1 :

6 MR (6)

Round 2 :

INC*6 (12)

Round 3 :

(1 SC, INC)*6 (18)

Round 4 :

(2 SC, INC)*6 (24)

Round 5 :

(3 SC, INC)*6 (30)

Round 6 - 9 :

4 rnds straight: 30 SC

Round 10 :

(DEC, 3 SC)*6 (24)

Round 11 :

(DEC, 2 SC)*6 (18)

Round 12 :

(DEC, 1 SC)*6 (12)

Info :

Stuff tightly.

Round 13 :

(DEC, 4 SC)*2 (10)

Info :

Switch to gold yarn. Go on crocheting. Don’t stuff the gold piece.

Round 14 - 65 :

52 rnds straight: 10 SC. Switch to black yarn.

Round 66 :

(INC, 4 SC)*2 (12)

Round 67 :

(1 SC, INC)*6 (18)

Round 68 :

(2 SC, INC)*6 (24)

Round 69 :

(3 SC, INC)*6 (30)

Round 70 - 73 :

4 rnds straight: 30 SC

Round 74 :

(DEC, 3 SC)*6 (24)

Round 75 :

(DEC, 2 SC)*6 (18)

Round 76 :

(DEC, 1 SC)*6 (12)

Info :

Stuff the piece.

Round 77 :

DEC*6. Fasten off.

— Ears (make 2) :

Info :

Work in brown with 2 mm hook. Don't stuff.

Round 1 :

6 MR (6)

Round 2 :

(1 SC, INC)*3 (9)

Round 3 :

1 rnd straight: 9 SC (9)

Round 4 :

(2 SC, INC)*3 (12)

Round 5 :

(3 SC, INC)*3 (15)

Round 6 - 11 :

6 rnds straight: 15 SC

Round 12 :

(4 SC, INC)*3 (18)

Round 13 - 20 :

8 rnds straight: 18 SC

Round 21 :

(DEC, 4 SC)*3 (15)

Round 22 - 24 :

3 rnds straight: 15 SC

Round 25 :

(DEC, 3 SC)*3 (12)

Round 26 - 28 :

3 rnds straight: 12 SC

Info :

Fold in half and single crochet 6 through both edges. Leave a long yarn tail for sewing.

— Body (make 2) :

Info :

Work in gold with 3 mm hook. Chain 25, and starting into the 2nd stitch from hook work 24 SC. Make 1 turning CH at the end of each row.

Round 1 - 19 :

19 rnds straight: 24 SC.

Round 20 :

1 SC, DEC, 18 SC, DEC, 1 SC (22)

Round 21 :

1 rnd straight: 22 SC

Round 22 :

1 SC, DEC, 16 SC, DEC, 1 SC (20)

Round 23 - 25 :

3 rnds straight: 20 SC.

Info :

Fasten off and cut yarn.

— Assembly :

Info :

Begin joining the body parts together from the right upper corner using 2 mm hook. Put the two parts together and work 19 SC through both parts’ stitches, work 2 SC to the corner stitch.

Info :

Get to the side edge. You are going to insert the arm-leg piece here. It should go between rows 11 and 15. I worked 10 SC through both parts’ stitches, then 3 SC across the front part of the body only (skip 3 stitches on the back body part), put the arm-leg piece and go on crocheting across both body parts 11 SC, 2 SC to the corner stitch.

Info :

Get to the bottom edge. 5 SC through both parts’ stitches, 3 SC across the front part only, put the arm-leg piece, 6 SC across both body parts, 3 SC across the front part only, put the second arm-leg piece, 5 SC, 2 SC to the corner stitch. Stuff the body.

Info :

Work the other side alike (11 SC across both body parts, 3 SC across the front part only, stuff the body, 10 SC through both parts’ stitches).

— Decoration :

Info :

Ears: Attach the ears on the back, 4 SC away from the left and right edges. I like the ears bent in the middle slightly.

Info :

Eyes: Sew on between rows 16 - 22 in the middle. Stitch around the eyes contour and in the middle as shown in the photo with black yarn.

Info :

Nose: Embroider a nose between rows 13-15 in black.

Info :

Mouth: Embroider a mouth between rows 7-8 in black.

Assembly Instructions

  • Join the two body panels from the right upper corner with 2 mm hook: work 19 SC through both parts' stitches, then 2 SC to the corner stitch.
  • Insert an arm-leg piece at the side edge between rows 11 and 15: work 10 SC through both panels, 3 SC across front panel only (skip 3 back stitches), place arm-leg, then continue 11 SC across both panels and 2 SC to the corner.
  • At the bottom edge join: 5 SC through both panels, 3 SC across the front panel only, insert second arm-leg, 6 SC across both parts, 3 SC across the front only, finish with 5 SC and 2 SC to the corner, then stuff the body.
  • Work the opposite side the same way: 11 SC across both panels, 3 SC across front only, stuff the body, then 10 SC through both parts' stitches to finish the join.
  • Sew ears to back panel 4 SC from left and right edges, sew eyes between rows 16-22 centered, and embroider nose and mouth between the specified rows to complete facial features.

Important Notes

  • 💡Use stitch markers to keep track of your rounds and the start of each row when joining body panels for accurate alignment.
  • 💡Stuff the limb bulbs and body firmly but not overstuffed; overstuffing can distort the square body shape and make sewing difficult.
  • 💡Place and pin all parts (ears, arms, legs, eyes) before sewing to check symmetry and position; adjust placement as needed before permanently stitching.
  • 💡When changing yarn colors, carry the yarn neatly or weave in ends to avoid bulky joins and visible loose ends.

This stretchy Woof the Dog pattern is perfect for playful gifting and hands-on fun.🧶 The clever limb construction lets arms and legs stretch up and down for interactive play.🧸 Make different color versions to build a whole family of Woofs for endless imaginative adventures.✨

You ask,

we answer.

FAQs

What size will the finished piece be?

The finished toy measures approximately 30 cm from ears to feet when using the recommended yarn (YarnArt Jeans) and hook sizes.

Can I use different yarn weights for this pattern?

Yes, you can use different yarn weights, but the final size and texture will change; adjust hook size accordingly and expect a different finished measurement.

Do I need prior crochet experience for this pattern?

This pattern is rated intermediate, so basic knowledge of single crochet, increasing, decreasing, magic ring, and sewing amigurumi parts is recommended.

How long does this project typically take to complete?

Most crocheters complete this project in 5-7 hours, though time may vary depending on experience level, stitching speed, and assembly detail.

Are safety eyes required or can I embroider eyes?

You can use 8 mm safety eyes as instructed, or embroider eye centers if you prefer a fully sewn toy for young children; position eyes between rows 2-3 on the eye panel.