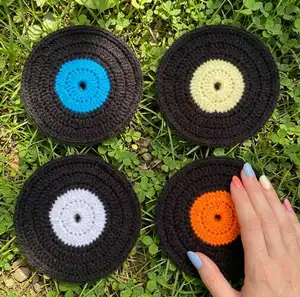
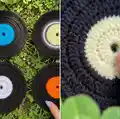
Create retro-inspired vinyl record coasters with this easy-to-follow crochet pattern. Youll make a contrast centre and a black vinyl surround to recreate the classic record look. The pattern includes both UK and US terms so you can use whichever terminology youre familiar with. Perfect for gifting or adding a playful touch to your home decor.
Progress Tracker
0% Complete
— Materials :
Info :
Hayfield Bonus Black 0965 – 15g. Hayfield Bonus Contrast – 2g. 3mm Crochet Hook. Wool Needle (for sewing).
— Abbreviations (UK terms) :
Infos :
ch – chain. htr – half treble crochet. tr – treble crochet. inc – 2 stitches into next stitch. htrinc – 2 half treble crochets into next stitch. trinc – 2 treble crochets into next stitch. dec – decrease over next two stitches in front loops only. htrdec – half treble crochet decreased over next two stitches in front loops only. 3dec – decrease over next three stitches in front loops only. sl st – slip stitch. f/o – fasten off by slip stitch in next stitch. FP(htr) – work (half treble crochet) round front post of stitch inserting hook from in front of the stitch from right to left.
— Note :
Info :
Unless stated work in continuous rounds marking last stitch of each row with a stitch marker before proceeding with the next.
— Measurements :
Info :
Contrast Insert: 6cm/2.5inches. Final Coaster: 13cm/5.5inches.
— Contrast Insert (UK Terms) :
Row 1 :
leaving a 10cm end, ch8, sl st to join (8)
Row 2 :
ch2, tr x21 into centre circle, sl st to join at top of ch2 (22, ch2 counts as 1st st)
Row 3 :
ch2, trinc into base of same st, trinc x21, sl st to join at top of ch2 (44, ch2 counts as 1st st)
Info :
F/O leaving a 10cm end.
Info :
Secure ends with a couple of small sts before weaving through back of nearest tr sts and cutting flush to finish.
— Vinyl (UK Terms) :
Row 4 :
leaving a 10cm end, FP(htr) into top of any of the tr sts in previous row, FP(htr) into next 43 sts, sl st to join at top of 1st FP(htr) (44)
Row 5 :
ch2, trinc into next st, (tr into next st, trinc) x21, sl st to join at top of ch2 (66, ch2 counts as 1st st)
Row 6 :
ch2, tr into next st, trinc, (tr into next 2sts, trinc) x21, sl st to join at top of ch2 (88, ch2 counts as 1st st)
Info :
THE COASTER WILL BE SLIGHTLY WAVY AT THIS STAGE BUT THE LAST ROW WILL FLATTEN IT BACK OUT.
Row 7 :
ch1, htr into next 87sts, sl st to join at top of ch1 (88, ch1 counts as 1st st)
Info :
F/O leaving a 10cm end.
Info :
Secure ends with a couple of small sts before weaving through back of nearest htr sts and cutting flush to finish.
— Abbreviations (US terms) :
Infos :
ch – chain. hdc – half double crochet. dc – double crochet. inc – 2 stitches into next stitch. hdcinc – 2 half double crochets into next stitch. dcinc – 2 double crochets into next stitch. dec – decrease over next two stitches in front loops only. hdcdec – half double crochet decreased over next two stitches in front loops only. 3dec – decrease over next three stitches in front loops only. sl st – slip stitch. f/o – fasten off by slip stitch in next stitch. FP(hdc) – work (half double crochet) round front post of stitch inserting hook from in front of the stitch from right to left.
— Contrast Insert (US Terms) :
Row 1 :
leaving a 10cm end, ch8, sl st to join (8)
Row 2 :
ch2, dc x21 into centre circle, sl st to join at top of ch2 (22, ch2 counts as 1st st)
Row 3 :
ch2, dcinc into base of same st, dcinc x21, sl st to join at top of ch2 (44, ch2 counts as 1st st)
Info :
F/O leaving a 10cm end.
Info :
Secure ends with a couple of small sts before weaving through back of nearest dc sts and cutting flush to finish.
— Vinyl (US Terms) :
Row 4 :
leaving a 10cm end, FP(hdc) into top of any of the dc sts in previous row, FP(hdc) into next 43 sts, sl st to join at top of 1st FP(hdc) (44)
Row 5 :
ch2, dcinc into next st, (dc into next st, dcinc) x21, sl st to join at top of ch2 (66, ch2 counts as 1st st)
Row 6 :
ch2, dc into next st, dcinc, (dc into next 2sts, dcinc) x21, sl st to join at top of ch2 (88, ch2 counts as 1st st)
Info :
THE COASTER WILL BE SLIGHTLY WAVY AT THIS STAGE BUT THE LAST ROW WILL FLATTEN IT BACK OUT.
Row 7 :
ch1, hdc into next 87sts, sl st to join at top of ch1 (88, ch1 counts as 1st st)
Info :
F/O leaving a 10cm end.
Info :
Secure ends with a couple of small sts before weaving through back of nearest hdc sts and cutting flush to finish.
Assembly Instructions
- Work contrast insert rows 1-3 and fasten off leaving a 10cm tail, then secure ends with a couple of small stitches before weaving through back of nearest tr/dc stitches and trimming flush.
- Join the black vinyl rows using front post half treble/half double crochet as instructed to create the textured vinyl effect, ensuring the first FP stitch is joined to form 44 sts.
- After completing the final row, fasten off leaving a 10cm tail and secure ends by weaving the tails through the back of the nearest htr/hdc stitches and trimming flush for a neat finish.
- Mark the last stitch of each round with a stitch marker and move it each round to keep rounds continuous and aligned during assembly.
Important Notes
- 💡Unless stated, work in continuous rounds and mark the last stitch of each round with a stitch marker before proceeding.
- 💡Leave a 10cm end at starts and finishes to allow secure weaving and neat finishing of tails.
- 💡The coaster may appear slightly wavy after certain rounds; the final row will flatten the piece back out.
Make a set of these vinyl record coasters for a retro and playful touch to your home decor. Theyre quick to make and perfect for gift sets or a fun craft night with friends. Add different contrast colours for a striking collection of records. 🧶🏡