🧢 Beautiful ✨ Detailed πŸ’ Adorable

Turtle Memory Game Amigurumi Pattern

Turtle Memory Game Amigurumi Pattern
4.3β˜… Rating
5-7 Hours Time Needed
2.5K Made This
βœ‚οΈ

Intermediate Level

Ideal for those with basic crochet experience, featuring slightly more advanced stitches and techniques to expand your skills.

⏱️

Weekend Treat

Takes 5-7 hours, making it an enjoyable project to finish over a couple of days.

🧸

Cute Companion

An adorable friend to cherish, handcrafted with love to bring comfort and joy for years to come.

About This Turtle Memory Game Amigurumi Pattern

This pattern creates a plush turtle memory game: one large turtle and multiple baby turtles for matching play. It uses soft Himalaya Dolphin Baby velvet yarn for a plush finish and tactile appeal. The instructions include every round, color change notes, and simple assembly tips to help you finish beautifully.

Turtle Memory Game Amigurumi Pattern crochet pattern - detailed view of completed project

You will learn to crochet the legs, head, shell/body, and tiny baby turtles step by step. Clear photos and helpful notes make assembly and finishing enjoyable.

Why You'll Love This Turtle Memory Game Amigurumi Pattern

I absolutely love this pattern because it combines tactile velvet yarn with sweet, toy-sized details that kids adore. I enjoy how the set creates a playful memory game that is both educational and cuddly. The construction is clever β€” joining the head, legs and body in one round makes assembly neat and fast. I also love offering a pattern that produces multiple small toys from the same yarn, so you get a satisfying, gift-ready set.

Turtle Memory Game Amigurumi Pattern step 1 - construction progress Turtle Memory Game Amigurumi Pattern step 2 - assembly progress Turtle Memory Game Amigurumi Pattern step 3 - details and accessories Turtle Memory Game Amigurumi Pattern step 4 - final assembly and finishing

Switch Things Up

I love changing the tummy colors on the baby turtles to make a rainbow matching set; try pastel shades for a baby-friendly look.

You can make a mini keychain version by using thinner yarn and a smaller hook to create tiny turtles perfect for bag charms.

I often switch the main shell color to a soft pastel for a nursery-themed toy; the contrast with beige still looks cute and cohesive.

Try embroidering different facial expressions to give each baby turtle its own personality instead of using the same mouth shape for all.

To make a sturdier toy for toddlers, I sometimes use safety eyes with backing washers and sew around them with matching yarn for extra security.

I sometimes add a small rattle inside one baby turtle to make a discovery toy within the memory game set.

For a more realistic look, use variegated yarn for the shell; it adds natural color variations and texture without extra work.

I like to replace the elastic ring used for the initial shell with a cardboard ring to experiment with a firmer starting point for different shrug shapes.

If I want a washable toy, I choose sewn-on felt eyes instead of glued beads and secure everything with additional stitches and fabric glue on seams.

To create a themed set, I swap the tummy colors for seasonal palettesβ€”autumn tones, winter pastels, or holiday colorsβ€”to match gifts or decorations.

Common Mistakes & How to Fix Them

βœ— Skipping stitch markers during the shell joining round can make it hard to align head and legs correctly; place markers to mark leg and head positions before joining and count carefully. βœ— Forgetting to stuff gradually causes lumps or misshapen parts; stuff small amounts at a time and shape as you go to create smooth rounded forms. βœ— Not changing color at the specified round will distort the shell appearance; follow the color change instruction exactly at the end of round 8 of the shell/body to get the correct front/back loop effect. βœ— Cutting the yarn too short when closing the shell leaves no tail for sewing; always leave a long end when you cut so you can tighten and sew the hole securely. βœ— Pulling decreases too tight while crocheting eyes or mouth placements can distort the face; keep moderate tension and place eyes before final stuffing so you can adjust placement.

Turtle Memory Game Amigurumi Pattern

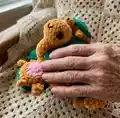
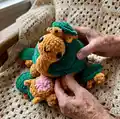
Make a charming turtle memory game set with this detailed crochet pattern. You will create a big plush turtle and 9-12 tiny baby turtles using soft velvet yarn for a tactile, child-friendly toy. The pattern includes step-by-step rounds, helpful photos, and clear assembly notes so you can finish a delightful handmade gift. Perfect for gifting or playroom fun, this pattern guides you from materials to final finishing touches.

Intermediate 5-7 Hours

Materials Needed for Turtle Memory Game Amigurumi Pattern

β€” Main Fabric

  • 01
    HIMALAYA DOLPHIN BABY velvet yarn, 131 yards / 3.5 oz (120 m / 100 g) - Beige (main color for body/head/legs) - 1 skein
  • 02
    HIMALAYA DOLPHIN BABY velvet yarn, 131 yards / 3.5 oz (120 m / 100 g) - Green (main color for shell and baby turtle shells) - 1 skein
  • 03
    Small amounts of colored yarn for baby turtle tummies (various colors) - a few grams each
  • 04
    Black yarn or spare black embroidery yarn for mouth and small details - a few grams

β€” Tools Required

  • 01
    Crochet hook size 7 (4.5 mm)
  • 02
    Polyester stuffing
  • 03
    Black beads for eyes 1/3 inch (8-10 mm) - 2 pcs for main turtle, small beads for babies if desired
  • 04
    Transparent glue
  • 05
    Sewing needle
  • 06
    A piece of black yarn for facial details
  • 07
    Some colored yarn for baby turtle tummies
  • 08
    Stitch markers
  • 09
    Elastic band for hair - diameter 2" (5 cm) - used as elastic form when crocheting the shell ring
  • 10
    Scissors
  • 11
    Yarn needle for sewing and finishing

Progress Tracker

0% Complete

β€” Materials :

Info :

The main yarn: HIMALAYA DOLPHIN BABY 131 yards / 3.5oz (120 m/100 g), beige and green color. Stuffing. Hook 7 (4,5 mm). Eyes: Black beads for eyes 1/3 inch (8-10 mm) - 2 pcs. Transparent glue. A sewing needle. A piece of any black yarn, some colored yarn for baby turtle tummies. Stitch markers. Elastic band for hair - diameter 2" (5 cm). The size of the toy is 12 x 5 inches (30 x 12 cm), baby turtles - 4 x 2 1/2 inches (9 x 4 cm). Attention! You will need 1 skein of beige and 1 skein of green yarn to crochet a big turtle and 9-12 baby turtles.

β€” Abbreviation :

Infos :

MR - magic ring (you can make 2 ch and crochet 6 sc in the second chain from the hook). sc - single crochet. inc - increase. dec - decrease. ch - chain. sl st - slip stitch. dc - double crochet. tc - treble crochet. (...) * N - repeat N times.

β€” Legs :

Round 1 :

5 sc in MR (5)

Round 2 :

5 inc (10)

Round 3-5 :

10 sc (10)

Round 6 :

(3 sc, dec) x 2 (8)

Info :

Stuff the detail.

Info :

Fold the detail in half and crochet 3sc, grasping the stitches of the both edges.

Info :

Fasten off and cut the yarn, hide the end.

Info :

Crochet the rest of the legs in the same way.

β€” Head :

Round 1 :

6 sc in MR (6)

Round 2 :

6 inc (12)

Round 3 :

(1 sc, inc) x 6 (18)

Round 4 :

(inc, 2 sc) x 6 (24)

Round 5-8 :

24 sc (24)

Round 9 :

12 dec (12)

Round 10 :

(4 sc, dec) x 2 (10)

Round 11-17 :

10 sc (10)

Info :

Stuff the detail.

Info :

Fold the detail in half and crochet 4 sc, grasping the stitches of the both edges.

Info :

Fasten off and cut the yarn, hide the end.

β€” Shell / Body :

Round 1 :

24 sc in elastic (picture 1-2)

Round 2 :

(3 sc, inc) x 6 (30)

Round 3 :

(inc, 4 sc) x 6 (36)

Round 4 :

(5 sc, inc) x 6 (42)

Round 5 :

(inc, 6 sc) x 6 (48)

Round 6 :

(7 sc, inc) x 6 (54)

Round 7 :

(inc, 8 sc) x 6 (60) In the next round crochet together the stitches of the body, legs and head (pic.4).

Round 8 :

7 sc, 3 sc with leg, 10sc, 3 sc with leg, 5 sc, 4 sc with head, 5 sc, 3 sc with leg, 10 sc, 3 sc with leg, 7 sc, crochet the tail: 4 ch, sl st in 2nd ch from hook, 2 sc, sl st

Info :

Change the color to green.

Round 9 :

60 sc (60)

Round 10 :

crochet for the front loops only (pic. 5): (9 sc, inc) x 6 (66), crochet for the back loops only (pic. 6): 60sc (60)

Round 11-15 :

60 sc (60)

Round 16 :

(dec, 8 sc) x 6 (54)

Round 17 :

(7 sc, dec) x 6 (48)

Round 18 :

(dec, 6 sc) x 6 (42)

Round 19 :

(5 sc, dec) x 6 (36)

Round 20 :

(dec, 4 sc) x 6 (30)

Round 21 :

(3 sc, dec) x 6 (24)

Round 22 :

(dec, 2 sc) x 6 (18)

Round 23 :

(1 sc, dec) x 6 (12)

Round 24 :

6 dec

Info :

Cut the yarn, tighten the hole. Fasten the yarn, hide the end inside. Sew the neck to the shell. Glue or sew eyes. You can add black felt circles. Embroider eyelashes and mouth.

β€” Baby Turtle :

Round 1 :

6 sc in KA (6)

Round 2 :

6 inc (12)

Round 3 :

(1 sc, inc) x 6 (18)

Round 4 :

(inc, 2 sc) x 6 (24)

Round 5 :

24 sc for the front loops only (pic. 2)

Info :

Change the color to beige.

Round 6 :

crochet the body, legs and head for the back loops only of the 4th round (pic. 4-6): 2 sc, 1st leg: (1 sc, 4 ch, 1 sc) in one loop, 5 sc, 2nd leg: (1 sc, 4 ch, 1 sc) in one loop, 2 sc, head: (1 sc, 2 ch, 2 tc) in one loop, (1 tc, 1 dc, sl st) in one loop, 2 sc, 3rd leg: (1 sc, 4 ch, 1 sc) in one loop, 5 sc, 4th leg: (1 sc, 4 ch, 1 sc) in one loop, 2 sc

Round 7 :

(1 sc, dec) x 7, 1 sc, sl st (16)

Info :

Do not crochet the legs and head, leave them between the stitches of the decrease (pic. 7).

Info :

Change the color to blue (or any other).

Round 8 :

crochet for the back loops only 8 dec (8)

Info :

Stuff the body. Cut the yarn, leaving a long end enough for sewing the hole. Tighten the hole (pic. 8-9).

Info :

You can glue on the eyes.

Info :

Baby is ready! Crochet 9-12 of these babies with tummies of different colors.

β€” Assembly :

Info :

Cut the yarn, tighten the hole. Fasten the yarn, hide the end inside. Sew the neck to the shell. Glue or sew eyes. You can add black felt circles. Embroider eyelashes and mouth.

Assembly Instructions

  • Sew the neck to the shell by aligning the neck opening with the hole in the shell and whipstitching securely all around so the head sits centered.
  • Insert and sew the legs into the positions indicated in round 8 of the shell, attaching each leg through the stitches used when joining the body, and secure with tight, even stitches.
  • Fasten eyes onto the head by either gluing beads with transparent glue or sewing them in place; add black felt circles behind beads if desired to increase size.
  • Cut the yarn and tighten the hole on the shell body; fasten the yarn and hide the end inside the shell to create a neat finish.
  • Stuff the baby turtles and close their holes by leaving a long tail when cutting the yarn and using it to sew the opening shut securely.
  • Embroider eyelashes and mouth with black yarn, and hide all ends inside the toy for a tidy finish.

Important Notes

  • πŸ’‘Use stitch markers to keep track of rounds and to mark the positions for legs and head before joining in round 8 of the shell.
  • πŸ’‘Stuff parts firmly but gradually; overstuffing can distort shape and under-stuffing leaves floppy parts.
  • πŸ’‘When changing colors for the shell and baby tummies, follow the specified rounds exactly to keep stitch counts and appearance correct.
  • πŸ’‘Leave long yarn tails when cutting for closures so you have enough length to sew holes and hide ends neatly.

This Turtle Memory Game is a joyful and tactile crochet project that makes a perfect handmade gift for little ones! 🐒 Create a large plush turtle and a set of tiny baby turtles with colorful tummies for matching play. 🧢 Follow the step-by-step rounds and assembly tips to finish a professional-looking set. ✨

You ask,

we answer.

FAQs

What size will the finished piece be?

The finished main turtle measures approximately 12 x 5 inches (30 x 12 cm), and each baby turtle is approximately 4 x 2.5 inches (9 x 4 cm) when using the recommended yarn and hook size.

Can I use different yarn weights for this pattern?

Yes, you can use different yarn weights, but the finished sizes will change. If you choose a heavier yarn, use a larger hook; if you choose thinner yarn, a smaller hook will be needed. Adjust eye sizes and stuffing accordingly.

Do I need prior crochet experience for this pattern?

This pattern is rated intermediate because it uses joined rounds, front/back loop work, and assembling multiple pieces; basic knowledge of single crochet, increases, decreases, and magic ring is recommended.

How long does this project typically take to complete?

Most crocheters complete the set in 5-7 hours, though time may vary depending on skill level, number of baby turtles you make, and how quickly you assemble and finish pieces.