🧢 Beautiful ✨ Detailed πŸ’ Adorable

Turtle Amigurumi Pattern

Turtle Amigurumi Pattern
4.3β˜… Rating
5-7 Hours Time Needed
1.7K Made This
βœ‚οΈ

Intermediate Level

Ideal for those with basic crochet experience, featuring slightly more advanced stitches and techniques to expand your skills.

⏱️

Weekend Treat

Takes 5-7 hours, making it an enjoyable project to finish over a couple of days.

🧸

Cute Companion

An adorable friend to cherish, handcrafted with love to bring comfort and joy for years to come.

About This Turtle Amigurumi Pattern

This pattern teaches you how to crochet a sweet turtle amigurumi with a removable-looking shell and cute detailing. You will work primarily in continuous rounds and add embroidered facial details and crochet spots. The instructions include photos and step-by-step rounds to make assembly straightforward and enjoyable.

Turtle Amigurumi Pattern crochet pattern - detailed view of completed project

Perfect for intermediate crocheters, it includes materials, abbreviations, and stitch-by-stitch rounds. The finished toy is roughly 20 cm tall using the recommended yarn and hooks.

Why You'll Love This Turtle Amigurumi Pattern

I absolutely love this pattern because it brings a playful, characterful turtle to life with simple shaping and charming details. I enjoy how the shell construction combines texture (bobble stitches) with a neat lower shell to create a realistic look. I love that the pattern uses small motifs (spots) and embroidery to add personality without complicated techniques. Making this turtle is satisfying β€” the pieces come together quickly and create a sturdy, huggable toy that I am proud to gift or display.

Turtle Amigurumi Pattern step 1 - construction progress Turtle Amigurumi Pattern step 2 - assembly progress Turtle Amigurumi Pattern step 3 - details and accessories Turtle Amigurumi Pattern step 4 - final assembly and finishing

Switch Things Up

I love how easy it is to customize this turtle pattern by changing colors; try pastel greens for a softer baby-friendly look or bright greens for a playful character.

If you want a mini version, switch to lace or fingering weight yarn and a smaller hook to create keychain-sized turtles.

For a chunkier, more cuddly turtle, use a bulky yarn and a larger hook β€” the shell texture becomes more pronounced and the toy becomes very huggable.

I often add little accessories like a tiny crocheted scarf or a miniature hat to personalize each turtle for gifts.

Embellish the shell with embroidered patterns or add tiny beads for a sparkling effect, but make sure to secure beads well if the toy is for a child.

Try alternative eyes: embroider the eyes for a fully soft toy or use safety eyes for a glossy, characterful finish.

To vary personality, move the eye placement slightly up or down or change eyebrow angle to give a happy, sleepy, or surprised expression.

I sometimes add wire to the legs to make them posable; if you do, cover the wire ends and secure them safely inside stuffing to avoid sharp edges.

Make a family of turtles by changing yarn weights and color palettes β€” they make great matching gifts or nursery decor.

If you enjoy sewing, try appliqued felt shapes on the shell for a mixed-media look; felt and embroidery together give a charming handcrafted finish.

Common Mistakes & How to Fix Them

βœ— Placing safety eyes too early or in the wrong rounds can make repositioning difficult; place and pin the eyes first and count rounds carefully before securing them. βœ— Overstuffing the head or shell leads to distortion of shape and stitches; stuff gradually and check shape frequently to avoid lumps or misshaping. βœ— Skipping stitch counts after increases and decreases results in incorrect shaping; count your stitches every few rounds, especially after shaping rounds. βœ— Crocheting with inconsistent tension can change the finished size and fit of parts; maintain even tension and use the suggested hook sizes for best results.

Turtle Amigurumi Pattern

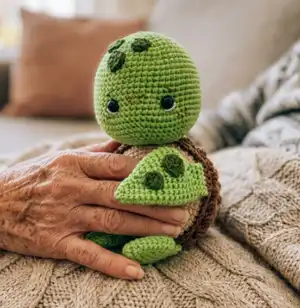
Create an adorable hand-crocheted turtle with this detailed intermediate amigurumi pattern. You will find complete round-by-round instructions, clear assembly steps, and helpful tips to guide you. Perfect for gifting or adding a sweet handmade friend to your collection. Follow the photos and stitch notes to achieve a neat, professional finish.

Intermediate 5-7 Hours

Materials Needed for Turtle Amigurumi Pattern

β€” Main Fabric

  • 01
    YarnArt Jeans (160 m / 50 g) color 87 (beige) - lower part of shell, approximately 50 g
  • 02
    YarnArt Jeans (160 m / 50 g) color 69 (green) - head and legs, approximately 50 g
  • 03
    YarnArt Jeans (160 m / 50 g) color 40 (brown) - upper part of shell, approximately 30 g
  • 04
    YarnArt Jeans (160 m / 50 g) color 82 (dark green) - spots, small amounts for 7 spots
  • 05
    YarnArt Jeans (160 m / 50 g) color 03 (cream) - small amount for eye whites and details

β€” Tools Required

  • 01
    Crochet hook 2 mm (US B)
  • 02
    Crochet hook 3 mm (US D)
  • 03
    Soft toy filling (polyester stuffing)
  • 04
    8-9 mm safety eyes (2 pieces)
  • 05
    Needle for sewing and embroidery
  • 06
    Stitch marker
  • 07
    Scissors
  • 08
    Pins for assembly
  • 09
    Brown felt pen (for freckles)

Progress Tracker

0% Complete

β€” Head :

Round 1 :

6 sc in mr (6)

Round 2 :

(inc) x 6 (12)

Round 3 :

(1 sc, inc) x 6 (18)

Round 4 :

(2 sc, inc) x 6 (24)

Round 5 :

(3 sc, inc) x 6 (30)

Round 6 :

(4 sc, inc) x 6 (36)

Round 7 :

(5 sc, inc) x 6 (42)

Round 8 :

(6 sc, inc) x 6 (48)

Round 9 :

(7 sc, inc) x 6 (54)

Round 10-11 :

54 sc (54) 2 rounds

Round 12 :

(8 sc, inc) x 6 (60)

Round 13-20 :

60 sc (60) 8 rounds

Round 21 :

10 sc, (inc) x 3, 7 sc, (inc) x 3, 37 sc (66)

Infos :

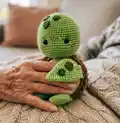
Place the eyes between rnds 19/20, with a distance of 8 sts between the eyes. Insert the first eye over the second increase of rnd 21, insert the second eye over the fifth increase of rnd 21. (See pics 1-3)

Round 22-23 :

66 sc (66) 2 rounds

Round 24 :

(9 sc, dec) x 6 (60)

Round 25 :

(8 sc, dec) x 6 (54)

Round 26 :

(7 sc, dec) x 6 (48)

Round 27 :

(6 sc, dec) x 6 (42)

Round 28 :

(5 sc, dec) x 6 (36)

Round 29 :

(4 sc, dec) x 6 (30)

Round 30 :

(3 sc, dec) x 6 (24)

Round 31 :

(2 sc, dec) x 6 (18)

Infos :

Start to stuff the head. Stuff the head from rnd 29 to rnd 31 not tightly.

Round 32 :

(1 sc, dec) x 6 (12)

Info :

Cut the thread leaving a long tail. After all the head details are finished, close the opening on the head using this thread tail by working (dec) x 6 (6), then pull closed through front loops and weave in the tail. (See pics 4-5)

β€” Big spots :

Round 1 :

7 HDC in mr (7)

Info :

Join the beginning and the end of rnd with sl st. Cut the thread leaving a long tail. Make 3 big spots in dark green color. (Pic. 6)

β€” Small spots :

Round 1 :

7 sc in mr (7)

Info :

Join the beginning and the end of rnd with sl st. Cut the thread leaving a long tail. Make 4 small spots in dark green color. (Pic. 7)

β€” Head details :

Info :

The beginning and the end of all threads are located in the head opening. Tie all thread tails in knots and cut the ends after all the head details are made.

Info :

Make shaping for the eyes using the thread of the green color YarnArt Jeans. Using a needle, insert the thread into the hole on the head, bring it out at point 1, insert it at point 2 and bring it out at point 3, insert it at point 4 and bring it out into the hole on the head. Tighten the ends well and fix them with a knot. (Pic. 8)

Info :

Embroider the eye whites with the thread of cream color. (Pics 9-11)

Info :

Embroider the eyebrows above the eyes with brown thread YarnArt Jeans. Divide it into 4 thin strands and use 2 strands. Draw freckles between the eyes and on the cheeks using a brown felt pen. (Pic. 12)

Info :

Sew spots on the head: 1) Sew a large spot between rnds 8 and 12. 2) Sew a small spot between rnds 5 and 8. 3) Sew a small spot between rnds 6 and 9. Count rnds from the top of the head. (Pic. 13)

Info :

Close the opening on the head using the thread tail as follow: (dec) x 6 (6). Pull the opening closed pulling a needle through front loops of stitches. Weave in the thread tail. (Pics 14-15)

β€” Lower legs (make 2, use a 2 mm crochet hook, in green color, don\'t stuff) :

Round 1 :

6 sc in mr (6)

Round 2 :

(1 sc, inc) x 3 (9)

Round 3 :

9 sc (9)

Round 4 :

(2 sc, inc) x 3 (12)

Round 5 :

(3 sc, inc) x 3 (15)

Round 6 :

15 sc (15)

Round 7 :

(4 sc, inc) x 3 (18)

Round 8-10 :

18 sc (18) 3 rounds

Round 11 :

6 sc, (dec) x 3, 6 sc (15)

Round 12 :

4 sc, (dec) x 3, 5 sc (12)

Round 13-14 :

12 sc (12) 2 rounds

Round 15 :

Fold the leg in half and work 6 sc through two layers. Cut the thread. (Pic. 16)

β€” Upper legs (make 2, use a 2 mm crochet hook, in green color, don\'t stuff) :

Note :

Please note! Before you start crocheting the upper legs, you need to crochet the spots.

Round 1 :

6 sc in mr (6)

Round 2 :

(1 sc, inc) x 3 (9)

Round 3 :

9 sc (9)

Round 4 :

(2 sc, inc) x 3 (12)

Round 5 :

12 sc (12)

Round 6 :

3 sc, (1 sc, inc) x 3, 3 sc (15)

Round 7 :

3 sc, (2 sc, inc) x 3, 3 sc (18)

Round 8 :

3 sc, (3 sc, inc) x 3, 3 sc (21)

Round 9-10 :

21 sc (21) 2 rounds

Round 11 :

3 sc, (4 sc, inc) x 3, 3 sc (24)

Round 12-14 :

24 sc (24) 3 rounds

Round 15 :

6 sc, (dec) x 6, 6 sc (18)

Round 16 :

6 sc, (dec) x 3, 6 sc (15)

Info :

Sew the spots on the legs: sew a large spot on top and a smaller spot under it. Pay attention to the spot placement on both legs. (Pic. 17)

Round 17 :

(3 sc, dec) x 3 (12)

Round 18-19 :

12 sc (12) 2 rounds

Round 20 :

Sc, fold the leg in half and work 6 sc through two layers. Cut the thread. (Pic. 18)
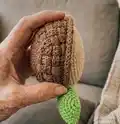
β€” Shell :

Note :

Start crocheting from the upper part of the shell (in brown color) using a 3 mm crochet hook, then crochet the lower part (in beige color). The legs are attached when crocheting the upper part of the shell. Please note! Before you start crocheting the shell, you need to crochet the legs.

Round 1 :

6 sc in mr (6)

Round 2 :

(bo, sc) x 6 (12)

Round 3 :

(1 sc, inc) x 6 (18)

Round 4 :

(bo, sc, in next st: bo, sc) x 6 (24)

Round 5 :

(3 sc, inc) x 6 (30)

Round 6 :

(bo, sc, bo, sc, in next st: bo, sc) x 6 (36)

Round 7 :

(5 sc, inc) x 6 (42)

Round 8 :

(bo, sc, bo, sc, bo, sc, in next st: bo, sc) x 6 (48)

Round 9 :

(7 sc, inc) x 6 (54)

Round 10 :

(bo, sc) x 23, ch7, skip 7 st, beginning from the 8th st crochet 1 sc (54)

Info :

Change to beige color. Don\'t cut the brown thread, leave it in front of the work. Next crochet in beige color.

Round 11 :

BLO 54 sc (54)

Round 12-13 :

54 sc (54) 2 rounds

Info :

Return to the brown thread. We are going to join the legs. Use a crochet hook 2 mm. Ch1, 3 sc, take the upper leg and crochet through both pieces layers 6 sc. Pay attention to the position of the leg. (Pic. 25)

Info :

Next crochet 6 sc, take the lower leg and crochet through both pieces layers 6 sc, 3 sc, take the second lower leg and crochet 6 sc through both pieces layers. Pay attention to the position of the lower legs. (Pic. 27)

Info :

Then crochet 6 sc, take the upper leg and crochet through both pieces layers 6 sc. Pay attention to the position of the second upper leg. Then 3 sc, sl st. Cut the thread leaving a long tail. (Pics 28-29)

Round 14 :

(7 sc, dec) x 6 (48)

Round 15 :

(6 sc, dec) x 6 (42)

Round 16 :

(5 sc, dec) x 6 (36)

Round 17 :

(4 sc, dec) x 6 (30)

Info :

Stuff the shell.

Round 18 :

(3 sc, dec) x 6 (24)

Round 19 :

(2 sc, dec) x 6 (18)

Round 20 :

(1 sc, dec) x 6 (12)

Round 21 :

(dec) x 6 (6)

Info :

Cut the thread leaving a long tail. Using this thread tail pull the opening closed pulling a needle through front loops of stitches. Weave in the thread tail. Add some stuffing through the hole on top, giving the shell a beautiful shape. (Pic. 30)

β€” Pattern for the upper part of the shell (diagram) :

Info :

Pattern diagram shows how rounds 1-6 are worked (mr, sc and bo stitches). Refer to diagram to understand placement and direction of bobble (bo) stitches and sc increases for upper shell shaping.

β€” Toy assembly :

Info :

Sew the head to the shell having fixed it with pins. (Pics 31-33)

Info :

Congratulations! Your Turtle is now complete. Weave in remaining ends and adjust spots and embroidered details as needed.

Assembly Instructions

  • Pin the head to the top of the shell to check placement, then sew the head to the shell using a yarn needle and the long tail left from closing the head, securing evenly around the neck opening.
  • Attach the legs while crocheting the upper shell: when instructed, crochet through both layers to join upper and lower legs to the shell, making sure leg positions match the photos and pattern notes.
  • Sew the crochet spots to the head and shell following the recommended round locations: a large spot between rnds 8-12 on the head and smaller spots between specified round ranges for symmetry.
  • Embroider eye whites with cream thread and eyebrows with brown thread; draw freckles with a brown felt pen between the eyes and on the cheeks for added personality.

Important Notes

  • πŸ’‘The toy pieces are crocheted in continuous non-joining rounds unless otherwise stated; use a stitch marker to mark the beginning of each round.
  • πŸ’‘The finished toy measures about 20 cm (7.87 inches) when using the recommended yarn and hook sizes, but size may vary with tension and yarn choice.
  • πŸ’‘Stuff firmly but gradually for best shaping; overstuffing can distort the toy, and under-stuffing can make it floppy.

This adorable Turtle amigurumi is designed to become a cherished handmade friend you can gift or keep. It combines textured shell stitches with sweet embroidered details for a lovable finish. Enjoy every stitch and the joy of creating something special by hand! 🧢🐒

You ask,

we answer.

FAQs

What size will the finished piece be?

The finished amigurumi measures approximately 20 cm tall when using the recommended YarnArt Jeans yarn and hook sizes.

Can I use different yarn weights for this pattern?

Yes, you can use different yarn weights, but this will change the final size. Adjust hook size accordingly and remember that a larger hook will produce a bigger toy with looser stitches.

Do I need prior crochet experience for this pattern?

This pattern is rated intermediate; you should be comfortable with single crochet, increases, decreases, bobble stitches and working in continuous rounds.

How long does this project typically take to complete?

Most crocheters complete this project in 5-7 hours, though time may vary based on experience level and the speed at which you work.