๐Ÿงถ Beautiful โœจ Detailed ๐Ÿ’ Adorable

Tree of Life Leather Bag Pattern

Tree of Life Leather Bag Pattern
4.5โ˜… Rating
5-7 Hours Time Needed
4.2K Made This
โœ‚๏ธ

Intermediate Level

Ideal for those with basic crochet experience, featuring slightly more advanced stitches and techniques to expand your skills.

โฑ๏ธ

Weekend Treat

Takes 5-7 hours, making it an enjoyable project to finish over a couple of days.

โœจ

Stylish Touch

An elegant detail to elevate any look, combining traditional techniques with contemporary design sensibilities.

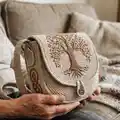
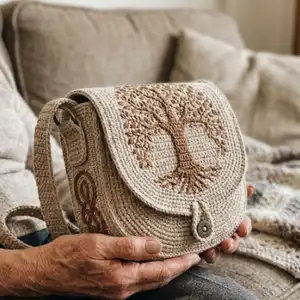
About This Tree of Life Leather Bag Pattern

This printable pattern guides you through creating a small Tree of Life leather bag with laser-engraved detail. The design includes the flap, body, strap tabs, and placement for hardware and a LOXX closure. You will receive clear printing instructions, a materials list, and diagrams to cut and stitch your bag.

Tree of Life Leather Bag Pattern crochet pattern - detailed view of completed project

The pattern is optimized for 6 oz (2.4 mm) vegetable tanned leather and includes hardware suggestions and hole punch placements. A companion instructional video is available to walk you through the process step by step.

Why You'll Love This Tree of Life Leather Bag Pattern

I absolutely love this pattern because the Tree of Life motif gives the bag a timeless, elegant look that works with many styles. I enjoy how compact and functional the design is โ€” it holds essentials while staying light and wearable. The pattern balances laser-engraving detail with traditional hand-stitching, which makes the crafting process both satisfying and creative. I also love that the layout and templates are ready to print at actual size so you can start cutting and stitching right away.

Tree of Life Leather Bag Pattern step 1 - construction progress Tree of Life Leather Bag Pattern step 2 - assembly progress Tree of Life Leather Bag Pattern step 3 - details and accessories Tree of Life Leather Bag Pattern step 4 - final assembly and finishing

Switch Things Up

I often change the look of this bag by staining or dyeing the leather in different tones; a darker saddle brown makes the engraved tree pop beautifully.

I like to substitute the LOXX closure with a magnetic snap or different vintage button to change the front hardware aesthetic.

I sometimes scale the template up or down in 10% increments to create mini or larger versions; just remember to re-check hole spacing and hardware fit.

I add decorative stitching in contrasting thread colors for a bold graphic look โ€” try cream or red against natural leather.

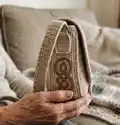
I also experiment with different strap styles: a slim adjustable strap, chain and leather combo, or a short handle to turn it into a wristlet.

For a more rustic finish I edge-bevel and hand-burnish with beeswax for a softer, vintage feel.

I sometimes replace the printed tree with embossed tooling or hand-tooled decoration if I want a fully handcrafted motif.

If I want extra structure I glue and stitch a thin fabric or veg-tan lining inside to protect the leather and provide pockets.

I enjoy mixing hardware finishes โ€” antiqued brass, gunmetal, or bright nickel each give the bag a different personality.

When gifting, I personalize by engraving initials or a small symbol on the inside flap for a thoughtful custom touch.

Common Mistakes & How to Fix Them

โœ— Printing at anything other than 100% or Actual Size will distort the template and cause hardware holes to misalign; always check the calibration page and set printer scaling to 100% before cutting. โœ— Using leather that is too thin or too thick for the pattern will affect the bag shape and sewing; use 6 oz (2.4 mm) vegetable tanned leather as recommended for correct structure and fit. โœ— Failing to punch holes in exactly the correct positions can cause stitching and hardware misalignment; mark and verify hole placement against the printed template before punching. โœ— Skipping edge finishing leaves raw edges that look unfinished and can wear faster; apply edge dye and burnish or bevel edges before final assembly for a professional look.

Tree of Life Leather Bag Pattern

Make a beautiful Tree of Life leather crossbody bag using this printable pattern and clear instructions. You will learn which materials and tools to prepare, how to print and cut the template accurately, and how to assemble the small bag from vegetable-tanned leather. This pattern is perfect for makers who want a stylish, hand-crafted accessory with a laser-engraved motif.

Intermediate 5-7 Hours

Materials Needed for Tree of Life Leather Bag Pattern

โ€” Main Fabric

  • 01
    6 oz (2.4 mm) vegetable tanned leather (enough to make up to 4 bags from 11 sqft / 1 sqm)
  • 02
    1 mm waxed thread for hand stitching
  • 03
    Edge dye for finishing leather edges
  • 04
    Leather glue for bonding layers before stitching

โ€” Tools Required

  • 01
    Cutter (sharp rotary cutter or utility knife)
  • 02
    Leather needles for saddle stitching
  • 03
    1/16" (1.5 mm) hole punch for stitching holes
  • 04
    10 mm hole punch (for the LOXX closing system)
  • 05
    Cutting mat
  • 06
    Mallet for hole punching and setting hardware
  • 07
    Ruler and compass or template for marking
  • 08
    Awl for marking and opening holes
  • 09
    Edge beveler and burnisher (optional)

Progress Tracker

0% Complete

โ€” Introduction :

Info :

PDF pattern and the link to an instructional video that will walk you through the process of making The Tree of Life Bag. This cute little bag is cut and engraved with Creality Falcon 2 22W Laser. Sign up on our WEBSITE (vasileandpavel.com) for special offers. Enjoy!

โ€” Instructional Video :

Info :

CLICK HERE FOR THE VIDEO TUTORIAL. A companion instructional video is provided to walk you step-by-step through cutting, engraving, hole punching and assembly.

โ€” Printing Instructions :

Info :

Print the pattern on A4, legal or letter size paper, setting the printer on Actual size (100%). Check the calibration page to make sure the measurements are correct. CLICK HERE for the VIDEO TUTORIAL.

โ€” Size :

Info :

TALL: 5 1/2" (14 cm). WIDE: 6 3/4" (17 cm). DEEP: 1 3/4" (4.5 cm).

โ€” Materials :

Infos :

6 oz (2.4 mm) vegetable tanned leather (you can make 4 from 11 sqft / 1 sqm). 1 mm waxed thread. Edge dye. Glue.

โ€” Hardware :

Infos :

1 x LOXX closing system. 1 x 1" (25 mm) buckle. 2 x 3/4" (20 mm) D rings.

โ€” Tools :

Infos :

Cutter. Needles. 1/16" (1.5 mm) hole punch. 10 mm hole punch (for the LOXX closing system). Cutting mat. Mallet.

โ€” Template & Printing Notes :

Info :

Use the provided printable template pages and align dashed trim marks when taping pages together. Ensure the calibration square measures correctly before cutting leather. The template includes hole positions (represented by circles) for stitching and for hardware placement; transfer these points accurately to the leather.

โ€” Cutting & Engraving :

Info :

If you are engraving the Tree of Life motif with a laser, follow your laser manufacturer's settings for 6 oz vegetable tanned leather; test on a scrap piece. Cut all pattern pieces precisely and bevel corners as indicated by the template. Mark and punch stitching holes using the 1/16" punch on the guided spacing from the template.

โ€” Stitching & Assembly Prep :

Info :

Glue edges where indicated to hold layers in position, then stitch using 1 mm waxed thread and saddle stitch technique. Use the mallet to set the LOXX and other hardware with the 10 mm punch for the LOXX stud. Finish edges with edge dye and burnishing before final assembly.

โ€” Finishing :

Info :

Apply edge dye to the cut edges, burnish for a smooth finish, and polish. Attach strap and buckles, ensure LOXX closing system is secured and functions correctly. Inspect all stitches and trim excess thread. Your Tree of Life bag is complete.

Assembly Instructions

  • Glue the main body layers together where indicated on the template, align edges precisely, and clamp or weight until the adhesive sets before stitching.
  • Sew the edges using a saddle stitch with 1 mm waxed thread, following the punched holes from the template and keeping even tension for consistent stitch spacing.
  • Install the LOXX closing system using the 10 mm hole punch and mallet, ensuring the stud and cap align and lock securely before final stitching around the flap.
  • Attach the strap tabs and D-rings to the bag body, fold and stitch the tabs as shown on the template, then thread the strap through the buckle and secure it at the desired length.

Important Notes

  • ๐Ÿ’กAlways print pattern pages at Actual size (100%) and verify the calibration square before transferring the template to leather.
  • ๐Ÿ’กTest engraving and cutting settings on a scrap of the same 6 oz vegetable-tanned leather to avoid mistakes on your main piece.
  • ๐Ÿ’กPunch all stitching holes before gluing or final assembly to ensure holes remain crisp and aligned for saddle stitching.

This Tree of Life Leather Bag pattern gives you everything to create a stylish, handcrafted mini crossbody with laser-engraved detail. The printable templates, materials list, and video tutorial make the process clear and enjoyable. Whether you stitch by hand or use a laser for decoration, this little bag is a beautiful gift or personal accessory. ๐Ÿงต๐Ÿชตโœจ

You ask,

we answer.

FAQs

What size will the finished piece be?

The finished bag measures approximately 5 1/2" (14 cm) tall, 6 3/4" (17 cm) wide, and 1 3/4" (4.5 cm) deep as shown in the pattern.

Can I use different leather thicknesses for this pattern?

You can use different leather thicknesses, but this will affect structure and fit; the pattern is optimized for 6 oz (2.4 mm) vegetable-tanned leather for best results.

Do I need a laser to make the Tree of Life engraving?

No, a laser is optional; the design is laser-friendly for engraving and cutting, but you can also transfer the motif by hand or leave the flap plain.

What difficulty level is this pattern suitable for?

This pattern is rated intermediate โ€” basic leatherworking skills such as punching, stitching, and hardware setting are recommended.