🧢 Beautiful ✨ Detailed πŸ’ Adorable

Toucan Amigurumi Pattern

Toucan Amigurumi Pattern
4.1β˜… Rating
5-7 Hours Time Needed
2.9K Made This
βœ‚οΈ

Intermediate Level

Ideal for those with basic crochet experience, featuring slightly more advanced stitches and techniques to expand your skills.

⏱️

Weekend Treat

Takes 5-7 hours, making it an enjoyable project to finish over a couple of days.

🧸

Cute Companion

An adorable friend to cherish, handcrafted with love to bring comfort and joy for years to come.

About This Toucan Amigurumi Pattern

This pattern creates a small, stuffed toucan with a bright multicolor beak and soft plush body using chenille-style yarn. It includes detailed round-by-round instructions for eyes, body, beak, wings, tail and legs. Youll find photo-guides and assembly tips to help place eyes and sew parts neatly for a professional finish.

Toucan Amigurumi Pattern crochet pattern - detailed view of completed project

The design uses simple amigurumi shaping and color changes to make a playful, expressive bird. Ideal for crafters wanting a colourful, gift-ready amigurumi project.

Why You'll Love This Toucan Amigurumi Pattern

I absolutely love this pattern because it combines squishy, plush yarn with bold, playful colors to create a characterful toy. I enjoy how quick the body works up while the beak offers fun color-change detailing that really makes the toucan pop. The pattern is thoughtfully organized so I can follow each round precisely and get consistent results. Making several of these is addictive β€” each one can be customized with different beak colors or embroidered feathers for variety.

Toucan Amigurumi Pattern step 1 - construction progress Toucan Amigurumi Pattern step 2 - assembly progress Toucan Amigurumi Pattern step 3 - details and accessories Toucan Amigurumi Pattern step 4 - final assembly and finishing

Switch Things Up

I love how easy it is to customize the beak colors to create completely different personalities β€” try pastel shades for a soft look or neon brights for a funky version.

You can change the yarn weight and hook size to make a mini keychain version or a large plush depending on the gift you want to give.

I often swap the chenille yarn for a fluffy worsted yarn when I want more stitch definition; it changes the look but the shaping instructions stay the same.

Try embroidering different feather patterns on the back and wings with contrast yarn to give each toucan a unique backstory.

I sometimes add a small bell or ribbon around the neck to make a festive ornament or a playful toy for kids.

For a poseable toy, consider adding thin wire to the legs before stuffing to let you position them.

Make a set in tonal colors for a coordinated collection to display on a shelf or windowsill.

If youre giving it as a gift, sew a small pocket inside the tail or base to hold a tiny note or surprise token.

I recommend trying different eye styles β€” flat sewn eyes, safety eyes, or embroidered pupils β€” to vary expression and personality.

Don’t be afraid to mix yarn brands or textures; I love combining the chenille body with a smoother cotton for details to add visual contrast.

Common Mistakes & How to Fix Them

βœ— Skipping stitch markers during shaping can lead to uneven increases and decreases; place a marker at the start of each round to track your counts accurately. βœ— Changing colors without securing ends neatly often causes loose tails or bulky joins; carry color when possible and weave in ends as you go to keep the surface smooth. βœ— Not stuffing while shaping results in a misshapen body or gaps; stuff gradually and firmly, especially around the beak and head junctions, to maintain smooth curves. βœ— Ignoring stitch counts after each round causes errors to compound later; count your stitches frequently, especially after increase or decrease rounds to stay on track. βœ— Sewing parts without pinning first can give lopsided placement; pin or use stitch markers to position eyes, beak and wings before permanently stitching them in place.

Toucan Amigurumi Pattern

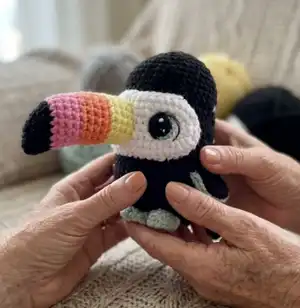
Make a charming plush toucan with this step-by-step crochet pattern that guides you through eyes, beak, body, wings, tail and legs. Youll use soft chenille yarns and simple shaping to create a colorful beak and a cuddly black body. The pattern includes full round-by-round instructions, color change notes and assembly tips so you can finish a polished handmade toy. Perfect as a gift or a playful home accent to brighten any shelf.

Intermediate 5-7 Hours

Materials Needed for Toucan Amigurumi Pattern

β€” Main Fabric

  • 01
    Himalaya Dolphin Baby chenille yarn - black (main body) - quantity: small skein (use enough for body and details)
  • 02
    Himalaya Dolphin Baby chenille yarn - white (eye patch and accents) - quantity: small skein
  • 03
    Himalaya Dolphin Baby chenille yarn - blue (eye detail) - quantity: small amount for eyes
  • 04
    Himalaya Dolphin Baby chenille yarn - pink (beak accent) - small amount
  • 05
    Himalaya Dolphin Baby chenille yarn - orange (beak accent) - small amount
  • 06
    Himalaya Dolphin Baby chenille yarn - yellow (beak accent) - small amount
  • 07
    Yarn Art jeans or similar for eye details - black, white, blue - small amounts

β€” Tools Required

  • 01
    Crochet hook 3.5 mm
  • 02
    Crochet hook 2.0 mm (for eyes and fine details)
  • 03
    Toys stuffing (sintepon, holofiber)
  • 04
    Scissors
  • 05
    Large-eye needle for joining parts and sewing
  • 06
    Stitch markers
  • 07
    Pins for assembly

Progress Tracker

0% Complete

β€” Eyes :

Info :

Left and right eyes are crocheted different, with Yarn Art Jeans, using 2.0 mm hook

Left eye - Round 1 :

work in black, 6 sc into MR = 6 sc

Left eye - Round 2 :

(inc)*6t = 12 sc

Left eye - Round 3 :

(1 sc, inc)*6t = 18 sc

Left eye - Round 4 :

work in blue, 2 sc, 3 inc, 2 sc, sl st (11 sts in blue in total), go on working in black, 10 sl st (21 sts)

Left eye - Round 5 :

work in white, 1 sl st, (1 sc, inc)*3t, 1 sc, 3 sl st (14 sts), fasten off.

Left eye - Round 6 :

turn the eye wrong side towards yourself and work 10 sl st in black. Leave 4 sc in white uncrocheted.

Right eye - Round 1 :

work in black, 6 sc into MR = 6 sc

Right eye - Round 2 :

(inc)*6t = 12 sc

Right eye - Round 3 :

(1 sc, inc)*6t = 18 sc

Right eye - Round 4 :

work in blue, 1 sl st, 2 sc, 3 inc, 2 sc, (11 sts in blue in total), go on working in black, 10 sl st

Right eye - Round 5 :

work in white, 3 sl st, 1 sc, (inc, 1 sc)*3t, 1 sl st (14 sts), fasten off.

Right eye - Round 6 :

count the 5th st from the bottom of the round in white and place marker. Turn the eye wrong side towards yourself and work 9 sl st in black from the point you placed marker.

β€” White part (for eyes) :

White part - Round 1 :

chain 21 in white, work from the 2nd st from hook as follows: (3 to 1 st, 18 sc)*2t = 42 sc

White part - Round 2 :

(3 inc, 18 sc)*2t = 48 sc

White part - Round 3 :

(1 sc, inc)*3t, 18 sc, (1sc, inc)*3t, 18 sc = 54 sc

White part - Round 4 :

(2 sc, inc)*3t, 18 sc, (2 sc, inc)*3t, 18 sc = 60 sc

White part - Round 5 :

7 sc, 2 sl st, fasten off leaving a yarn tail for sewing.

β€” Body :

Round 1 :

chain 2 in black, work 6 sc to the 2nd st from hook

Round 2 :

(inc)*6t = 12 sc

Round 3 :

(3 sc, 3 inc)*2t = 18 sc

Round 4 :

3 sc, (1 sc, inc)*3t, 3 sc, (1sc, inc)*3t = 24 sc

Round 5 :

3 sc, (2 sc, inc)*3t, 3 sc, (2 sc, inc)*3t = 30 sc

Round 6 :

3 sc, (3 sc, inc)*3t, 3 sc, (3sc, inc)*3t = 36 sc

Round 7 :

3 sc, (4sc, inc)*3t, 3 sc, (4sc, inc)*3t = 42 sc

Round 8 :

3 sc, (5 sc, inc)*3t, 21 sc = 45 sc

Round 9-16 :

45 sc

Round 17 :

15 sc, inc, 29 sc = 46 sc

Round 18 :

46 sc

Round 19 :

15 sc, inc, 30 sc = 47 sc

Round 20 :

47 sc

Round 21 :

16 sc, inc, 30 sc = 48 sc

Round 22 :

48 sc

Round 23 :

17 sc, inc, 30 sc = 49 sc

Round 24 :

49 sc

Round 25 :

18 sc, inc, 30 sc = 50 sc

Round 26 :

50 sc

Round 27 :

19 sc, inc, 30 sc = 51 sc

Round 28 :

19 sc, inc, 31 sc = 52 sc

Round 29 :

20 sc, inc, 31 sc = 53 sc

Round 30 :

21 sc, inc, 31 sc = 54 sc

Round 31 :

(dec, 7 sc)*6t = 48 sc

Round 32 :

3 sc, (dec, 6 sc)*5t, dec, 3 sc = 42 sc

Round 33 :

(dec, 5 sc)*6t = 36 sc

Round 34 :

2 sc, (dec, 4 sc)*5t, dec, 2 sc = 30 sc

Round 35 :

(dec, 3sc)*6t = 24 sc

Round 36 :

(dec, 2 sc)*6t = 18 sc

Round 37 :

(dec, 1 sc)*6t = 12 sc

Round 38 :

(dec)*6t, or stitch up the hole.

β€” Tail :

Large part (make 1) - Round 1 :

chain 2, 6 sc into the 2nd st from hook

Large part - Round 2 :

(inc)*6t = 12 sc

Large part - Round 3 :

12 sc

Large part - Round 4 :

dec, 10 sc = 11 sc

Large part - Round 5 :

dec, 9 sc = 10 sc

Large part - Round 6 :

dec, 8 sc = 9 sc

Large part - Round 7 :

dec, 7 sc = 8 sc

Large part - Round 8 :

dec, 6 sc = 7 sc

Large part - Round 9 :

dec, 5 sc = 6 sc

Large part - Round 10 :

dec, 4 sc = 5 sc

Large part - Round 11 :

dec, 3 sc = 4 sc, leave a yarn tail for sewing.

Small piece (make 2) - Round 1 :

chain 2, 6 sc into the 2nd st from hook

Small piece - Round 2 :

(1 sc, inc)*3t = 9 sc

Small piece - Round 3 :

9 sc

Small piece - Round 4 :

dec, 7 sc = 8 sc

Small piece - Round 5 :

dec, 6 sc = 7 sc

Small piece - Round 6 :

dec, 5 sc = 6 sc

Small piece - Round 7 :

dec, 4 sc = 5 sc

Small piece - Round 8 :

dec, 3 sc = 4 sc, leave a yarn tail for sewing.

β€” Wings :

Wings (make 2) - Round 1 :

chain 2 in black, 6 sc into the 2nd st from hook

Wings - Round 2 :

(inc)*6t = 12 sc

Wings - Round 3 :

(3 sc, 3 inc)*2t = 18 sc

Wings - Round 4 :

3 sc, (1 sc, inc)*3t, 3 sc, (1sc, inc)*3t = 24 sc

Wings - Fold and finish :

Fold the piece in half and slip stitch 12 through both edges in blue. I show in fare color smooth yarn for better demonstration how to fold the wing:

β€” Beak :

Beak Option 1 - Round 1 :

chain 6 in black, work from the 2nd st from hook as follows: (3 to 1 st, 3 sc)*2t = 12 sc

Beak Option 1 - Round 2 :

6 sc, inc, 1 sc, inc, 3 sc = 14 sc

Beak Option 1 - Round 3 :

6 sc, (inc, 1 sc)*3t, 2 sc = 17 sc

Beak Option 1 - Round 4 :

9 sc, (inc, 1 sc)*3t, 2 sc = 20 sc

Beak Option 1 - Round 5 :

2 sc in black, switch to pink: 18 sc

Beak Option 1 - Round 6-8 :

20 sc

Beak Option 1 - Round 9 :

2 sc in pink, switch to orange: 18 sc

Beak Option 1 - Round 10-12 :

20 sc

Beak Option 1 - Round 13 :

2 sc in orange, switch to yellow: 18 sc

Beak Option 1 - Round 14-16 :

20 sc, leave a yarn tail for sewing

Beak Option 2 - Round 1 :

chain 2 in pink, 6 sc into the 2nd st from hook

Beak Option 2 - Round 2 :

6 sc

Beak Option 2 - Round 3 :

3 inc, 3 sc = 9 sc

Beak Option 2 - Round 4 :

6 inc, 3 sc = 15 sc

Beak Option 2 - Round 5 :

(2 sc, inc)*4t, 3 sc = 19 sc

Beak Option 2 - Round 6-7 :

19 sc

Beak Option 2 - Switch to orange :

Switch to orange yarn

Beak Option 2 - Round 8-12 :

19 sc

Beak Option 2 - Switch to yellow :

Switch to yellow yarn

Beak Option 2 - Round 13-16 :

19 sc, leave a yarn tail for sewing

β€” Legs :

Info :

1 leg consists of 3 parts: 1 big and 2 little toes.

Big toe - Round 1 :

chain 10, starting from the 2nd st from hook work 9 sc, turn your work, turning chain = 9 sc

Big toe - Round 2 :

9 sc

Big toe - Round 3 :

fold lengthwise and work 9 sl st, leave a yarn tail for sewing

Little toes - Round 1 :

chain 8, starting from the 2nd st from hook work 7 sc, turn your work, turning chain = 7 sc

Little toes - Round 2 :

7 sc

Little toes - Round 3 :

fold the piece and work 7 sl st, leave a yarn tail for sewing.

β€” Toy decoration :

Info :

Sew the eyes white piece over rounds 13-23 of the body

Info :

Sew on the beak and eyes. Eyes should be 2-3 sc away from the beak

Info :

Sew on the tail and legs

Info :

Sew on wings and embroider feathers in grey

Info :

Your birdy is finished!

Assembly Instructions

  • Sew the eyes white piece over rounds 13-23 of the body, aligning the outer edge evenly to create the patch shape.
  • Position and sew the beak to the front of the head, then place the eyes so they are 2-3 sc away from the beak and stitch them securely through the white eye piece into the body.
  • Attach the tail parts: sew the large tail piece to the bottom back of the body and sew the two small tail pieces around it for full shape, using the yarn tails to secure.
  • Sew legs to the bottom front of the body, arranging the big toe and two little toes to form a stable base, then weave in tails securely.
  • Pin wings to the sides of the body, fold and tack the edges, then slip stitch or sew through both edges in blue and embroider feather accents in grey for detail.

Important Notes

  • πŸ’‘Use stitch markers to keep track of the beginning of rounds, especially during increases and decreases to maintain correct stitch counts.
  • πŸ’‘Stuff firmly but evenly, adding filling gradually to avoid lumps and to keep the shape smooth around the beak and head join.
  • πŸ’‘Pin parts in place before sewing to check symmetry and correct spacing; this helps prevent misaligned eyes or beak placement.
  • πŸ’‘Weave in ends as you go to keep the surface neat and avoid extra finishing work at the end.

This cute toucan is a joyful, colorful little bird to make and gift. Its squishy chenille yarn body and rainbow beak give it a playful, tactile charm you will love to display. Make a flock with different beak colors or personalize details like embroidered feathers and you have a warm, handmade friend. 🧢✨

You ask,

we answer.

FAQs

What size will the finished piece be?

The finished amigurumi measures approximately 12-14 cm tall when using the recommended chenille yarn and 3.5 mm hook; exact size varies with yarn tension.

Can I use different yarn weights for this pattern?

Yes, you can use different yarn weights, but this will affect the final size and texture; adjust hook size accordingly and remember color changes may work differently with other yarn textures.

Do I need prior crochet experience for this pattern?

This pattern is rated intermediate, so basic knowledge of amigurumi techniques, increases/decreases and color changes is recommended for best results.

How long does this project typically take to complete?

Most crocheters complete this project in 5-7 hours, though time may vary based on experience level, assembly, and detail work.