Bring the dragon Toothless to life with this full-scale plush sewing pattern. Youll cut, sew, and topstitch detailed wings and fins using quilt batting for structure and optional magnets for interchangeable tail fins. The pattern includes clear printing instructions, piece lists, and step-by-step assembly guidance so you can make a large, display-ready plush with realistic wing detail.
Progress Tracker
0% Complete
— Printing & Pattern Setup :
Step 1 :
Open the pattern document with Adobe Acrobat Reader/Pro DC. If you do not have this program installed yet, you can download it from the Adobe website.
Step 2 :
Once the document is opened, go to Files > Print. In the Print dialog box, click the Poster button in the Page Sizing & Handling section.
Step 3 :
From there, apply the options described: Tile Scale - Make sure this is on 100% if you want the original pattern size; Overlap - determine how much each tile overlaps adjacent tiles; Cut marks - add guide marks to each page (optional); Labels - add filename and page number on each page (optional).
Step 4 :
Click the Print button once all set. If you are using a different program, consider printing the page with the scale first to confirm 100% printing.
— Getting to know the pattern document :
Info :
Scale: Use the 2 inches square in the upper right corner to confirm the document printed at 100%. If both sides measure 2 inches, the print is successful.
Info :
Direction of fabric hairs: Every pattern piece has an orange arrow indicating alignment on fabric. If using hairy fabric like minky, align arrows with the hair direction to maintain natural flow over Toothless's body.
Info :
Seam allowance: Each pattern piece is surrounded by three lines that represent different seam allowances. You can choose the included seam allowance lines or add your own allowance around the solid original piece.
Info :
Body A: Along the bottom of the tail in Body A there are blue marks indicating where tailfins start and end. Two marks near the legs show placement for Fin A; two marks at the tail end show placement for Fin B.
Info :
Wing: The wing has a green line that indicates a second edge of the pattern piece. The wing has a top piece (includes darker part right of green line) and a bottom piece (ends after the green line). Decorative lines on the wing are top-stitched guidelines that give wing shape; you will be sewing over the quilting batting to create definition.
Info :
Feet: Feet each consist of two pieces: one inner and one outer. Outer pieces include darker part above the green line; inner pieces do not.
Info :
Tail fin bands: The bands have a square with a circle at the end to represent snaps and overlaps for bands that go around the tail to hold interchangeable tail fins.
Info :
Head side: The head side piece includes text advising a large square be cut first for embroidery. Cut enough fabric to fit in an embroidery ring if you plan to embroider eyes and nose directly on the piece.
Info :
Nails: The nails piece is a rectangle with a dashed sewing line that forms 16 nails in sets of four so you can cut groups apart after sewing and trim excess fabric in between.
Info :
Skull: The skull is an appliqu�e9 — do not cut seam allowance; it must be cut from white fabric for Toothless's red fin appliqu�e9.
— What you will need :
Tools :
Sewing machine. Fabric scissors and regular scissors. Seam ripper. Pins and needles. Fabric marker that works on black fabric. Optional: an embroidery ring.
Materials :
3-4 meters/yards of polyester quilt batting (see chapter 2). 5 meters (or 5-5.5 yards) of black fabric. Small amounts of light brown, red and white fabric for interchangeable fins. Small amount of blue fabric for the back/alpha fins. 1 spool of 500 meters/547 yards black sewing thread and small spools of brown, white and red thread. Random color sewing/basting thread. Polyester stuffing (filling of 3 small inner pillows recommended). For eyes: lighter and darker green fabric plus black and white; optional 500 grams poly pellets to weight feet; tiny magnets for back/alpha fins; snaps, velcro or other fasteners for interchangeable tail fins.
— Preparing the pieces :
Info :
How to cut the pieces from the fabric: Fold fabric in half with right sides together (hairs inside) to automatically get one original and one mirrored piece that fit together. For fabrics with small hairs, create a fold that follows hair direction. For pieces with green lines, cut both pieces initially neglecting the green line and trim excess before sewing later.
Info :
Amount of pieces needed: The pattern includes a table listing each piece and the number of originals and mirrored pieces required; follow the column for cutting when fabric is folded to yield the correct total amounts.
— A few tips before sewing :
Info :
Work Precisely: Trace pattern pieces without seam allowance onto the fabric back if needed, and baste difficult lines by hand before machine sewing for accurate results.
Info :
Prevent mistakes by double checking: Double check fabric direction, folded fabric orientation, and which edges need to remain open prior to sewing to avoid irreversible errors.
Info :
Prevent movement while sewing: Use basting thread and a needle to hold pieces together first; pins help when pieces fit perfectly straight but basting is superior for stretchy fabrics.
Info :
Keep wrinkles away from your seamline: When joining opposite curves, push folds away from the seam line and take time to manage folds before sewing under the presser foot.
Info :
Cut away excess seam allowance around sharp corners: Trim as much seam allowance as possible near corners and clip slits near curves to reduce bulk when turning right sides out.
Info :
Always sew the right sides together: Follow figures and colored lines in the instructions and sew with wrong sides out so final pieces have right sides out when turned.
— Part 1: The head :
Info :
Eyes & Nose: Many methods possible: machine embroidery, hand embroidery, fabric or paint. The instructions demonstrate hand embroidery for best results and advise cutting a large square for embroidery if doing eyes on the piece directly.
Step 1 :
Spikes: Take two spike pieces (one original and one mirrored), sew them right sides together leaving the end that will attach to the head open. Sew along the orange lines shown once pieces are atop each other with right sides together.
Step 2 :
Ears: Start by taking the three back pieces of the ear. Sew both the left and right back pieces to the center back piece as shown; since you sew right sides together, the pieces will bend in opposite directions. Pay attention to wrinkles when sewing.
Step 3 :
Finish ear: Take the front ear piece and sew front to back pieces right sides together. They should fit on top of each other and lay fairly flat. Sew along the orange line shown.
Info :
Mark ears after completing them to avoid confusing left and right later.
Item Name (Head Assembly) :
Parts needed: Ears; Head back; Head sides (including eyes & nose); Head top; Spikes (Side, top & head). Follow steps below to assemble head.
Step 4 :
Start by taking the two side pieces and cutting them to the shape of the pattern piece. Put them right sides together and sew along the shortest edge as shown in the figure.
Step 5 :
Next, take the top pieces and sew them right sides together with the head spikes in between. Make sure the spikes are trimmed and turned right sides out before sewing them in. Align the row of spikes so they stand apart; sew along the drawn line, a few millimetres more to left than right if needed.
Step 6 :
As the top of the head is ready, sew it to the completed side pieces (see figure). Then take the back piece and sew it to the edges of the top and side of the head, leaving holes for the ears and spikes open. Only sew small lines that create holes for the ears and top spikes as shown.
Step 7 :
Take the ears and top spikes and sew them right sides together to the head. Ensure correct ear orientation by turning them so right sides are out and lining inner side of ear with corresponding inner side of head so ear front will attach to the head top piece. Sew in a circle so ears and spikes can be stuffed together with the head. Small circles or hand-sewing may be necessary for tiny spikes.
Info :
For side spikes: Partly sew them between the side and head back pieces. Line them up right sides together and sew the remaining parts of the head back piece to the head side pieces with spikes in between. Leave the holes for the two biggest side spikes unsewn to stuff them from the head later.
Info :
When ears and spikes are attached, the outer edge of the Head back should be fully attached and the head preparation is complete.
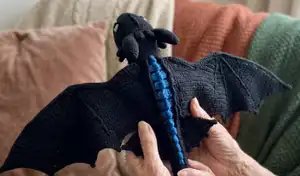
— Part 2: Wings and fins :
Info :
How to work with polyester quilt batting: Batting gives firmer wings with beautiful detailing. The pattern used double layers of the thickest batting available in this design; a medium thickness will keep tailfins more flexible while a thicker batting adds depth but increases difficulty top-stitching.
Info :
Once fabric and batting are ready, lay fabric pieces (which include seam allowance) on top of quilt batting and cut so both fabric and batting fit each other perfectly. The following pieces will need batting as listed in the pattern table.
Info :
How to add detail: Use a random color of sewing or basting thread to trace black guideline lines on the wing pieces then stitch the guidelines by hand before top-stitching with your machine. For double lines, make one guideline and then the second line using a double needle or the foot as a distance guide.
Step 1 :
Sewing the wings: Place an original and mirrored wing piece right sides together on top of the quilt batting. Sew around the edges leaving open the edge that will be attached to the body later.
Step 2 :
Flip the wing so right sides are out and start sewing the guidelines by hand. After hand-guidelines are in place, use your sewing machine to top-stitch the orange guideline lines onto the wing.
Step 3 :
Repeat the same steps for the other wing.
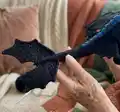
Section :
Sewing the fins - Back fins: Split pieces into two sets; each set consists of a blue and a black fabric piece and a single-layer quilt batting piece. Arrange so one set has blue on top and the other has black on top so you get left and right parts with blue on the inside. Sew along the edge of each piece.
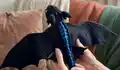
Step 5 :
Before turning right sides out, place or glue magnets at the top corners of the fins on the blue fabric so the magnets of left and right pieces will bring blue inner sides together. When magnets are secured, trim and turn the pieces.
Step 6 :
Small tail fins: For tail fins on the side of the tail, take two fabric pieces and one single-layer batting piece and sew along the outer edge. Trim excess fabric in corners and flip right sides out.
Step 7 :
Fin A: Make Fin A like wings: two pieces right sides together on top of batting, sew around leaving edge that attaches to body open, flip right sides out and add detail by tracing guidelines and top-stitching with your sewing machine.
Step 8 :
Fin B: Follow same method for brown and black Fins B. For the red interchangeable tail fin, first take the white skull appliqu�e9, top-stitch with a zig-zag stitch on the original Fin B piece (not mirrored).
Step 10 :
Put the appliqu�e9 piece with batting and mirrored piece and sew them like other fins; flip right sides out and sew over the skull when adding detail.
Step 11 :
Take all Bands A, B & C pieces: The black interchangeable fin will get black bands; brown and red fins get brown bands. Sew Bands B and C right sides together leaving left edge open.
Step 12 :
Turn bands right sides out. If installing buttons/snaps partly from inside, do this now.
Step 13 :
Take two Band B and two Band C parts and place them in between Band A pieces. Sew along outer edges (top, bottom and right) of Band A.
Step 14 :
Flip Band A right sides out and put around the open edge of Fin B. Fold seam allowance inwards on both sides and top-stitch the left side of Band A into place.
Step 15 :
Repeat steps 13 and 14 for the other two Fins B so all bands are attached and fins complete.
— Part 3: Legs :
Step 1 :
Preparing the nails: Sew one line to create the nails on their pattern piece. Draw the line on the fabric first, cut into sets of four, and trim away as much extra fabric around the nails as possible while leaving horizontal edges allowances intact.
Step 2 :
Preparing the fins for the legs: Take two pieces, put them right sides together on top of batting and sew around the outer edge. Trim allowance and repeat for the other front leg fin.
Item Name (Assembly of the legs) :
Parts needed: Fin Foot; Foot (bottom pieces); Front Legs; Hips; Nails; Rear Legs.
Step 3 :
Sew the Front Legs right sides together, placing the fin piece in between so the right sides of the fins are against the right sides of the leg and the fin piece is inside the leg. Leave the bottom part and outside part open.
Step 4 :
Take the bottom foot pieces and sew them right sides to the bottom of the legs with the point facing the back of the leg. Place nails between two pieces as done for fins, pointing nails inside leg and sewing over ends of nails to attach them to each other.
— Assembly & Final Steps :
Info :
Always sew right sides together when assembling large body sections. Use the colored lines on figures to identify seam locations. Face wrong sides together while sewing pieces so final seams are right sides out after turning.
Info :
Stuff the plush progressively, using polyester stuffing and optionally poly pellets in feet to help the plush stand. Stuff firmly but not overstuffing to preserve shape when sewing final seams.
Info :
Attach wings: Mark the wing profile on the fabric before sewing into the body to determine placement. Sew the wing shoulder in a circle so the shoulder can be stuffed from the body, giving the wing a firm base.
Info :
Attach fins and tail bands according to blue marks on Body A tail edge for Fin A and Fin B positions. Use snaps, velcro or magnet bands to secure interchangeable tail fins around the tail bands.
Info :
Finish: Weave in ends, top-stitch final seams where required and add final decorative top-stitching along wing guideline lines and fin details to give polished shape and definition.
This Toothless Plush Pattern is made to create a show-stopping dragon plush with structured wings and interchangeable tail fins ready for display or play. The instructions guide you through quilting wing detail, magnet-ready fins, and accurate assembly so your finished dragon looks professional and proud. Make one to gift or keep — youll love the way it lives in your home! 🧶✨