🧢 Beautiful ✨ Detailed πŸ’ Adorable

Tommy the T-Rex Amigurumi Pattern

Tommy the T-Rex Amigurumi Pattern
4.8β˜… Rating
5-7 Hours Time Needed
3.4K Made This
βœ‚οΈ

Intermediate Level

Ideal for those with basic crochet experience, featuring slightly more advanced stitches and techniques to expand your skills.

⏱️

Weekend Treat

Takes 5-7 hours, making it an enjoyable project to finish over a couple of days.

🧸

Cute Companion

An adorable friend to cherish, handcrafted with love to bring comfort and joy for years to come.

About This Tommy the T-Rex Amigurumi Pattern

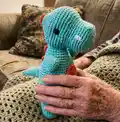
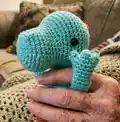
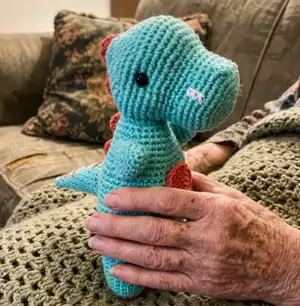
Tommy the T-Rex is a charming amigurumi toy pattern that creates a standing dinosaur approximately 23cm tall using the recommended yarn and hook. The design features a rounded head with embroidered teeth, tiny arms, a long tail with embroidered stripes and a contrasting stomach patch. This pattern uses US terminology and is written in rounds with clear stitch counts for each round.

Tommy the T-Rex Amigurumi Pattern crochet pattern - detailed view of completed project

Perfect for crafters who enjoy shaping and simple embroidery details. Includes step-by-step rounds, materials list and assembly instructions.

Why You'll Love This Tommy the T-Rex Amigurumi Pattern

I absolutely love this pattern because it captures so much personality in a small, approachable amigurumi. I adore the way the rounded head and tiny arms make Tommy instantly lovable β€” perfect for gifting or keeping. The step-by-step rounds and clear stitch counts make shaping predictable and satisfying as you work. I also enjoy how easy it is to customize the colours and stripes to make each Tommy unique.

Tommy the T-Rex Amigurumi Pattern step 1 - construction progress Tommy the T-Rex Amigurumi Pattern step 2 - assembly progress Tommy the T-Rex Amigurumi Pattern step 3 - details and accessories Tommy the T-Rex Amigurumi Pattern step 4 - final assembly and finishing

Switch Things Up

I love how easy it is to customise Tommy by switching yarn colours for a fresh look.

I often make the stomach patch in a contrasting colour or a patterned embroidery to add personality.

To make Tommy bigger or smaller, change your yarn weight and hook size β€” bulky yarn with a larger hook makes a chunky friend, while finer yarn creates a mini keychain version.

I sometimes add a little wire inside the tail for a poseable finish; just be sure to keep wire ends covered and secure.

Try embroidering different facial expressions: move the eyes or change the mouth shape and Tommy’s personality shifts instantly.

For a softer toy, use a plush or chenille yarn but note your eyes should be embroidered for safety with small children.

Swap the orange stripes for pom-poms or felt scales sewn on for a textured variation.

I like to make a family: change colour palettes for a set of dinos to gift as a themed nursery collection.

Consider adding tiny clothes or a scarf to give Tommy seasonal flair or character-specific outfits.

Use metallic or variegated yarn for stripes to make a special edition Tommy that sparkles under lights.

Common Mistakes & How to Fix Them

βœ— Not switching colours at the correct stitch can leave visible joins; change colour by pulling through the new colour on the last stitch of the previous round so joins are neat. βœ— Forgetting to stuff gradually causes lumps or uneven shaping; stuff little by little during rounds and shape as you go for a smooth finish. βœ— Skipping stitch counts after increases or decreases results in uneven shaping; always count your stitches at the end of each round to ensure accuracy. βœ— Placing safety eyes too late makes positioning difficult; place 7.5mm safety eyes between rounds 17-18 and check spacing before securing to avoid misplacement.

Tommy the T-Rex Amigurumi Pattern

Crochet your own playful Tommy the T-Rex with this detailed intermediate amigurumi pattern. You will make a standing dinosaur with a rounded head, little arms, a pointy tail and a colourful stomach patch. The pattern includes complete round-by-round instructions, material and assembly notes so you can follow along with confidence.

Intermediate 5-7 Hours

Materials Needed for Tommy the T-Rex Amigurumi Pattern

β€” Main Fabric

  • 01
    8ply yarn/DK or Light Worsted - GREEN, approximately 50g (Paintbox Cotton DK Col 425 Pistachio Green recommended)
  • 02
    8ply yarn/DK or Light Worsted - ORANGE, approximately 25g (Paintbox Cotton DK Col 409 Light Camel recommended for the photos)
  • 03
    WHITE 4ply yarn or embroidery thread for teeth and small details

β€” Tools Required

  • 01
    Crochet hook size 2.75mm (C-2 US)
  • 02
    Scissors
  • 03
    Tapestry needle
  • 04
    Polyester toy stuffing
  • 05
    7.5mm plastic safety eyes (2 pieces)
  • 06
    Stitch marker (optional)

Progress Tracker

0% Complete

β€” Important info :

Info :

Difficulty: Intermediate, US terminology. Materials: 2.75mm hook/C-2 (US). 8ply yarns/DK or Light Worsted > 50g GREEN, 25g yarn ORANGE. WHITE 4ply yarn or embroidery thread. Scissors. Tapestry needle. Polyester toy stuffing. 7.5mm plastic safety eyes. Stitch marker (optional).

Infos :

Amigurumi is stitched in the round (unless it says otherwise). A yarn with no stretch is best for amigurumi, I ordinarily use cotton or cotton blend. When changing colour, pull through new colour on the last stitch of the round prior. For the step-by-step photos GREEN = Paintbox Yarns Cotton DK Col "425 Pistachio Green". ORANGE = Paintbox Yarns Cotton DK Col "409 Light Camel". Generally, the hook you use for amigurumi will be a smaller than for other crochet as you want the stitches tight. The yarn thickness and hook size used will affect the size of the finished item. My Tommy is approximately 23cm tall (9 inches). I have used plastic safety eyes but you may also embroider. Please ensure that there are no loose fittings.

β€” Arms :

Round 1 :

6 sc in MR [6]

Round 2 :

(sc, inc) x 3 [9]

Round 3 :

(sc x 2, inc) x 3 [12]

Round 4-7 :

sc x 12 [12]

Info :

Stuff, sc across the top and fasten off. Leave a tail for sewing.

β€” Head :

Round 1 :

6 sc in MR [6]

Round 2 :

inc x 6 [12]

Round 3 :

(sc, inc) x 6 [18]

Round 4 :

(sc x 2, inc) x 6 [24]

Round 5 :

(sc x 3, inc) x 6 [30]

Round 6 :

(sc x 4, inc) x 6 [36]

Round 7 :

sc x 36 [36]

Round 8 :

sc x 14, dc bobble, sc x 6, dc bobble, sc x 14 [36]

Round 9-10 :

sc x 36 [36]

Round 11 :

(dec, sc x 4) x 6 [30]

Round 12-13 :

sc x 30 [30]

Round 14 :

(sc x 2, inc) x 10 [40]

Round 15 :

(sc x 3, inc) x 10 [50]

Round 16 :

(sc x 9, inc) x 5 [55]

Round 17-19 :

sc x 55 [55]

Round 20 :

(sc x 6, dec) x 6, sc x 7 [49]

Round 21 :

(sc x 5, dec) x 7 [42]

Round 22 :

(sc x 4, dec) x 7 [35]

Round 23 :

(sc x 3, dec) x 7 [28]

Round 24 :

sc x 28 [28]

Info :

Place 7.5mm safety eyes between rounds 17-18, 25 stitches apart. Stuff head and continue stuffing until fastened off. To indent the eyes, using the one piece of green yarn sew a stitch under each safety eye, pull the yarn and tie together.

Round 25 :

(sc x 2, dec) x 7 [21]

Round 26 :

sc x 21 [21]

Round 27 :

(sc x 3, dec) x 4, sc [17]

Round 28 :

sc x 2, (dec, sc) x 5 [12]

Round 29 :

dec x 6 [6]

Info :

Weave tail through stitches of final round and pull to close. Weave end.

β€” Legs and torso :

Round 1 :

5 sc in MR [5]

Round 2 :

inc x 5 [10]

Round 3 :

(sc, inc) x 5 [15]

Round 4 :

(sc x 2, inc) x 5 [20]

Info :

Change to GREEN yarn.

Round 5 :

in BLO: sc x 20 [20]

Round 6-12 :

sc x 20 [20]

Info :

Fasten off 1st leg ONLY, continue for 2nd leg.

Round 13 :

ch5, sc x 20 around 1st leg, sc in 5 ch, sc x 20 in 2nd leg [50]

Round 14 :

sc in 5 ch, sc x 45 [50]

Round 15-22 :

sc x 50 [50]

Info :

Stuff and continue stuffing as you go.

Round 23 :

(sc x 8, dec) x 5 [45]

Round 24-25 :

sc x 45 [45]

Round 26 :

(sc x 7, dec) x 5 [40]

Round 27-28 :

sc x 40 [40]

Round 29 :

(sc x 6, dec) x 5 [35]

Round 30-31 :

sc x 35 [35]

Round 32 :

(sc x 5, dec) x 5 [30]

Round 33-34 :

sc x 30 [30]

Round 35 :

(sc x 4, dec) x 5 [25]

Round 36 :

sc x 25 [25]

Round 37 :

(sc x 3, dec) x 5 [20]

Round 38 :

sc x 20 [20]

Info :

Weave tail through final round and pull to close. Leave a tail for sewing.

β€” Tail :

Round 1 :

4 sc in MR [4]

Round 2 :

sc x 4 [4]

Round 3 :

(sc, inc) x 2 [6]

Round 4 :

sc x 6 [6]

Round 5 :

(sc x 2, inc) x 2 [8]

Round 6 :

(sc x 3, inc) x 2 [10]

Round 7 :

sc x 10 [10]

Round 8 :

(sc x 4, inc) x 2 [12]

Round 9 :

(sc x 5, inc) x 2 [14]

Round 10 :

sc x 14 [14]

Round 11 :

(sc x 6, inc) x 2 [16]

Round 12 :

(sc x 7, inc) x 2 [18]

Round 13 :

(sc x 8, inc) x 2 [20]

Round 14 :

sc x 20 [20]

Round 15 :

(sc x 3, inc) x 5 [25]

Round 16 :

sc x 25 [25]

Round 17 :

(sc x 4, inc) x 5 [30]

Round 18 :

sc x 30 [30]

Info :

Fasten off and leave a tail for sewing.

β€” Stomach :

Round 1 :

6 sc in MR [6]

Round 2 :

inc x 6 [12]

Round 3 :

(sc, inc) x 6 [18]

Round 4 :

(sc x 2, inc) x 6 [24]

Round 5 :

(sc x 3, inc) x 6 [30]

Info :

Fasten off and leave a tail for sewing.

β€” Assembly :

Item Name (P1) :

1) Stomach - sew to torso between rounds 21-30.

Item Name (P2) :

2) Arms - sew to sides of torso between rounds 28-34.

Item Name (P3) :

3) Head - sew to torso, go around twice to make secure.

Item Name (P4) :

4) Tail - sew to torso between rounds 19-27.

Item Name (P5) :

5) Stripes - using ORANGE, embroider stripes over every second round for the tail, back of the torso and head.

Item Name (P6) :

6) Teeth - using WHITE, embroider teeth on each side of the head over rounds 8-10.

Assembly Instructions

  • Stomach - sew to torso between rounds 21-30, centering the patch and securing with small whipstitches around the edge.
  • Arms - sew to sides of torso between rounds 28-34, spacing evenly and angling slightly forward for a natural pose; sew firmly with the same yarn color.
  • Head - sew to torso, matching the neck opening to the torso top and go around twice to make secure, then weave in ends.
  • Tail - sew to torso between rounds 19-27, aligning the tail base centrally on the lower back and reinforcing with multiple passes.
  • Stripes - using ORANGE yarn, embroider stripes over every second round along the tail, down the back of the torso and over the head as shown.
  • Teeth - using WHITE 4ply yarn or embroidery thread, embroider small teeth on each side of the head over rounds 8-10.

Important Notes

  • πŸ’‘Place safety eyes between rounds 17-18 and ensure they are 25 stitches apart before securing.
  • πŸ’‘Change colour by pulling through the new colour on the last stitch of the prior round for a neat join.
  • πŸ’‘Stuff gradually and continue stuffing as you go to maintain smooth shaping and avoid lumps.
  • πŸ’‘Use a smaller-than-usual hook for amigurumi to keep stitches tight and stuffing secure.

This adorable Tommy the T-Rex was designed to be playful, cuddly and fun to personalise. Whether you make one for a child or as a thoughtful handmade gift, he adds a cheerful handmade touch to any shelf. Enjoy stitching Tommy and creating your own colour variations! πŸ§ΆπŸ¦–

You ask,

we answer.

FAQs

What size will the finished piece be?

The finished amigurumi measures approximately 23 cm (9 inches) tall when using the recommended yarn and 2.75mm hook.

Can I use different yarn weights for this pattern?

Yes, you can change yarn weight, but this will affect the final size; choose an appropriate hook size for your yarn to maintain stitch tension.

Do I need prior crochet experience for this pattern?

This pattern is rated intermediate, so basic knowledge of single crochet, increases, decreases and working in the round is recommended.

How long does this project typically take to complete?

Most crafters finish Tommy in about 5-7 hours depending on experience and how much time is spent on embroidery and assembly.

Where should I place the safety eyes?

Place 7.5mm safety eyes between rounds 17-18 of the head, spacing them 25 stitches apart as instructed before securing.