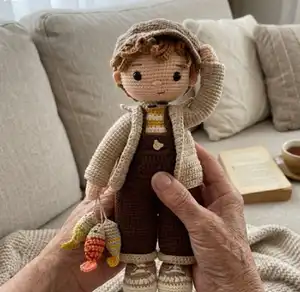
Make your own charming Tommy the Fisher amigurumi with this detailed crochet pattern. You'll create a 30 cm decorative doll with striped sweater, trousers, shoes, hat and tiny accessories. The pattern includes clear round-by-round instructions, photos and assembly tips to help you finish a beautiful hand-crafted toy. Perfect as a gift or to decorate a nursery, Tommy is full of character and handmade charm.
Progress Tracker
0% Complete
— Head :
Round 3 :
(sc, inc)*6 (18)
Round 4 :
(sc, inc, sc)*6 (24)
Round 5 :
(3 sc, inc)*6 (30)
Round 6 :
(2 sc, inc, 2 sc)*6 (36)
Round 7 :
(5 sc, inc)*6 (42)
Round 8 :
(3 sc, inc, 3 sc)*6 (48)
Round 9 :
(7 sc, inc)*6 (54)
Round 10 :
(4 sc, inc, 4 sc)*6 (60)
Round 11 :
(9 sc, inc)*6 (66)
Info :
Eyes in row 17-18, each eye is 10 stitches apart. Nose in row 19-20.
Round 21 :
(9 sc, dec)*6 (60)
Round 22 :
(4 sc, dec, 4 sc)*6 (54)
Round 23 :
(7 sc, dec)*6 (48)
Round 24 :
(3 sc, dec, 3 sc)*6 (42)
Round 25 :
(5 sc, dec)*6 (36)
Round 26 :
(2 sc, dec, 2 sc)*6 (30)
Round 27 :
(3 sc, dec)*6 (24)
Round 28 :
(sc, dec, sc)*6 (18)
Info :
Fiberfill, fasten off and leaving a tail to sew into the body
— Ears :
Left ear (P1) :
(1 ch, 2 sc, 3 dc) in MR. Draw yarn and fasten off. Leaving a tail to sew into the head (5)
Right ear (P1) :
(2 ch, 2 dc, 3 sc) in MR. Draw yarn and fasten off. Leaving a tail to sew into the head (5)
Info :
Sewing the ears into the head in row 17-20
— Right Leg :
Round 1 :
Make a chain of 9 ch, start in second ch from the hook: sc, 6 sc, 3 sc into the last stitch, 6 sc, inc (18)
Round 2 :
inc, 6 sc, 3 inc, 6 sc, 2 inc (24)
Round 3 :
sc, inc, 7 sc, hdc, 5 inc*dc, 2 dc, 2 hdc, 2 sc, inc, sc, inc (32)
Round 7 :
10 sc, 6 dec, 10 sc (26)
Round 9 :
7 sc, 6 dec, 7 sc (20)
Round 10 :
6 sc, 4 dec, 6 sc (16)
Round 11 :
15 sc, inc (17)
Round 12 :
2 sc, dec, 9 sc, inc, 3 sc (17)
Round 13 :
inc, sc, dec, 10 sc, inc, 2 sc (18)
Round 15 :
14 sc, inc, 2 sc, inc (20)
Round 17 :
2 sc, dec, 12 sc, inc, 3 sc (20)
Round 23 :
dec, 14 sc, dec, 2 sc (18)
Round 24 :
inc, 7 sc, inc, 9 sc (20)
Round 26 :
8 sc, dec, 6 sc, inc, 3 sc (20)
Round 27 :
inc, 7 sc, dec, 10 sc (20)
Round 28 :
3 sc, inc, 11 sc, inc, 4 sc (22)
Round 31 :
3 sc, inc, 18 sc (23)
Round 32 :
19 sc, inc, 3 sc (24)
Info :
Change to Grey color
Info :
Fiberfill, cut the yarn
— Left Leg :
Round 1 :
Make a chain of 9 ch, start in second ch from the hook: sc, 6 sc, 3 sc into the last stitch, 6 sc, inc (18)
Round 2 :
inc, 6 sc, 3 inc, 6 sc, 2 inc (24)
Round 3 :
sc, inc, 2 sc, 2 hdc, 2 dc, 5 inc*dc, hdc, 7 sc, inc, sc, inc (32)
Round 7 :
10 sc, 6 dec, 10 sc (26)
Round 9 :
8 sc, 6 dec, 6 sc (20)
Round 10 :
7 sc, 4 dec, 5 sc (16)
Round 11 :
15 sc, inc (17)
Round 12 :
2 sc, inc, 9 sc, dec, 3 sc (17)
Round 13 :
inc, sc, inc, 10 sc, dec, 2 sc (18)
Round 15 :
inc, 2 sc, inc, 14 sc (20)
Round 17 :
2 sc, inc, 12 sc, dec, 3 sc (20)
Round 23 :
dec, sc, dec, 15 sc (18)
Round 24 :
inc, 9 sc, inc, 7 sc (20)
Round 26 :
3 sc, inc, 9 sc, dec, 5 sc (20)
Round 27 :
inc, 9 sc, dec, 8 sc (20)
Round 28 :
4 sc, inc, 11 sc, inc, 3 sc (22)
Round 31 :
17 sc, inc, 4 sc (23)
Round 32 :
4 sc, inc, 18 sc (24)
Info :
Change to Grey color
Info :
Fiberfill. Don't cut the yarn
— Body :
Round 1 :
From left leg, chain 3 to and slip stitch to right leg (at a position 5 stitches from the yarn end of the right leg): 24 sc, 3 sc (into 3 chain), 24 sc, 3 sc (into 3 chain) (54)
Round 5 :
13 sc, (move the marking position here) change to yellow color: 54 sc (54)
Round 7 :
Change to white color: 54 sc (54)
Round 9 :
Change to yellow color: 54 sc (54)
Round 11 :
Change to white color: (7 sc, dec)*6 (48)
Round 12 :
(3 sc, dec, 3 sc)*6 (42)
Info :
If you want to make a wire diagram to make the doll sturdy, follow the instructions in the pictures, or you can omit the diagram if you want the doll to be soft.
Round 13-22 :
42 sc (10 rounds) (42)
Round 23 :
Change to white color: (5 sc, dec)*6 (36)
Round 24 :
(2 sc, dec, 2 sc)*6 (30)
Round 25 :
Change to yellow color: (3 sc, dec)*6 (24)
Info :
Fiberfill, fasten off and cut the yarn
Item Name (P1) :
Connect hands to the body, mark the 4 positions. Sew the 6 stitches of the hand to the body.
— Hands :
Right hand :
Rnd 1: 6 sc in MR (6)
Round 5 :
(2 sc, inc)*4 (16)
Round 8 :
2 sc, sc3tog, 11 sc (14)
Round 9 :
sc, sc3tog, 10 sc (12)
Round 10 :
Change to yellow color: BLO: 12 sc; FLO: 12 sc (12)
Round 12 :
Change to white color: 12 sc (12)
Round 14-32 :
Hook 2 yellow color rows and then 2 white color rows until the hands ends: 12 sc
Info :
Fiberfill, fasten off and leaving a tail to sew into the body
Left hand :
Make same as right hand (6 sc in MR, rounds follow same sequence)
— Trousers :
Round 1 :
Start with Beige color: Make a chain of 36 ch and close circle: 1 ch, 35 sc, slst (35)
Round 5-26 :
Change to dark brown color: 35 sc (35)
Info :
Hook similar to the other pant leg and join them together
Round 27 :
32 sc, skip 3 chains of the 1st pant leg, skip 3 chains of the 2nd pant leg (and join them together), 32 sc (64)
Round 29 :
(14 dc, dec*dc)*4 (60)
Round 30 :
(4 dc, dec*dc, 4 dc)*6 (54)
Round 31 :
(7 dc, dec*dc)*6 (48)
Round 32 :
16 slst, 2 ch, 16 dc, turn
Round 33 :
2 ch, skip 1 ch, 14 dc, turn
Round 34 :
2 ch, skip 1 ch, 13 dc, turn
Round 35 :
2 ch, skip 1 ch, 12 dc, turn
Round 36 :
2 ch, skip 1 ch, 11 dc, turn
Strap :
make 2. Rnd 37: Continue to make a chain of 35 ch, start in 8th ch from the hook: 28 sc, turn. Rnd 38: 10 slst, make a chain of 35 ch, start in 8th ch from the hook: 28 sc. Fasten off. Cut the yarn.
Pocket (P1) :
Make 1. Rnd 1: Make a chain of 11 ch, start in 3rd ch from the hook: 9 dc, turn. Rnd 2: 2 ch, 9 dc, turn. Rnd 3: 2 ch, 9 dc. Fasten off and leaving a tail to sew into the trousers.
— Hair :
Round 1 :
(1 ch, 8 hdc, slst) in MR (8)
Round 2 :
1 ch, BLO: 8 inc*hdc, slst (16)
Round 3 :
1 ch, BLO: (hdc, inc*hdc)*8, slst (24)
Round 4 :
1 ch, BLO: (hdc, inc*hdc, hdc)*8, slst (32)
Wings Rnd 1-8 :
Make a chain of 20 ch, start in second ch from the hook: 3 sc, 4 hdc, 9 dc, 3 hdc, skip 1 chain, slst (19)
Round 9-10 :
Make a chain of 18 ch, start in second ch from the hook: 4 sc, 11 hdc, 2 sc, slst (17)
Round 11-12 :
Make a chain of 16 ch, start in second ch from the hook: 4 sc, 9 hdc, 2 sc, slst (15)
Round 13-14 :
Make a chain of 15 ch, start in second ch from the hook: 14 sc, slst (14)
Round 15-16 :
Make a chain of 14 ch, start in second ch from the hook: 13 sc, slst (13)
Round 17-20 :
Make a chain of 15 ch, start in second ch from the hook: 14 sc, slst (14)
Round 21-22 :
Make a chain of 16 ch, start in second ch from the hook: 4 sc, 9 hdc, 2 sc, slst (15)
Round 23-24 :
Make a chain of 18 ch, start in second ch from the hook: 4 sc, 11 hdc, 2 sc, slst (17)
Info :
Fasten off. Cut the yarn. You can use glue guns or fabric glue to attach hair into the head
— Hat :
Round 3 :
(sc, inc)*6 (18)
Round 4 :
(sc, inc, sc)*6 (24)
Round 5 :
(3 sc, inc)*6 (30)
Round 6 :
(2 sc, inc, 2 sc)*6 (36)
Round 7 :
(5 sc, inc)*6 (42)
Round 8 :
(3 sc, inc, 3 sc)*6 (48)
Round 9 :
(7 sc, inc)*6 (54)
Round 10 :
(4 sc, inc, 4 sc)*6 (60)
Round 11 :
(9 sc, inc)*6 (66)
Round 13 :
(5 sc, inc, 5 sc)*6 (72)
Round 14 :
(11 sc, inc)*6 (78)
Round 15 :
(6 sc, inc, 6 sc)*6 (84)
Round 16 :
(13 sc, inc)*6 (90)
Round 17 :
(7 sc, inc, 7 sc)*6 (96)
Round 18 :
(3 sc, dec, 3 sc)*12 (84)
Round 19 :
(5 sc, dec)*12 (72)
Round 21 :
(2 sc, dec, 2 sc)*12 (60)
Round 23 :
FLO: 24 sc, turn (24)
Round 24 :
1 ch, 8 sc, (inc, sc)*4, 8 sc, turn (28)
Round 25 :
1 ch, dec, 4 sc, (inc, 3 sc)*4, 4 sc, dec, turn (30)
Round 26 :
1 ch, 2 dec, 22 sc, 2 dec, turn (26)
Round 27 :
1 ch, 2 dec, 18 sc, 2 dec (22)
Info :
Fasten off. Cut the yarn.
— Shoes :
Right shoe :
Rnd 1: Make a chain of 9 ch, start in second ch from the hook: sc, 6 sc, 3 sc into the last stitch, 6 sc, inc, slst (18)
Round 2 :
1 ch, inc, 6 sc, 3 inc, 6 sc, 2 inc, slst (24)
Round 3 :
1 ch, sc, inc, 6 sc, hdc, 5 inc*dc, 2 dc, 2 hdc, 3 sc, inc, sc, inc, slst (32)
Round 4 :
1 ch, 12 sc, inc, sc, inc, 2 sc, inc, sc, inc, 12 sc, slst (36)
Round 5 :
1 ch, BLO: 36 sc, slst (36)
Round 6 :
Turn the sole (wrong side facing): 1 ch, 36 sc, slst (36)
Info :
Change to brown color (No.71 Yarn art Jeans)
Round 7 :
Turn the sole (wrong side facing): 1 ch, 36 sc, slst (36)
Info :
Change to white color (No.03 Yarn art Jeans)
Round 8 :
1 ch, 12 sc, 6 hdc*dec, 12 sc, slst (30)
Info :
Fasten off. Cut the yarn
Make body of the shoe :
Count 12 sc from the slip stitch to the left side and 12 sc from the slip stitch to the right side and place markers. Rnd 1: Start to the right stitch marker and with the brown color: 1 ch, 24 sc, turn (24)
Round 2-4 :
1 ch, 24 sc, turn (24)
Info :
Fasten off. Cut the yarn
Make the tongue of the shoe :
With the brown color: BLO (in the 8th round of the sole): 1 ch, 6 sc, turn. Rnd 2-7: 1 ch, 6 sc, turn. Fasten off. Cut the yarn. With the white color make the shoelaces to finish.
Left shoe :
Make same as right shoe (follow rounds same as right shoe)
Tommy the Fisher is a delightful amigurumi that makes a sweet handmade gift or charming decor piece. The pattern is detailed with photos and clear round-by-round instructions so you can recreate every cute detail. Whether you make him for yourself or as a thoughtful present, Tommy brings warmth and personality to any shelf or nursery. 🧶🧵