🧢 Beautiful ✨ Detailed πŸ’ Adorable

Sunflower Lovers Granny Square Pattern

Sunflower Lovers Granny Square Pattern
4.1β˜… Rating
2-3 Hours Time Needed
2.3K Made This
βœ‚οΈ

Intermediate Level

Ideal for those with basic crochet experience, featuring slightly more advanced stitches and techniques to expand your skills.

⏱️

Bite-Sized Project

Finishes in 2-4 hoursβ€”perfect for an afternoon of creative relaxation.

🏑

Cozy Accent

A warm touch for your space that transforms ordinary corners into inviting nooks filled with handmade charm.

About This Sunflower Lovers Granny Square Pattern

This pattern creates a single sunflower-themed granny square featuring a textured centre and layered petals. It combines mini puff stitches, front-post double crochet and clustered double crochet to build a realistic floral motif. The square is perfect for coasters, bag panels or joining into blankets and other home accessories. Photo tutorials are included for less familiar stitches so you can follow every step.

Sunflower Lovers Granny Square Pattern crochet pattern - detailed view of completed project

Worked in four colors, this pattern gives clear, photographed guidance for each special stitch. The finished square measures approximately 13cm x 13cm (5 1/2 x 5 1/2") using the recommended yarn and hook.

Why You'll Love This Sunflower Lovers Granny Square Pattern

I absolutely love this pattern because it brings a bright sunflower design to life with simple, satisfying stitchwork. I enjoy the way the mini puff stitches create a defined petal texture without too much bulk. The combination of textured stitches and a square layout makes it incredibly versatile for many projects. I also love including photo tutorials β€” they make the slightly unusual stitches approachable and boost confidence as you work.

Sunflower Lovers Granny Square Pattern step 1 - construction progress Sunflower Lovers Granny Square Pattern step 2 - assembly progress Sunflower Lovers Granny Square Pattern step 3 - details and accessories Sunflower Lovers Granny Square Pattern step 4 - final assembly and finishing

Switch Things Up

I love how easy it is to customise this square by swapping colours β€” try muted autumn tones for a fall-ready set, or bright pastels for a spring look.

I often change yarn weight to create different sizes: use a bulkier yarn and larger hook for chunky squares or a 4ply and smaller hook for delicate mini squares.

For a different texture, replace the ESC rounds with standard SC or HDC to reduce height and make a flatter square.

I sometimes add a decorative embroidered centre once the square is finished to personalize the sunflower even more.

Try adding a thin contrasting border around the finished square to make the sunflower pop when joining multiple squares into a blanket.

I like to use metallic or variegated yarn for the petal round to add subtle shimmer and visual interest to special projects.

You can experiment with changing the number of petals by adjusting the repeats in Round 4 and Round 5 but remember to keep corner placement consistent in Round 6.

I often turn the square into a coaster set or trivet by using cotton yarn for kitchen-friendly durability.

Want a wearable item? Make several squares and join them to create a statement bag panel or a bold cardigan patch β€” be creative with placement!

When making a set of squares, I always block and press each square before joining to ensure consistent size and smooth joins.

Common Mistakes & How to Fix Them

βœ— Skipping the CH1 spacer between mini puff stitches can squash the petals; always chain where instructed to give petals room and consistent shape. βœ— Not drawing the FPDC up to the same height as the beginning CH3 can leave the centre uneven; pull up the FPDC loop to match the CH3 height before completing the stitch. βœ— Incorrectly counting DC4TOG/DC5TOG clusters will alter petal counts and spacing; mark the start of each repeat and tally clusters as you go to ensure you reach the stated total. βœ— Working with inconsistent tension causes uneven rounds and misshapen corners; maintain even, relaxed tension and check stitch counts frequently. βœ— Failing to fasten off and weave in ends neatly will leave loose tails that show later; weave in ends securely and trim close to the work for a clean finish.

Sunflower Lovers Granny Square Pattern

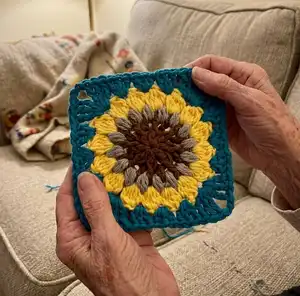
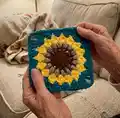
Make a sunny, textured granny square that captures the beauty of a sunflower. This pattern uses puff stitches, extended single crochet and clustered double crochet techniques to create a realistic flower centre and petals. You can use these squares for coasters, bags, blankets or as a decorative motif in many projects. Enjoy the photo tutorials included for the less familiar stitches so you can follow along with confidence.

Intermediate 2-3 Hours

Materials Needed for Sunflower Lovers Granny Square Pattern

β€” Main Fabric

  • 01
    Approximately 27m / 30 yds of aran weight yarn in total (pattern uses four colours)
  • 02
    Yarn & Colors Epic (100% cotton, 75m / 82yds per 50g) β€” total used approximately 18g across four colours
  • 03
    Yarn A: Brunet - approx 3g (4.5m / 5yds)
  • 04
    Yarn B: Clay - approx 3g (4.5m / 5yds)
  • 05
    Yarn C: Sunflower - approx 6g (9m / 10yds)
  • 06
    Yarn D: Petroleum - approx 6g (9m / 10yds)

β€” Tools Required

  • 01
    5mm crochet hook (or size required to achieve gauge)

Progress Tracker

0% Complete

β€” Materials :

Info :

-Yarn: approximately 27m/30 yds of aran weight yarn. I used a total of 18g Yarn & Colors Epic (100 % cotton, 75m/82yds per 50g) in four colours, with yarn quantities as below. Yarn A: Brunet - approx 3g (4.5m/5yds) Yarn B: Clay - approx 3g (4.5m/5yds) Yarn C: Sunflower - approx 6g (9m/10yds) Yarn D: Petroleum - approx 6g (9m/10yds) -Hook: 5mm hook (or size required to achieve gauge). This pattern would also work well if you prefer to use a different yarn weight or fibre – use an appropriate hook size for your yarn (yarn band will give guidance). This will alter your square's finished size.

β€” Finished size :

Info :

Completed granny square measures approximately 13cm x 13cm (5 Β½ x 5 Β½").

β€” Abbreviations :

Infos :

This pattern is written in U.S crochet terminology. CH – Chain. MR – Magic Ring. SLST – Slip Stitch. ST(s) - Stitch(es). SP(s) - Space(s). SK - Skip. SC – Single Crochet. ESC – Extended Single Crochet. DC – Double Crochet. FPDC – Front Post Double Crochet. TC – Treble Crochet. MP – Mini Puff Stitch. DC4TOG – Double Crochet 4 Together. DC5TOG – Double Crochet 5 Together. Extra guidance for ESC, MP, and DC4(or5)TOG stitches is given in stitch tutorials from Page 6 onwards.

β€” Gauge :

Info :

Rounds 1-3 give a circle measuring 5cm/2" diameter. A gauge swatch using double crochet would give 13 stitches & 6.5 rows in 10cm x 10cm (4" x 4") square.

β€” Notes :

Info :

Beginning CH1 does not count as stitch. Beginning CH3 counts as a DC, beginning CH4 counts as a TC. Stitches in parentheses () are worked into same ST. (Parentheses also indicate stitch counts at end of rows). Stitches in brackets [] indicate sections which are repeated. Photos are included in two places in this pattern. Those integrated with the pattern text illustrate stitch placement. Additional photos are added at the end of the pattern in stitch tutorials, providing extra guidance for stitches that may be less familiar.

β€” Rounds :

Round 1 :

Using Yarn A, work CH3 and 7 DC into a MR. SLST to top of CH3 to join (8 DC)

Round 2 :

Continuing in Yarn A, CH1 and work (SC, CH1) in each SP between DC from Round 1. SLST to top of first SC to join. (8 SC, 8 CH)

Round 3 :

Still using Yarn A, CH3 then work 1 FPDC around first DC from Round 1, drawing up stitch to same height as the beginning CH3. [SK CH1 SP from Round 2 then in next SC work 1 DC. Work 1 FPDC around next DC from Round 1] 7 times. SLST to top of CH3, and fasten off. (8 DC, 8 FPDC)

Round 4 :

Join Yarn B with a SLST in any SP between STs. Without a starting chain, work 1MP into same SP. [CH1, make 1 MP in next SP] 15 times. CH1, and join with SLST to top of first MP. Fasten off. (16 MP)

Round 5 :

Join Yarn C with a SLST in any CH1 SP. CH2, DC4TOG in same ST (counts as first DC5TOG). [CH2, DC5TOG in next SP] 15 Times. CH1, SLST to top of DC4TOG. Fasten off. (16 DC5TOG)

Round 6 :

Join Yarn D with a SLST in any CH2 SP. CH4, and work 2 TC in same SP. [Work 3 DC in next SP, 3 ESC in next SP, 3 DC in next SP. In next SP form a corner by working (3 TC, CH2, 3 TC) in same SP] 3 times. Work 3 DC in next SP, 3 ESC in next SP, 3 DC in next SP. Finish with 3 TC in your starting SP to complete corner, CH2 and SLST to top of CH4. (24 TC, 24 DC, 12 ESC) Fasten off, and weave in ends. Your Sunflower Lovers Granny Square is complete!

Info :

I’d love to see your Sunflower Lovers squares, and the projects you use them for – use the hashtag #sunflowerloversgrannysquare on Instagram, or share your projects on Lovecrafts or Ravelry. Enjoyed this project? Then you will love the Sunflower Lovers Market Bag, which uses this beautiful sunflower design as the base for a reusable shopping bag! Find the pattern here: Sunflower Lovers Market Bag or scan the QR code at top of page!

β€” Mini Puff Stitch Tutorial :

Step 1 :

Insert hook, pull up a loop. This gives two loops on hook

Step 2 :

Yarn over, insert hook back into same space, pull up a loop. This gives four loops on hook

Step 3 :

Yarn over, insert hook back into same space, pull up a loop. This gives six loops on hook

Step 4 :

Yarn over, pull through all six loops. Mini Puff (MP) complete. You will CH1 before moving on to next MP.

β€” DC4TOG Tutorial :

Step 1 :

CH2

Step 2 :

Yarn over, insert hook back into same SP. Pull up a loop. Yarn over, pull through two loops. 2 loops left on hook

Step 3 :

Yarn over, insert hook back into same SP. Pull up a loop. Yarn over, pull through two loops. 3 loops left on hook

Step 4 :

Yarn over, insert hook back into same SP. Pull up a loop. Yarn over, pull through two loops. 4 loops left on hook

Step 5 :

Yarn over, insert hook back into same SP. Pull up a loop. Yarn over, pull through two loops. 5 loops left on hook

Step 6 :

Yarn over, Pull through all 5 loops. DC4TOG is complete.

β€” DC5TOG Tutorial :

Step 1 :

Yarn over, insert hook into SP between STs. Pull up a loop. Yarn over, pull through two loops. 2 loops left on hook

Step 2 :

Yarn over, insert hook back into same SP. Pull up a loop. Yarn over, pull through two loops. 3 loops left on hook

Step 3 :

Repeat Step 2. 4 loops left on hook

Step 4 :

Repeat Step 2. 5 loops left on hook

Step 5 :

Repeat Step 2. 6 loops left on hook

Step 6 :

Yarn over, Pull through all 6 loops. DC5TOG is complete.

β€” Extended SC Tutorial :

Step 1 :

Insert hook into SP. Yarn over, pull up a loop.

Step 2 :

Yarn over. Pull through one loop only.

Step 3 :

Yarn over again. Pull through both loops. Extended Single Crochet (ESC) is complete. In this way, you create a stitch similar to a SC, but with extra height!

Assembly Instructions

  • Fasten off each colour at the end of the round and weave in ends securely using a yarn needle to prevent tails from showing.
  • Block each completed square lightly if needed to even out stitches and ensure the finished size measures approximately 13cm x 13cm before joining.
  • Join multiple squares using your preferred seaming method (mattress stitch, whipstitch or join-as-you-go) ensuring corners align for a neat border.
  • If using the square as a bag base (Sunflower Lovers Market Bag), attach the square as directed in the Market Bag pattern, ensuring the sunflower is centered on the bag panel.
  • Weave in ends after joining and press lightly or pin to shape before finishing to secure seams and neat edges.

Important Notes

  • πŸ’‘Beginning CH1 does not count as a stitch; beginning CH3 counts as a DC and beginning CH4 counts as a TC.
  • πŸ’‘Stitches in parentheses () are worked into the same stitch and show stitch counts at the end of rounds.
  • πŸ’‘Stitches in brackets [] indicate the sections which are repeated β€” follow these repeats exactly for correct shaping.
  • πŸ’‘Photos are included within the pattern and stitch tutorials to illustrate stitch placement for less familiar stitches.

This cheerful Sunflower Lovers Granny Square pattern brings sunny texture to your projects with a realistic petal design and simple construction. Use it for coasters, panels, bags or join many together for a blanket β€” the possibilities are endless. Share your creations using #sunflowerloversgrannysquare and spread the sunny vibes! 🧢🌻✨

You ask,

we answer.

FAQs

What size will the finished piece be?

The completed granny square measures approximately 13cm x 13cm (5 Β½ x 5 Β½") when worked in the recommended yarn and 5mm hook.

Can I use different yarn weights for this pattern?

Yes, you can substitute yarn weight, but your finished square size will change; use an appropriate hook for your chosen yarn and check gauge before proceeding.

Do I need prior crochet experience for this pattern?

This pattern is rated intermediate, so basic crochet knowledge plus familiarity with puff stitches and post stitches is recommended; photo tutorials are included to help.

How long does this project typically take to complete?

Most crocheters complete a single square in about 2-3 hours, though time will vary by experience and chosen yarn.