🧢 Beautiful ✨ Detailed πŸ’ Adorable

Tofi the Mushroom Amigurumi Pattern

Tofi the Mushroom Amigurumi Pattern
4.6β˜… Rating
5-7 Hours Time Needed
1.4K Made This
βœ‚οΈ

Intermediate Level

Ideal for those with basic crochet experience, featuring slightly more advanced stitches and techniques to expand your skills.

⏱️

Weekend Treat

Takes 5-7 hours, making it an enjoyable project to finish over a couple of days.

🧸

Cute Companion

An adorable friend to cherish, handcrafted with love to bring comfort and joy for years to come.

About This Tofi the Mushroom Amigurumi Pattern

This pattern creates Tofi, a charming mushroom amigurumi with a large cap, tiny mug and embroidered grass details. You will crochet multiple small parts and assemble them to form a seated mushroom character with personality. Techniques used include magic circle starts, increases, back loop rows, bobble stitches and surface embroidery.

Tofi the Mushroom Amigurumi Pattern crochet pattern - detailed view of completed project

The project uses super-bulky yarn and a 6mm hook for a soft, chunky result and measures about 25cm tall. Clear placement and assembly notes help you position the face, spots and accessories accurately.

Why You'll Love This Tofi the Mushroom Amigurumi Pattern

I absolutely love this pattern because it combines simple shaping with cute detailing that brings so much personality to the finished piece. I enjoy how the large cap and tiny mug create a whimsical scene that is fun to stitch and display. The embroidery and spots let me add my own creative touches, so every Tofi feels unique. Working this pattern is relaxing and rewarding β€” I always smile when the face comes together.

Tofi the Mushroom Amigurumi Pattern step 1 - construction progress Tofi the Mushroom Amigurumi Pattern step 2 - assembly progress Tofi the Mushroom Amigurumi Pattern step 3 - details and accessories Tofi the Mushroom Amigurumi Pattern step 4 - final assembly and finishing

Switch Things Up

I love how versatile this pattern is for customization! You can change the cap color and make a blue or pink Tofi by swapping the yellow yarn for any main color you like.

Want to make a mini or giant version? Adjust your yarn weight and hook size β€” use thinner yarn and a smaller hook for a tiny keychain, or bulky yarn and a larger hook for a cuddly giant version.

I often add extra embroidery around the stem: try tiny flowers, mushrooms or initials to personalize your piece for gifts and special occasions.

Switch the eye type to embroidered eyes or larger safety eyes for a different expression; moving the eyes slightly closer or farther apart changes the character's personality.

For a seasonal twist, add a tiny scarf or little hat to the cap, or create holiday-themed spots and embroidery to match the season.

Try using variegated yarn for the cap to get a mottled, painterly effect without changing colors often β€” it creates beautiful, organic spots and depth.

I sometimes add wire inside the arms for posability so Tofi can hold accessories; use thin craft wire and wrap it before inserting to keep it stable.

If you want a plush, weighted base, add a small pouch of plastic pellets to the bottom for extra stability so Tofi sits sturdier on shelves.

Experiment with different cheek styles β€” embroidered blush, felt circles, or tiny pom-poms β€” each gives a distinct cute look.

I recommend trying alternate yarn textures like boucle or chenille for a whimsical, soft result; just be mindful of stitch visibility for face placement.

Common Mistakes & How to Fix Them

βœ— Skipping stitch markers when changing sections makes placement confusing; mark the start of rounds and color-change rows to keep track of your position. βœ— Overstuffing the stem or cap leads to misshapen parts and difficulty assembling; stuff gradually and firmly but avoid overfilling the brown cap edge so the channel can close. βœ— Forgetting to leave long tails when fastening off small items prevents easy sewing; always leave a long tail for sewing spots, mug and cheeks. βœ— Not checking stitch counts after increases results in uneven shaping; count at the end of each increase round to ensure the correct number of stitches. βœ— Sewing parts without pinning first causes asymmetry; pin or use safety pins to position legs, arms and mug before permanently sewing. βœ— Pulling yarn too tight when embroidering will pucker the fabric; use gentle tension when making surface V stitches and bee details.

Tofi the Mushroom Amigurumi Pattern

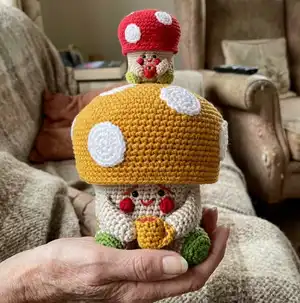
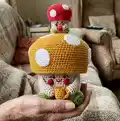
Make a delightful Tofi the Mushroom amigurumi with clear step-by-step instructions, colorful photos, and friendly shaping tips. You will crochet the stem, cap, legs, arms, cheeks, spots and tiny mug, then assemble and embroider charming grass details. This pattern is designed to help you create a cuddly decorative toy with a playful personality.

Intermediate 5-7 Hours

Materials Needed for Tofi the Mushroom Amigurumi Pattern

β€” Main Fabric

  • 01
    Yellow - Himalaya Everyday Big (70806) 100% anti-pilling acrylic [2.5 balls, around 250g]
  • 02
    Beige - Himalaya Everyday Big (70804) 100% anti-pilling acrylic [1.5 balls, around 120g]
  • 03
    Green - Himalaya Everyday Big (70818) 100% anti-pilling acrylic [Less than 1 ball, around 50g]
  • 04
    Warm Brown - Himalaya Everyday Big (70825) 100% anti-pilling acrylic [Less than 1 ball, around 50g]
  • 05
    White - Himalaya Everyday Big (70801) 100% anti-pilling acrylic [Less than 1 ball, around 50g]
  • 06
    Red - Himalaya Everyday Big (70815) 100% anti-pilling acrylic [Less than 1 ball, around 20g]

β€” Tools Required

  • 01
    Crochet hook size 6mm (10/0)
  • 02
    Optional crochet hook size 2.5mm (4/0) for mini version
  • 03
    Yarn needle for sewing and weaving ends
  • 04
    Scissors
  • 05
    Stitch markers
  • 06
    Polyester stuffing / filling material
  • 07
    Safety eyes 1cm (0.3 inch) - Black (2 pieces)
  • 08
    Small amount of black yarn for bee embroidery (optional)
  • 09
    Pencil (to push brown part into mug)
  • 10
    Pins for assembly

Progress Tracker

0% Complete

β€” Mug :

Round 1 :

Start with a magic circle, 6sc in the loop. [6st]

Round 2 :

1 sc, 1 inc. Repeat. [9st]

Info :

Change to YELLOW yarn.

Round 3 :

[YELLOW] BACK LOOP this row, sc all around. [9st]

Round 4 :

Sc all around. [9st]

Round 5 :

Sc all around. [9st]

Round 6 :

Sc all around. [9st]

Round 7 :

Sc all around. [9st]

Round 8 :

1 sc, 1 dec. Repeat. [6sc] Fasten off with a very long tail.

Info :

With the help of a pencil, push the brown part in as the inside part of the cup. Very lightly stuff the rest of the cup. Using your long tail, weave loose ends through each stitch and pull it close.

Info :

Feed your tail inside first, then pull it out from where you want the bottom of your mug handle to start. Using adjacent stitches, attach your yarn tail. Chain 9 (or more, if you think you need more) and attach your last chain to the brim of the mug with a slip stitch and fasten off.

Info :

I also used this new yarn tail to weave it back in and come out again to shape my handle as an half-S shape. Leave a long tail again, you will use this to sew the mug to the hands.

β€” Spots (x6) :

Round 1 :

With your white yarn: Start with a magic circle, 8sc in the loop. [8st]

Round 2 :

Increase each stitch. [16st]

Round 3 :

1 sc, 1 inc. Repeat. [24st]

Info :

Fasten off with a long tail, you will use this tail to sew the spots to the mushroom cap later. Make at least six. If you want spottier mushroom, make eight.

β€” Cheeks (x2) :

Info :

With your RED yarn, chain 3. We'll make a simple bobble stitch of 3 columns to the first stitch.

Step 1 :

Yarn over, using the first chain you created, pull up a loop. You have 3 loops on the hook. Pull through the first two. You have 2 loops on the hook.

Step 2 :

On the same stitch, do it again: Yarn over, pull up a loop. You have 4 loops on the hook. Pull through the first two. You have 3 loops on the hook.

Step 3 :

On the same stitch, do it again: Yarn over, pull up a loop. You have 5 loops on the hook. Pull through the first two. You have 4 loops on the hook.

Step 4 :

Pull through all of them. Chain 1 to fasten off. Cut a long tail, we’ll use both of the tails to sew the cheeks. Push your bobble out to give it a round shape. Make two.

β€” Legs (x2) :

Info :

We start from the feet. With your GREEN yarn:

Round 1 :

Start with a magic circle, 6sc in the loop. [6st]

Round 2 :

Increase all stitches. [12st]

Round 3 :

1 sc, 1 inc. Repeat. [18st]

Round 4 :

BACK LOOP this row, sc all around. [18 st]

Info :

Change to BEIGE yarn.

Round 5 :

[BEIGE] Sc all around. [18st]

Round 6 :

Sc all around. [18st]

Round 7 :

Sc all around. [18st] Fasten off with a long tail.

Info :

Make two. Stuff firmly.

β€” Arms (x2) :

Info :

With your BEIGE yarn:

Round 1 :

Start with a magic circle, 6sc in the loop. [6st]

Round 2 :

1 sc, 1 inc. Repeat. [9st]

Round 3 :

Sc all around. [9st]

Round 4 :

Sc all around. [9st]

Round 5 :

Sc all around. [9st]

Round 6 :

Sc all around. [9st]

Round 7 :

Sc all around. [9st]

Round 8 :

Sc all around. [9st]

Round 9 :

Sc all around. [9st]

Round 10 :

Sc all around. [9st]

Info :

Stuff firmly at the hands, then lightly towards the arm. Fold half, sc across the top to close the arm. Make two.

β€” Mushroom Stem :

Info :

We start our mushroom from the bottom. With your GREEN yarn:

Round 1 :

Start with a magic circle, 8sc in the loop. [8st]

Round 2 :

Increase all stitches. [16st]

Round 3 :

1 sc, 1 inc. Repeat. [24st]

Round 4 :

2 sc, 1 inc. Repeat. [32st]

Round 5 :

3 sc, 1 inc. Repeat. [40st]

Round 6 :

4 sc, 1 inc. Repeat. [48st]

Round 7 :

5 sc, 1 inc. Repeat. [56st]

Round 8 :

BACK LOOP this row, sc all around. [56st]

Round 9 :

Sc all around. [56st] Change to BEIGE yarn.

Rounds 10-24 :

[BEIGE] 15 rows of sc all around. [56st] Change to BROWN yarn.

Round 25 :

[BROWN] 6 sc, 1 inc. Repeat. [64st]

Round 26 :

7 sc, 1 inc. Repeat. [72st]

Round 27 :

8 sc, 1 inc. Repeat. [80st]

Round 28 :

19 sc, 1 inc. Repeat. [84st]

Info :

Put a marker on your last stitch and fasten off.

β€” Face :

Info :

Use the photo as a reference how to place the face. Your marker needs to be at the back of your project. I recommend starting by placing the eyebrows.

Info :

Counting beige rows from the top, leave the first beige row clear. Place the top of the first eyebrow between row 1-2 and the bottom of the eyebrow between row 3-4. In total, the eyebrow is 2sc wide. Between two eyebrows (the top part), there are 3sc.

Info :

Place your Amigurumi eyes between row 3-4, where the top and the bottom of the eyebrow aligns. Place your cheeks by feeding the end tails in and making a knot inside. The cheek is between row 5-7. For the mouth, make a simple U shape between row 5-6.

Info :

After completing the face, stuff the beige part of the mushroom stem very firmly, leave brown part empty for now.

β€” Mushroom Cap :

Info :

With your YELLOW yarn:

Round 1 :

Start with a magic circle, 6sc in the loop. [6st]

Round 2 :

Increase all stitches. [12st]

Round 3 :

1 sc, 1 inc. Repeat. [18st]

Round 4 :

2 sc, 1 inc. Repeat. [24st]

Round 5 :

3 sc, 1 inc. Repeat. [30st]

Round 6 :

4 sc, 1 inc. Repeat. [36st]

Round 7 :

5 sc, 1 inc. Repeat. [42st]

Round 8 :

6 sc, 1 inc. Repeat. [48st]

Round 9 :

7 sc, 1 inc. Repeat. [54st]

Round 10 :

8 sc, 1 inc. Repeat. [60st]

Round 11 :

9 sc, 1 inc. Repeat. [66st]

Round 12 :

10 sc, 1 inc. Repeat. [72st]

Round 13 :

11 sc, 1 inc. Repeat. [78st]

Round 14 :

12 sc, 1 inc. Repeat. [84st]

Rounds 15-26 :

12 rows of sc all around. [84st]

Info :

Firmly fill the mushroom cap halfway. Fill firmly as you go.

Round 27 :

Sandwich this row and the last BROWN row of mushroom stem together, sc all around. [84st]

Rounds 28-30 :

Continue only with YELLOW, 3 rows of sc all around. [84st]

Info :

Fasten off, shape the underside of the mushroom cap, creating a deep channel underneath.

β€” Final Placement :

SPOTS :

Sew the white spots all around the mushroom cap. I started by placing one on the left side of the face and then gone up and right, evenly distributing the spots. I made 8 spots for a spottier look, but for smaller Tofis, 6 spots would be enough.

MUG :

Position your mug so that it stays properly up and using the long tail, sew it to inside of both hands. I prefer sewing the mug first, as it is easier to see where I am putting it. But if you really can’t see where it will go, wait after you sew the arms in.

ARMS :

Position the top of the arms like this / \ between top BEIGE rows 4-7, just past 2 sc from the cheeks. Make sure the mug is holding up. You can adjust the arms depending on how you want Tofi to hold the mug.

LEGS :

Starting from the green back loop, sew your legs at the bottom 9 rows. Make sure that Tofi can sit properly without falling over to his face :) The outer stitches of the legs are roughly on the same line of where the arms end.

β€” Grass Embroidery :

Info :

Use the photos as your reference. Use the green back loop stitches to make simple V lines first. I placed a couple of white Vs as flowers and few double-brown lines as cattail plants. Since my Tofi is yellow, I also added a tiny bee by going over the same stitch with yellow and a bit of spare black yarn and added a white V for bee wings. Place your plants all around the mushroom backside starting from one leg to the other.

Assembly Instructions

  • Sew the white spots to the mushroom cap using the long tails left from each spot; distribute them evenly and stitch firmly to the cap surface.
  • Position and sew the mug to the inside of both hands using the long tail from the mug; pin the mug first to check placement before stitching permanently.
  • Attach arms between top beige rows 4-7, positioning them just past two single crochet from the cheeks so the mug sits naturally between the hands.
  • Sew legs to the bottom nine rows using the green back loop stitches as anchors; make sure Tofi sits level and that outer leg stitches line up with the arms.
  • Place and stitch cheeks, eyes and mouth according to face placement notes: eyes between rows 3-4, cheeks between rows 5-7, mouth between rows 5-6.
  • Embroider grass and plants across the back of the mushroom stem using back loop stitches for V lines and use small stitches for flowers and bee details.

Important Notes

  • πŸ’‘Use stitch markers to mark the start of rounds and each color-change row to maintain correct stitch counts.
  • πŸ’‘Leave long tails when fastening off small parts (spots, cheeks, mug) to make sewing easier and neater.
  • πŸ’‘Stuff the beige stem very firmly and keep the brown top part less stuffed so the cap can sit and the underside channel closes properly.
  • πŸ’‘Pin or use safety pins to place legs and arms before sewing to ensure symmetry and correct positioning.
  • πŸ’‘Use gentle tension for embroidery stitches to avoid puckering the fabric; practice on a scrap if needed.

This adorable Tofi the Mushroom makes a charming handmade gift or display piece, full of personality and cozy charm. Add spots, tiny mugs and embroidered grass to make each Tofi unique and full of character. You will love how fun and satisfying it is to watch the little face appear as you stitch. πŸ§ΆπŸ„βœ¨

You ask,

we answer.

FAQs

What size will the finished piece be?

The finished amigurumi measures approximately 25 cm (9.8 inches) tall when using the recommended super-bulky yarn and 6mm hook.

Can I use different yarn weights for this pattern?

Yes, you can use different yarn weights but the final size will change; adjust your hook size accordingly and expect a different look and feel.

Do I need prior crochet experience for this pattern?

This pattern is rated intermediate, so basic knowledge of magic ring, increases, decreases and back-loop work is recommended for best results.

How long does this project typically take to complete?

Most crocheters complete this project in 5-7 hours, though time may vary based on experience level, customization and embroidery details.