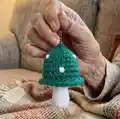
About This Toadstool Keychain Amigurumi Pattern
This pattern teaches you how to crochet a tiny toadstool keychain with a small cap and stalk using simple round shaping. The design uses very little yarn and is ideal for using up scraps. The instructions include both UK and US stitch terms so you can follow whichever you prefer.

You will make a stuffed stalk and a layered cap that are joined together and finished with sewn-on spots. The pattern is compact, quick to make, and great for beginners wanting a fast project.
Why You'll Love This Toadstool Keychain Amigurumi Pattern
I absolutely love this pattern because it turns tiny amounts of yarn into adorable, gift-ready keychains that brighten up everyday items. I enjoy how quick each toadstool is to make — you can whip one up in a short sitting. The simple shaping gives a satisfying three-dimensional result with minimal finishing. I also love that it's a great scrap-busting project and makes lovely small presents or market items.
Switch Things Up
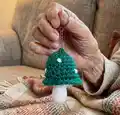
I love to change up the colours to create a whole family of toadstools; try bright primary colours or muted pastels for different moods.
I often swap the main yarn for a bulkier yarn and a larger hook to make a chunkier, cuddlier version of this keychain.
To make tiny keyrings for bags I use thin yarn and a smaller hook to get an even smaller finished piece that still holds shape nicely.
I sometimes embroider tiny faces on the stalk to make character toadstools — simple eyes and a smile add personality instantly.
Try adding a tiny crocheted flower or leaf to the cap edge for a seasonal or themed variation.
For a more textured cap, alternate rounds worked in the FLO to create a ridged effect that catches the light.
Use metallic or sparkly yarn for the cap to make whimsical, festive keychains suitable for gifts and holiday markets.
If you want a poseable charm, carefully insert a short length of thin wire into the stalk before stuffing to give a little bend to the finished piece.
I also like to make mini sets in coordinating colours and attach them to a single split ring so they become a decorative charm cluster.
For an eco-friendly approach, use leftover scrap yarns from other projects and mix colours for a patchwork cap effect that is unique each time.
Common Mistakes & How to Fix Them
✗ Skipping the stitch marker when working continuous rounds can cause you to lose track of the start of the round; place a marker at the last stitch of each round to keep your counting accurate.
✗ Overstuffing the stalk or cap will make the stitches spread and stuffing show through; stuff gradually, adding small amounts until the piece is firm but squeezable.
✗ Not working in the correct loop (FLO/BLO) can change the finished shape and size; read the row notes carefully and work in front or back loops where requested.
✗ Joining the cap and base incorrectly can leave uneven seams; pick up the base and place wrong sides together, then work through both layers evenly to the specified number of stitches.