🧢 Beautiful ✨ Detailed πŸ’ Adorable

SpaceBall Amigurumi Pattern

SpaceBall Amigurumi Pattern
4.9β˜… Rating
5-7 Hours Time Needed
3.3K Made This
βœ‚οΈ

Intermediate Level

Ideal for those with basic crochet experience, featuring slightly more advanced stitches and techniques to expand your skills.

⏱️

Weekend Treat

Takes 5-7 hours, making it an enjoyable project to finish over a couple of days.

🧸

Cute Companion

An adorable friend to cherish, handcrafted with love to bring comfort and joy for years to come.

About This SpaceBall Amigurumi Pattern

This pattern creates a bright, round SpaceBall toy with eight flexible arms designed for pulling and playing. You will crochet separate arms, attach them during the body construction, and finish with embroidered features for personality. The design focuses on tactile play, color learning, and safe construction for children aged one and over.

SpaceBall Amigurumi Pattern crochet pattern - detailed view of completed project

The arms are long and slightly hollow so they can be pulled in multiple directions for sensory engagement. Simple embroidery adds charming details to personalize your SpaceBall.

Why You'll Love This SpaceBall Amigurumi Pattern

I absolutely love this pattern because it combines playful movement with simple amigurumi techniques that really delight children. I appreciate how the arms can be pulled in all directions, creating interactive play and sensory exploration. I love the process of attaching the arms as you crochet the body β€” it makes the construction clever and satisfying. I also enjoy adding the embroidered spots and expressions, because small details bring so much personality to the finished toy.

SpaceBall Amigurumi Pattern step 1 - construction progress SpaceBall Amigurumi Pattern step 2 - assembly progress SpaceBall Amigurumi Pattern step 3 - details and accessories SpaceBall Amigurumi Pattern step 4 - final assembly and finishing

Switch Things Up

I love customizing colors to make each SpaceBall unique; try pastel shades for a softer baby-friendly version or neon brights for a playful, modern look.

You can change the arm length by adjusting the number of shaft rows (the 60-row section) to make longer or shorter arms for different play experiences.

If you want a smaller keychain version, use sport or fingering weight yarn with a smaller hook and reduce the body increase rounds accordingly to keep proportions.

I often add felt or embroidered accessories like tiny stars or initials to personalize a SpaceBall for a baby shower or birthday gift.

For a sturdier toy, consider using a slightly tighter tension and smaller hook; this reduces gaps where stuffing might show when arms are pulled.

I sometimes add a small bell or rattle inside the body before final stuffing to make it sound engaging for babies, ensuring it is sewn securely and safely enclosed.

Try alternative stuffing: small fabric scraps with polyester stuffing to reduce weight or add weight to the base for a more grounded feel when played with.

I recommend experimenting with embroidered facial expressions to change the toy's personality β€” a big smile, wink, or sleepy eyes make very different characters.

If you want posable arms, you can insert thin craft wire into the hollow shaft before closing, but make sure ends are well-covered and not accessible to small children.

I also enjoy making sets with matching mini SpaceBalls in complementary colors for decorative garlands or sensory play stations.

Common Mistakes & How to Fix Them

βœ— Skipping stitch markers during attachment rounds can cause misplacement of arms; use markers to mark where each arm will be inserted before you begin round 8 and round 19 to keep symmetry. βœ— Forgetting to leave the pipe part hollow in the arm will prevent the arm from being pullable; follow the instruction to leave 9 SC hollow and work the 60 rows for the shaft before closing the arm head. βœ— Understuffing or overstuffing arms and body can distort shape and functionality; stuff the bulb parts firmly and the body gradually, shaping as you go, and push filler back in with a stick when testing arms. βœ— Not working the single crochet rounds around the eyes can leave eyes loose and uneven; crochet 15 SC around each eye for two rounds to secure them neatly and evenly. βœ— Pulling yarn too tight during decreases can flatten the sphere and make sewing difficult; maintain consistent tension and stuff gradually to keep a smooth, spherical shape.

SpaceBall Amigurumi Pattern

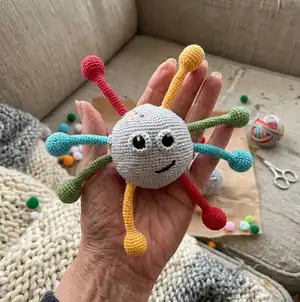
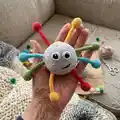
Create a colorful, tactile SpaceBall toy that encourages fine motor skills and playful learning. This cheerful amigurumi features eight pullable arms in bright colors and an embroidered face, making it a charming gift for little ones. You will enjoy assembling the pieces as you crochet the body and adding personalized embroidered details. Recommended for ages 1 and up, this project is a fun way to practice amigurumi techniques and color placement.

Intermediate 5-7 Hours

Materials Needed for SpaceBall Amigurumi Pattern

β€” Main Fabric

  • 01
    YarnArt Jeans 50g/160 m - 55% cotton, 45% acrylic; Shade 80 (grey) - main body (quantity: approx 50g)
  • 02
    YarnArt Jeans 50g/160 m - Shade 53 (black) - small details and eyes (quantity: small amount)
  • 03
    YarnArt Jeans 50g/160 m - Shade 03 (white) - eye highlights and securing (quantity: small amount)
  • 04
    YarnArt Jeans 50g/160 m - Shade 26 (red) - arm color (make one arm, approx 20-30g)
  • 05
    YarnArt Jeans 50g/160 m - Shade 69 (green) - arm color (make one arm, approx 20-30g)
  • 06
    YarnArt Jeans 50g/160 m - Shade 35 (yellow) - arm color (make one arm, approx 20-30g)
  • 07
    YarnArt Jeans 50g/160 m - Shade 33 (blue) - arm color (make one arm, approx 20-30g)
  • 08
    Fiber filler - enough to stuff body and bulb ends (approx 50-100g)

β€” Tools Required

  • 01
    Crochet hook size 2.0 mm
  • 02
    Fiber filler / polyester stuffing
  • 03
    Scissors
  • 04
    Large eye needle
  • 05
    Wooden stick or chopstick (to push stuffing back in)
  • 06
    Stitch markers (if necessary)
  • 07
    Yarn needle for sewing and embroidery

Progress Tracker

0% Complete

β€” Supplies :

Info :

2 -mm hook; Yarn: YarnArt Jeans 50gr\160 m; 55% cotton; 45 % acrylic: shades: 80 (grey), 53 (black), 03 (white), 26 (red), 69 (green), 35 (yellow), 33 (blue); Fiber filler; Scissors, large eye needle, a wooden stick, markers if necessary.

β€” Abbreviations :

Infos :

MR – magic/amigurumi ring. CH – (turning) chain. DEC - decrease. INC - increase. SC – single crochet. SL ST – slip stitch. (...) *n - repeat n times the sequence in brackets. (...) – number of stitches in a row/rnd.
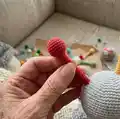
β€” Arms (make 4) :

Info :

Begin crocheting in any color you like. You should make pieces in 4 different colors. I used red, green, yellow, and blue. I began with red.

Round 1 :

6 MR (6)

Round 2 :

INC *6 (12)

Round 3 :

(1 SC, INC)*6 (18)

Round 4 :

(2 SC, INC)*6 (24)

Round 5 - 8 :

4 rnds straight: 24 SC

Round 9 :

(DEC, 2 SC)*6 (18)

Info :

Stuff tightly.

Round 10 :

(DEC, 1 SC)*6 (12)

Round 11 :

(DEC, 2 SC)*3 (9)

Info :

Further on leave the pipe part of 9 SC hollow. Go on crocheting 60 rows.

Round 12 - 71 :

60 rnds straight: 9 SC

Round 72 :

(INC, 2 SC)*3 (12)

Round 73 :

(1 SC, INC)*6 (18)

Round 74 :

(2 SC, INC)*6 (24)

Round 75 - 78 :

4 rnds straight: 24 SC

Round 79 :

(DEC, 2 SC)*6 (18)

Info :

Stuff tightly.

Round 80 :

(DEC, 1 SC)*6 (12)

Round 81 :

DEC*6 fasten off.

β€” Body :

Info :

Begin crocheting with grey yarn. Be very attentive, as you are going to attach arms pieces as you crochet the body.

Round 1 :

6 MR (6)

Round 2 :

INC *6 (12)

Round 3 :

(1 SC, INC)*6 (18)

Round 4 :

(2 SC, INC)*6 (24)

Round 5 :

(3 SC, INC)*6 (30)

Round 6 :

(4 SC, INC)*6 (36)

Round 7 :

(5 SC, INC)*6 (42)

Info :

Take red and yellow arm pieces at this stage.

Round 8 :

Chain 3, skip 3 SC, put the yellow arm and continue crocheting the round. 3 SC, INC, (6 SC, INS)*2, 3 CH, put the red arm, 3 SC, INC, (6 SC, INC)*2. The arms should be placed opposite each other symmetrically. (48)

Round 9 :

(7 SC, INC)*6 (54) (work 1 SC into each CH)

Round 10 :

(8 SC, INC)*6 (60)

Round 11 :

(9 SC, INC)*6 (66)

Round 12 :

(10 SC, INC)*6 (72)

Round 13 :

(11 SC, INC)*6 (78)

Round 14 :

(12 SC, INC)*6 (84)

Round 15 - 18 :

4 rnds straight : 84 SC

Round 19 :

In this round you want to attach green and blue arms. 6 SC, 3 CH, skip 3 SC, put the green arm, 39 SC, 3 CH, skip 3 SC, blue arm, 33 SC.

Round 20 - 24 :

5 rnds straight: 84 SC.

Round 25 :

In this round place the remaining loose ends of blue and green arms. 3 SC, 3 CH, skip 3 SC, put the blue arm, 39 SC, 3 CH, skip 3 SC, green arm, 36 SC (84). Yellow and red pieces should go between the green and blue pieces inside the toy.

Round 26 - 29 :

4 rnds straight: 84 SC.

Info :

Further on work decreases.

Round 30 :

(DEC, 12 SC)*6 (78)

Round 31 :

(DEC, 11 SC)*6 (72). Stuff the piece.

Round 32 :

(DEC, 10 SC)*6 (66)

Round 33 :

(DEC, 9 SC)*6 (60)

Round 34 :

(DEC, 8 SC)*6 (54)

Round 35 :

(DEC, 7 SC)*6 (48)

Round 36 :

In this round attach the r loose ends of red and yellow arm pieces. DEC, 1 SC, 3 CH, skip 3 SC, put the red arm, 2 SC, DEC, (6 SC, DEC)*2, 1 SC, 3 CH, skip 3 SC, put the yellow arm, 2 SC, (DEC, 6 SC)*2 (42)

Round 37 :

(DEC, 5 SC)*6 (36). Work 1 SC into each CH.

Round 38 :

(DEC, 4 SC)*6 (30).

Info :

Stuff tightly. Shape a nice sphere.

Round 39 :

(DEC, 3 SC)*6 (24)

Round 40 :

(DEC, 2 SC)*6 (18)

Round 41 :

(DEC, 1 SC)*6 (12)

Round 42 :

DEC*6 fasten off.

β€” Eyes (make 2) :

Info :

Begin crocheting in black yarn.

Round 1 :

6 MR (6)

Round 2 :

INC *6 (12)

Round 3 :

(1 SC, INC)*6 (18), SL ST, fasten off.

Info :

Place the eyes between rounds 25 to 29, 4 SC apart. Secure them in place with white thread, embroider 3 white stitches on top of the eyes and stitch semicircles at the bottom of each eye.

Info :

Now you need to single crochet round the eyes. Insert your hook into the body and work 15 SC around the eyes. Do 2 rounds.

Info :

Embroider a mouth in black under the left eye between rounds 30 and 32, make 2 stitches.

β€” Embroidery :

Info :

Embroider small spots over the top of the head above the right eye and over the back using red, yellow, green, and blue yarn with cross-stitch. You can add these spots wherever and however you like, the key thing is to make the toy bright and attractive.

β€” Please note :

Info :

Quite tricky is the issue of the filler, which might come out when the arms are pulled. I always test the arms, and push the filler back in with a chopstick, and I simply cut the excess stuffing with scissors.

Info :

For the best effect, you could single crochet round each opening, from where the arms come out (that is, 8 openings). Insert your hook into the corner of the hole on the body and work 3 SC, 2 SC to the corner, 3 SC, 2 SC - round 1 is done. Round 2 - 10 SC, SL ST.

Assembly Instructions

  • Attach red and yellow arm pieces during Round 8 of the body: chain 3, skip 3 SC, insert the yellow arm, and continue crocheting so the arm shaft is captured in the body layer; place red opposite the yellow for symmetry.
  • Attach green and blue arm pieces during Round 19 of the body using 6 SC, 3 CH placement: insert the arm through the chain space as written so the arms run inside the toy before closing.
  • When placing the remaining loose ends of blue and green arms in Round 25, make sure yellow and red pieces sit between the green and blue pieces inside the toy to keep even spacing and allow pulling action.
  • Sew the eyes in position between rounds 25-29, 4 SC apart, secure with white thread and embroider white highlights and semicircles on each eye for detail.
  • After decreasing rounds and before final closing, stuff the body firmly and test each arm by pulling gently; push stuffing back in with a chopstick if it works loose and finish closing the opening with single crochet round adjustments as recommended.

Important Notes

  • πŸ’‘Use stitch markers to track where each arm will be attached during Round 8, Round 19, Round 25, and Round 36 to maintain symmetry and spacing.
  • πŸ’‘Stuff the bulb ends firmly and the body gradually; overstuffing can distort the spherical shape while understuffing reduces structural stability.
  • πŸ’‘When testing the arms, push the filler back in with a wooden stick if it comes out and trim excess stuffing with scissors for a clean finish.
  • πŸ’‘Single crochet around each arm opening after assembly (3 SC, 2 SC to corner sequence, round 2 = 10 SC, SL ST) to secure edges and keep filler from escaping.

This cheerful SpaceBall is a playful addition to any nursery or playroom, designed to encourage pulling, exploring, and color recognition. The bright arms and embroidered details make it fun to interact with, and the clever attachment technique keeps everything secure. Make one for a child, a baby shower, or as a colorful handmade gift to bring smiles. πŸ§ΆπŸ€—

You ask,

we answer.

FAQs

What size will the finished piece be?

The finished toy measures approximately 30 cm arm length and the body forms a small sphere roughly 12-14 cm in diameter using the recommended yarn and 2 mm hook.

Can I use different yarn weights for this pattern?

Yes, you can use different yarn weights but this will change the final size; choose an appropriate hook and adjust stuffing amounts and arm row counts to maintain shape and functionality.

Do I need prior crochet experience for this pattern?

This pattern is rated intermediate; basic amigurumi experience and familiarity with increases, decreases, and working in the round are recommended for best results.

How long does this project typically take to complete?

Most crocheters complete this project in 5-7 hours depending on experience, color changes, and time spent on assembly and embroidery.