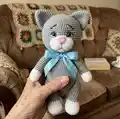
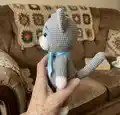
Make an adorable handmade cat named Tishka using this step-by-step crochet pattern. Youll work simple amigurumi techniques to create a soft, poseable toy with sculpted muzzle and fluffy fur. The pattern includes full rounds, assembly tips, and decoration notes so you can finish a charming keepsake. Ideal for gifting or keeping as a cozy handmade companion.
Progress Tracker
0% Complete
— Head :
Round 1 :
start 6 sc in a mr (6)
Round 3 :
(1 sc, inc)6 (18)
Round 4 :
(2 sc, inc)6 (24)
Round 5 :
(3 sc, inc)6 (30)
Round 6 :
(4 sc, inc)6 (36)
Round 7 :
(5 sc, inc)6 (42)
Round 10 :
(6 sc , inc)6 (48)
Round 13 :
(7 sc, inc)6 (54)
Round 16 :
16 sc, 8 inc, 6 sc, 8 inc, 16 sc (70)
Round 22 :
16 sc, (1 sc, dec)6, 2 sc, (1 sc, dec)6 , 16 sc (58)
Round 25 :
2 sc, (7 sc, dec)6, 2 sc (52)
Round 26 :
2 sc, (6 sc, dec)6, 2 sc (46)
Round 27 :
2 sc, (5 sc, dec)6 , 2 sc (40)
Round 28 :
(6 sc, dec)5 (35)
Round 29 :
(5 sc, dec)5 (30) stuff tight
Round 30 :
(4 sc, dec)5 (25) insert plastic joint
Round 31 :
(3 sc, dec)5 (20)
Round 32 :
(2 sc, dec)5 (15)
Round 33 :
(1 sc, dec)5 (10)
Info :
Align marker by the middle of back side!
Info :
Video: Muzzle sculpting: https://drive.google.com/file/d/1rwWrUVe4GoFkSjePl-TTrR42hRDVhRj13W/view?usp=drivesdk
— Muzzle :
Round 1 :
start 6 sc in a mr (6)
Round 3 :
(1 sc, inc)6 (18)
Info :
Connect 2 parts with sl st and crochet 36 sc (do not crochet sc into sl st)
— Lip :
Round 1 :
Start 5 sc in a mr
Info :
Do not join a circle, turn the item, ch
Round 2 :
1 sc, 3 inc, 1 sc
— Muzzle decoration :
Muzzle :
Sew muzzle close to eyes
Eyes :
I used glass eyes and hot glue gun. When youve finished sculpting, glue eyes into eyes sockets you formed. Embroider eyebrows
Nose :
I glued nose. If you use safety one, cut leg and glue nose. Glue nose above the muzzle, in the middle, where 2 parts meet. Embroider black nose line (w.pic. below)
Lip :
Sew lip in bottom, where 2 parts meet
— Ears :
Round 1 :
start 6 sc in a mr (6)
Round 5 :
(1 sc, inc)6 (18)
Round 8 :
(2 sc, inc)6 (24)
— Body :
Round 1 :
start 6 sc in a mr (6)
Round 3 :
(1 sc, inc)6 (18)
Round 4 :
(2 sc, inc)6 (24)
Round 5 :
(3 sc, inc)6 (30)
Round 6 :
(4 sc, inc)6 (36)
Round 14 :
(5 sc, inc)6 (42)
Round 16 :
(6 sc, inc)6 (48)
Round 18 :
16 sc, (1 sc, inc)8, 16 sc (56)- inc are placed in front - it is belly
Round 26 :
(5 sc, dec)8 (48)
Round 31 :
(6 sc, dec)6 (42)
Round 32 :
(5 sc, dec)6 (36)
Round 33 :
(4 sc, dec)6 (30)
Round 34 :
(3 sc, dec)6 (24)
Round 35 :
(2 sc, dec)6 (18) Stuff
Round 36 :
(1 sc, dec)6 (12)
Info :
Crochet body from top to bottom. Lock plastic joint in the 7th row.
Info :
Marker is placed in the middle of back side!
— Tail :
Info :
Crochet tail alternating grey and white colors: 4 rows - grey color, 2 rows - white
Round 1 :
Start 7 sc in a mr (7)
Round 5 :
(6 sc, inc)2 (16)
Round 7-32 :
16 sc, stuff tail a little
Round 33 :
Put together and crochet 8 sc grabbing loops of both sides
— Front paws :
Round 1 :
start 6 sc in a mr (6)
Round 3 :
(1 sc, inc)6 (18)
Round 4 :
(2 sc, inc)6 (24)
Round 7 :
(dec, 1 sc)4, 12 sc (20)
Round 9 :
1 sc, 4 dec, 11 sc (16)
Round 10 :
16 sc, change color to grey
Round 26 :
(2 sc, dec)4 (12)
Info :
Embroider black stripes on paws to imitate fingers. Sew arms (thread jointing).
— Back paws :
Round 1 :
Start 7 sc in a mr (7)
Round 3 :
(1 sc, inc)7 (21)
Round 13 :
(5 sc, dec)3 (18)
Round 16 :
(4 sc, dec)3 (15), stuff a little
Round 17 :
(1 sc, dec)5 (10)
— Legs :
Info :
Crochet on top of foot 14 sc, on the 16th row of white foot, start working in back (right), if you look from back to front, crochet clock-wise.
Info :
Crochet 5 sc horizontally, 2 sc vertically, Crochet 5 sc horizontally, 2 sc vertically again. You get 14 sc now
Round 6 :
7 sc, 5 inc, 2 sc (19)-inc are in front, this is a knee
Round 8 :
7 sc, (1 sc, inc)5, 2 sc (24)- inc are in front, this is a knee
Round 19 :
(6 sc, dec)3 (21)
Round 20 :
(1 sc, dec)7 (14) stuff, do not stuff tight top part
— Assembly & Finishing :
Info :
Sew legs (thread jointing). Do not sew them too high.
Info :
Use Velcro or slicker brush for combing. Align yarn when youve finished combing. I trimmed muzzle a little and hid some threads inside (from edges).
Tishka the cat is a sweet handmade companion that brings charm to any shelf or gift box. Create a cuddly, sculpted face with sparkling eyes and a fluffy coat using this pattern. Have fun crafting every fuzzy detail and enjoy the warm satisfaction of a finished amigurumi. 🧶💕😊