🧢 Beautiful ✨ Detailed πŸ’ Adorable

Tiny Elephant Finger Puppet Amigurumi Pattern

Tiny Elephant Finger Puppet Amigurumi Pattern
4.1β˜… Rating
3-5 Hours Time Needed
1.9K Made This
βœ‚οΈ

Intermediate Level

Ideal for those with basic crochet experience, featuring slightly more advanced stitches and techniques to expand your skills.

⏱️

Afternoon Project

Takes 3-5 hours, perfect for an afternoon or evening of relaxing crochet.

🧸

Cute Companion

An adorable friend to cherish, handcrafted with love to bring comfort and joy for years to come.

About This Tiny Elephant Finger Puppet Amigurumi Pattern

This pattern recreates a tiny gray elephant finger puppet wearing a bright blue pleated dress with a small white flower applique. The puppet features a smoothly rounded head, embroidered eyebrows and mouth, stitched black nose, and wide, floppy ears with a pale pink inner detail. Arms are short and sewn to the front of the torso so the puppet sits neatly on a finger. The dress flares into defined pleats that create a skirt-like silhouette. All shaping is done in continuous rounds for a consistent amigurumi finish.

Tiny Elephant Finger Puppet Amigurumi Pattern crochet pattern - detailed view of completed project

I designed this pattern to be compact and easy to adapt for other tiny characters. The pieces are small and quick to crochet, with clear assembly instructions to make sewing and finishing straightforward. Perfect for sets or gift bundles.

Why You'll Love This Tiny Elephant Finger Puppet Amigurumi Pattern

I love how expressive such a small puppet can be β€” the floppy ears and simple embroidered face make it instantly charming. I also appreciate the pleated blue dress detail; it adds personality without complicated stitchwork. This pattern is satisfying because it combines fast construction with tiny, precise finishing touches that make the finished piece feel lovingly handcrafted.

Tiny Elephant Finger Puppet Amigurumi Pattern step 1 - construction progress Tiny Elephant Finger Puppet Amigurumi Pattern step 2 - assembly progress Tiny Elephant Finger Puppet Amigurumi Pattern step 3 - details and accessories Tiny Elephant Finger Puppet Amigurumi Pattern step 4 - final assembly and finishing

Switch Things Up

I absolutely loved designing this tiny elephant finger puppet pattern because it's incredibly adaptable while still being quick to crochet. The structure is straightforward, but the pleated skirt and floppy ears add personality without complex stitches.

I often switch up the colors β€” try a pastel dress for a soft look, a striped skirt for a playful version, or add tiny embroidered polka dots. You can change the expression by moving the eyebrow placement up or down, or swap safety eyes for embroidered ones for a safer toy for babies.

If you want a larger display piece, simply use a heavier yarn and a larger hook and increase the number of rounds in the head and torso proportionally. For a different species, alter the ears or snout shape: longer, narrower ears make a bunny, and a short rounded snout makes a mouse. Have fun experimenting and making each puppet your own!

Common Mistakes & How to Fix Them

βœ— Skipping stitch markers at round starts can cause misaligned features and uneven shaping; always mark your first stitch of each round βœ— Inconsistent tension between rounds creates lumpy or uneven surfaces; practice maintaining steady, even tension throughout the entire project βœ— Not stuffing gradually as you work causes difficulty reaching inside later; stuff sections as you complete them for best results βœ— Attaching ears or arms without pinning first can lead to asymmetry; pin both sides and compare before sewing βœ— Using a hook too large for the yarn will create visible stuffing gaps; use a slightly smaller hook than recommended for tight amigurumi fabric βœ— Forgetting to secure safety eyes before stuffing makes repositioning impossible; install and secure before finishing head stuffing

Tiny Elephant Finger Puppet Amigurumi Pattern

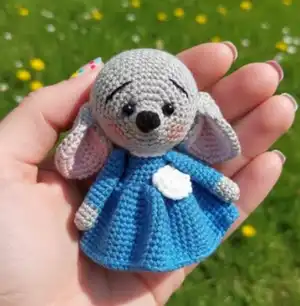
Create this tiny, palm-sized elephant finger puppet complete with floppy ears, a sweet embroidered face, and a pleated blue dress with a white flower. The finished puppet sits comfortably on a single finger and is perfect as a collectible or a quick handmade gift. Clear step-by-step rounds and assembly notes guide you through shaping the head, ears, tiny arms, torso, and the dress. This pattern is designed to replicate the cute miniature seen in the photo with realistic stitch counts and helpful tips.

Intermediate 3-5 Hours

Materials Needed for Tiny Elephant Finger Puppet Amigurumi Pattern

β€” Main Fabric

  • 01
    Sport/DK weight yarn (#3) approximately 30-40g in light gray for head and arms (main color)
  • 02
    15-20g in pale pink for inner ear detail
  • 03
    40-50g in bright blue for the dress (main skirt color)
  • 04
    5-10g in white for the flower applique
  • 05
    Small amount (5-8g) black for nose and eye embroidery

β€” Tools Required

  • 01
    2.5mm (B) crochet hook for main work (or hook appropriate for DK yarn to obtain tight fabric)
  • 02
    2.25mm (B) hook for smaller details (optional)
  • 03
    Safety eyes 6mm black (or 6-8mm depending on preference) or black embroidery thread for embroidered eyes
  • 04
    Polyester fiberfill stuffing
  • 05
    Yarn needle for sewing and embroidery
  • 06
    Stitch markers (at least 3-4)
  • 07
    Scissors
  • 08
    Pins for assembly and positioning
  • 09
    Optional: small piece of felt for backing appliques
  • 10
    Optional: thin floral wire for poseable short arms (if desired)

Progress Tracker

0% Complete

β€” Head :

Round 1 :

6 sc in magic ring (6)

Round 2 :

6 inc (12)

Round 3 :

(1 sc, 1 inc) x 6 (18)

Round 4 :

(2 sc, 1 inc) x 6 (24)

Round 5 :

(3 sc, 1 inc) x 6 (30)

Round 6 :

(4 sc, 1 inc) x 6 (36)

Round 7 :

(5 sc, 1 inc) x 6 (42)

Round 8 :

(6 sc, 1 inc) x 6 (48)

Round 9-14 :

1 sc in each st (48)

Info :

Place safety eyes between rounds 12-13, leaving about 6-8 stitches between them for a sweet, close-set expression. If using embroidered eyes, mark placement now and embroider after initial stuffing to ensure correct positioning.

Round 15-18 :

1 sc in each st (48)

Info :

At this point the head is reaching its full roundness. Begin to check proportions against a finger β€” the finished head should be palm-sized as in the photo. Keep tension even to avoid gaps.

Round 19 :

(6 sc, 1 dec) x 6 (42)

Round 20 :

(5 sc, 1 dec) x 6 (36)

Round 21 :

(4 sc, 1 dec) x 6 (30)

Info :

Begin stuffing the head firmly but not overly tight. Use small bits of fiberfill to keep the shape round and even. Make sure fiberfill reaches the eye area so eyes sit stable and slightly domed.

Round 22 :

(3 sc, 1 dec) x 6 (24)

Round 23 :

(2 sc, 1 dec) x 6 (18)

Round 24 :

(1 sc, 1 dec) x 6 (12)

Round 25 :

6 dec (6)

Info :

Fasten off leaving a long tail for sewing to the torso. Finish stuffing and close the opening using a yarn needle and whip stitch or ladder stitch for a neat finish. We will attach the snout and ears next.

β€” Snout / Nose :

Round 1 :

6 sc in magic ring (6)

Round 2 :

6 inc (12)

Round 3 :

(1 sc, 1 inc) x 6 (18)

Round 4 :

1 sc in each st (18)

Info :

Work 4 rounds to create a small, rounded snout. Leave a small opening to insert a little stuffing so the snout sits firm and slightly raised when sewn to the center front of the head.

Round 5 :

(1 sc, 1 dec) x 6 (12)

Round 6 :

6 dec (6)

Info :

Fasten off leaving a long tail for sewing. Stuff lightly so that the snout is compact. Sew the snout centered between the safety eyes, slightly below the eye line. Embroider the black nose tip with a few satin stitches for the round black nose shown in the photo.

β€” Ears (Make 2) :

Round 1 :

6 sc in magic ring (6)

Round 2 :

6 inc (12)

Round 3 :

(1 sc, 1 inc) x 6 (18)

Round 4 :

(2 sc, 1 inc) x 6 (24)

Round 5 :

1 sc in each st (24)

Info :

These ears are worked flat to create floppy, slightly rounded ears that fold toward the front. For the inner ear detail, change to pale pink in Round 3 and work the small oval separately, or embroider the pink using surface crochet after sewing. The outer ear remains gray to match the head.

Round 6 :

1 sc in each st (24)

Round 7 :

1 sc in first 12 sts, turn and work back along the same sts to create a double-layered ear: 12 sc across first row (12)

Round 8 :

Attach inner pink (optional) using slip stitch or surface crochet: 10 sc along center area to define inner ear

Info :

Fold ears slightly and sew to the head between rounds 10-13, placing them slightly below the top of the head so the ears droop forward as in the photo. Pin in place, checking symmetry before sewing. Use small, neat whip stitches around the base to attach.

Round 9 :

Fasten off leaving long tail for sewing; repeat for second ear

β€” Torso / Neck (Finger Sleeve) :

Round 1 :

6 sc in magic ring (6)

Round 2 :

6 inc (12)

Round 3 :

(1 sc, 1 inc) x 6 (18)

Round 4 :

(2 sc, 1 inc) x 6 (24)

Round 5 :

(3 sc, 1 inc) x 6 (30)

Round 6-8 :

1 sc in each st (30)

Info :

This torso is a hollow sleeve that becomes the finger puppet body. Work in continuous rounds so the inner cavity remains smooth. After attaching the head, you will stitch the neck opening to the top rows of the torso to form a secure fit over a finger.

Round 9 :

1 sc in each st BLO (30)

Round 10-12 :

1 sc in each st (30)

Info :

Decide the depth of the sleeve now. The puppet in the photo fits well over the first two joints of an adult finger; keep the sleeve about 25-30 rounds tall. If you want a taller sleeve, add more even rounds before finishing.

Round 13 :

(3 sc, 1 dec) x 6 (24)

Round 14 :

(2 sc, 1 dec) x 6 (18)

Round 15 :

(1 sc, 1 dec) x 6 (12)

Round 16 :

6 dec (6)

Info :

Fasten off leaving long tail for sewing. With the torso still inside-out, you can sew the head to the top opening: overlap head's bottom edge to the top of torso, pin evenly, and sew using a mattress or ladder stitch. After sewing, turn the torso right side out and smooth the seam so the head appears seamlessly attached atop the dress.

β€” Arms (Make 2) :

Round 1 :

6 sc in magic ring (6)

Round 2 :

6 inc (12)

Round 3 :

(1 sc, 1 inc) x 6 (18)

Round 4 :

1 sc in each st (18)

Info :

These little arms are short and slightly rounded to resemble tiny elephant arms. Stuff the hand area lightly so it keeps shape but remains flexible. If you want poseable arms, insert a short length of thin floral wire now and cover the wire end with tape before inserting into stuffing.

Round 5 :

1 sc in each st (18)

Round 6 :

(4 sc, 1 dec) x 3 (15)

Round 7 :

1 sc in each st (15)

Round 8 :

(3 sc, 1 dec) x 3 (12)

Round 9 :

1 sc in each st (12)

Round 10 :

(2 sc, 1 dec) x 3 (9)

Info :

Stuff hands more firmly than the arm shafts. The short arm length gives the puppet the look seen in the photo β€” arms peeking just above the dress waistline. Leave a long tail for sewing and repeat for the second arm.

Round 11 :

1 sc in each st (9)

Round 12 :

Fasten off leaving long tail for sewing

β€” Dress Skirt (Make Skirt and Upper Bodice) :

Info :

We work the skirt as a separate tube that slips over the torso sleeve. The pictured skirt has defined vertical pleats; we will create those by alternating increases and BLO ridges to create subtle flares. Use bright blue yarn for the skirt.

Round 1 :

Chain 26, join with sl st to form a ring (26)

Round 2 :

1 sc in each ch around (26)

Round 3 :

(2 sc, 1 inc) x 8 then 2 sc (34)

Round 4 :

1 sc in each st (34)

Round 5 :

1 sc in each st BLO (34)

Round 6 :

(3 sc, 1 inc) x 8 + 2 sc (42)

Info :

To form pleats, we will work alternating rounds of increases and BLO ridges. The BLO round pulls the next round in to create the fold. Keep stitch markers every 7-8 stitches to track increase points for even pleats.

Round 7 :

1 sc in each st (42)

Round 8 :

1 sc in each st BLO (42)

Round 9 :

(4 sc, 1 inc) x 7 + 4 sc (49)

Round 10 :

1 sc in each st (49)

Round 11 :

1 sc in each st BLO (49)

Round 12 :

(5 sc, 1 inc) x 7 (56)

Info :

If your skirt seems too wide for the torso, reduce the number of increases or work fewer rounds. The goal is a gentle flare with visible vertical ridges. Try the skirt over the torso periodically to check fit; you can always add or remove rounds.

Round 13 :

1 sc in each st (56)

Round 14 :

1 sc in each st BLO (56)

Round 15 :

(6 sc, 1 inc) x 7 (63)

Round 16 :

1 sc in each st (63)

Round 17 :

1 sc in each st BLO (63)

Round 18 :

(7 sc, 1 inc) x 7 (70)

Info :

At rounds 15-18 you are creating the main flare of the skirt. If you prefer deeper pleats, repeat an extra BLO and even round pair to emphasize folds. The sample puppet uses 6-7 pleats visible as ribs in the fabric.

Round 19 :

1 sc in each st (70)

Round 20 :

1 sc in each st BLO (70)

Round 21 :

(8 sc, 1 inc) x 7 (77)

Round 22 :

1 sc in each st (77)

Round 23 :

1 sc in each st BLO (77)

Round 24 :

(9 sc, 1 inc) x 7 (84)

Info :

Work 24-28 rounds for a nice full skirt. The stitch counts above create a progressively wider flare. When the skirt measures visually similar to the photo, stop increasing and work a few even rounds to finish the hem.

Round 25 :

1 sc in each st (84)

Round 26 :

1 sc in each st BLO (84)

Round 27 :

1 sc in each st (84)

Round 28 :

Fasten off leaving a long tail for sewing the bodice to the torso. Fold the top few rounds of the skirt inward and sew into a neat casing if desired, then slip the skirt over the torso to position the waistline just under the arms. Secure in place by sewing through skirt top and torso rounds evenly around.

β€” Flower Applique :

Round 1 :

6 sc in magic ring (6)

Round 2 :

Sl st into next st, *ch 3, sl st into same st* x 6 to form petals (6 petals)

Round 3 :

Fasten off leaving tail for sewing; flatten flower and sew to left chest of dress using small stitches. Optionally add a French knot or small bead center in yellow or matching color.

β€” Facial Embroidery & Finishing Touches :

Info :

Using black embroidery thread or thin yarn, embroider two short eyebrow arches above the safety eyes with satin or back stitch as in the photo. Embroider a small curved mouth just beneath the snout. Use blush or a tiny dab of pink chalk on cheeks if desired for added charm.

Info :

Weave in all ends through several stitches and trim close to fabric. If safety eyes are used, ensure washers are secure. Check overall symmetry, adjust stitches as needed, and press seams with fingers to round shapes neatly. The puppet is now ready to wear on a finger or display.

β€” Extra Notes for Adjustments and Variations :

Info :

If you want a slightly larger puppet, use a thicker DK yarn and a 3.0mm hook, or simply add extra even rounds to head and torso in the increase stages. Change dress color or make the skirt shorter by stopping increases earlier. For embroidering a different expression, move eyebrows and mouth up or down a round for variations.

Assembly Instructions

  • Attach head to torso by aligning the head bottom (Rounds 25-26) with the top of the torso (Rounds 6-8). Pin evenly around and sew with a ladder stitch to create an invisible seam
  • Sew snout centered between the eyes approximately 2-3 rounds below eye line. Use small stitches through the base of the snout to secure; do not overstuff the snout when sewing
  • Position ears on sides of head between rounds 10-13, slightly forward-facing. Pin both ears symmetrically, then sew through the ear base and a couple of head rounds to hold securely
  • Attach arms to front sides of torso at skirt waistline: sew each arm to torso rounds 9-11 to achieve the placement seen in the photo. Use ladder stitch for invisible seams and add a few extra stitches for durability
  • Slip skirt over torso and align waist under arms. Secure skirt to torso by sewing through the top round of skirt into the torso rounds at 12 evenly spaced points to hold pleats in place
  • Sew small white flower to left chest area of skirt about 4-6 stitches down from the skirt top. Anchor securely and weave in thread ends inside skirt
  • Embroider eyebrows and mouth with black yarn or thread; use small stitches and test on scrap yarn if unsure of placement. Add a tiny dab of blush on cheeks if desired
  • Weave and hide all loose ends inside the hollow torso or under the skirt so nothing shows externally

Important Notes

  • πŸ’‘Use stitch markers consistently at the beginning of each round to avoid counting errors and maintain proper shaping
  • πŸ’‘Stuff body parts gradually as you work rather than waiting until the end, especially for narrow openings like the neck and snout
  • πŸ’‘For safety eyes, position and secure before stuffing head fully - they cannot be repositioned once locked in place
  • πŸ’‘Maintain consistent tension throughout the project; too tight creates stiff, small pieces, too loose creates floppy, holey fabric
  • πŸ’‘When sewing pieces together, use yarn slightly thinner than working yarn for neater, less visible seams
  • πŸ’‘Pin all pieces in position before final sewing to ensure proper placement and symmetry
  • πŸ’‘For amigurumi, work tightly enough that stuffing doesn't show through stitches; if you see gaps, switch to a smaller hook
  • πŸ’‘Keep a row counter or notepad to track rounds, especially in long even-stitch sections like the skirt

This tiny elephant finger puppet combines classic amigurumi shaping with a sweet pleated dress and delicate embroidered features to make a special handmade friend. Each small section is quick to crochet and satisfying to assemble, resulting in a charming miniature toy that fits in the palm of your hand. Enjoy the process of customizing colors and expressions β€” these puppets make delightful gifts and collectibles. 🧢✨🐘

You ask,

we answer.

FAQs

What is the finished size of this amigurumi?

Based on the specified materials and hook size, the finished puppet measures approximately 3.5-4.5 inches (9-11 cm) tall from top of head to base of skirt. Using different yarn weights will proportionally change the final size.

Can I use different yarn weights for this pattern?

Yes! You can use any yarn weight, but remember to adjust your hook size accordingly (generally 1-2 sizes smaller than yarn recommendation for tight amigurumi fabric). Different weights and hooks will change the final size proportionally.

Do I need to use safety eyes or can I embroider them?

Both options work beautifully! Safety eyes give a polished look and are very secure. Embroidered eyes are ideal for young children and allow you to customize expression; embroider them before finishing stuffing for best results.

How much stuffing will I need?

For this tiny puppet, approximately 20-40 grams of polyester fiberfill should be sufficient. Use small amounts as you go; the head needs firmer stuffing than the arms and snout to maintain shape.

Can I make the arms poseable?

Yes β€” insert a short length of floral wire or pipe cleaner into each arm before final stuffing. Make sure to fold or tape the wire ends to prevent poking through the yarn and stuff around the wire so it is fully enclosed.

What if my stitch count is off?

If you notice a counting error, it is best to unravel back to the last correct round and fix it. Trying to compensate later often creates visible distortions. Using a stitch marker at round starts helps prevent counting mistakes.

How do I prevent holes when stuffing?

Work with tight, consistent tension, and use a hook slightly smaller than the yarn recommendation. Stuff in small increments and compress stuffing into curves and eye sockets to avoid gaps.

Can I customize colors and details?

Definitely! Swap dress colors, add lace trims, change the flower color, or embroider different facial expressions. The construction is forgiving and easy to adapt for personalization.