๐Ÿงถ Beautiful โœจ Detailed ๐Ÿ’ Adorable

Christmas Bells Amigurumi Pattern

Christmas Bells Amigurumi Pattern
4.8โ˜… Rating
5-7 Hours Time Needed
2.0K Made This
โœ‚๏ธ

Intermediate Level

Ideal for those with basic crochet experience, featuring slightly more advanced stitches and techniques to expand your skills.

โฑ๏ธ

Weekend Treat

Takes 5-7 hours, making it an enjoyable project to finish over a couple of days.

๐ŸŽ„

Holiday Cheer

Festive fun for the season, bringing handmade magic to celebrations and creating new family traditions.

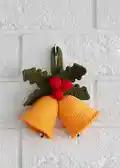
About This Christmas Bells Amigurumi Pattern

Christmas Bells Amigurumi Pattern crochet pattern - detailed view of completed project

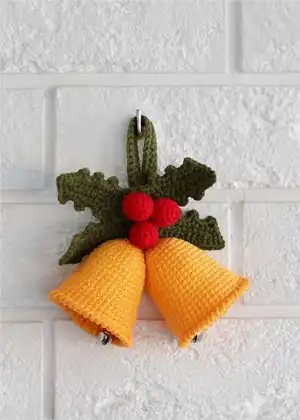
The pattern also features instructions for attaching real metal bells inside the crocheted shells for that authentic jingle sound. It serves as a beautiful keepsake decoration that can be cherished year after year.

Why You'll Love This Christmas Bells Amigurumi Pattern

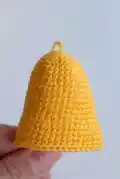
I absolutely love this pattern because it captures the nostalgic charm of traditional Christmas decorations. I find the process of assembling the holly leaves and berries together with the bells incredibly satisfying, as it instantly looks like a professional holiday ornament. The addition of the crab stitch border gives the bells a wonderful finish that I really enjoy crocheting. Plus, hearing the little jingle from the metal bells inside brings me so much joy every time I walk past the tree.

Christmas Bells Amigurumi Pattern step 1 - construction progress Christmas Bells Amigurumi Pattern step 2 - assembly progress Christmas Bells Amigurumi Pattern step 3 - details and accessories Christmas Bells Amigurumi Pattern step 4 - final assembly and finishing

Switch Things Up

I love how customizable this holiday pattern can be to match your specific decor theme! While the classic red, green, and gold is timeless, you can easily switch to a 'Winter Wonderland' theme by using silver yarn for the bells, icy blue for the leaves, and white for the berries.

If you want to add some extra sparkle, try using a yarn with a metallic thread running through it. This looks especially stunning on the bells and makes them twinkle under the Christmas tree lights.

For the 'clapper' inside the bell, if you don't have metal jingle bells on hand, you can simply crochet a small yellow bead or ball and attach it inside. It won't jingle, but it will still look adorable and complete.

You can also play with the size of the arrangement. Use a chunky weight yarn and a larger hook to create a massive door hanger version instead of a tree ornament. It would make a spectacular welcoming piece for your front door!

I also like the idea of adding small beads or sequins to the holly leaves to represent frost or dew drops. Just sew them on carefully after the steaming process for a magical touch.

Common Mistakes & How to Fix Them

โœ— Crocheting too loosely allows the stuffing to show through; use a smaller hook size to ensure tight, neat stitches. โœ— Forgetting to mark the beginning of rounds in spirals can lead to misaligned increases; always use a stitch marker to track your progress. โœ— Sewing the parts together without pinning first causes asymmetry; pin the leaves and berries in place before securing them permanently. โœ— Not ironing the leaves results in curling edges; use steam to flatten the leaves for a crisp, professional look.

Christmas Bells Amigurumi Pattern

Get ready to ring in the holiday season with this delightful Christmas Bells crochet pattern. You will create a stunning festive ornament featuring two golden bells, lush holly leaves, and bright red berries. This project is perfect for adding a handmade touch to your Christmas tree or gifting to a loved one.

Intermediate 5-7 Hours

Materials Needed for Christmas Bells Amigurumi Pattern

โ€” Main Fabric

  • 01
    Yarn Art Jeans 35 (yellow) - bells
  • 02
    Yarn Art Jeans No 82 (dark green) - leaves, loop
  • 03
    Yarn Art Jeans No 90 (red) - berries
  • 04
    DK weight yarn (55% cotton/45% acrylic; 50 g/160 m)

โ€” Tools Required

  • 01
    2.25 mm crochet hook
  • 02
    Stuffing material (fiberfill/ polyester)
  • 03
    Tapestry needle
  • 04
    Scissors
  • 05
    Stitch marker (a scrap of contrasting yarn)
  • 06
    Tambourine (jingle bells) 2 pieces

Progress Tracker

0% Complete

โ€” Bells (Make 2) :

Info :

Use Yellow yarn (YarnArt Jeans No. 03). Crochet in continuous spirals.

Rnd 1 :

6 SC into MR (6)

Rnd 2 :

6 INC (12)

Rnd 3 :

(1 SC, INC) x 6 (18)

Rnd 4 :

(2 SC, INC) x 6 (24)

Rnd 5 :

(3 SC, INC) x 6 (30)

Rnds 6-7 :

30 SC (2 rounds)

Rnd 8 :

(4 SC, INC) x 6 (36)

Rnds 9-14 :

36 SC (6 rounds)

Rnd 15 :

(5 SC, INC) x 6 (42)

Rnds 16-19 :

42 SC (4 rounds)

Rnd 20 :

42 SC using Crab (Reverse) stitch, 1 SL ST

Info :

Break yarn. Pull tightly. Hide the tail inside.

โ€” Bell Language (Clapper) :

Step 1 :

Chain 16 with yellow yarn.

Step 2 :

Using a smaller hook, pull the thread into the eye of the metal bell to grab and pull the thread.

Step 3 :

Start working in the second chain from hook: 15 SC.

Step 4 :

Break yarn. Attach the finished language to the crocheted bell. Tie all the threads.

Step 5 :

Tie both bells together.

โ€” Leaf (Make 4) :

Info :

Use Dark Green yarn (YarnArt Jeans No. 82).

Rnd 1 :

Chain 15, crochet to the chain foundation. Start working in the second chain from hook: 13 SC, 3 SC in 1 stitch. Continue crocheting on the other side of the chain foundation: 12 SC, 3 SC in 1 stitch.

Rnd 2 :

(3 SC, chain 3, 1 SC in the previous stitch) x 4, 3 SC, chain 3, 1 SC in the previous stitch, (3 SC, chain 3, 1 SC in the previous stitch) x 4, 2 SC, 2 SL ST.

Info :

Break yarn, leaving a long tail for sewing. Iron the part with steam if it is uneven.

โ€” Berries (Make 3) :

Info :

Use Red yarn (YarnArt Jeans No. 90).

Rnd 1 :

6 SC into MR (6)

Rnd 2 :

6 INC (12)

Rnds 3-6 :

12 SC (4 rounds)

Info :

Complete stuffing with fiberfill. Tighten the hole using a tapestry needle.

โ€” Loop :

Info :

Use Dark Green yarn (YarnArt Jeans No. 82).

Rnd 1 :

Chain 41, turn and continue crocheting on the other side of the chain.

Rnd 2 :

40 SC, 1 chain (cp), turn

Rnd 3 :

40 SC

Info :

Cut off the long end of the thread. Use a needle to connect the ends.

Assembly Instructions

  • Sew the four green leaves together at their bases to create the foliage backing.
  • Using a needle, pull the threads from the tied bells through to the back of the leaf assembly and tie them securely together.
  • Sew the three red berries to the center of the leaves, covering the point where the bells are attached.
  • With the remaining piece of thread from the loop, sew the loop to the back of the leaves, ensuring all protruding threads are hidden securely.

Important Notes

  • ๐Ÿ’กYarn consumption and size depend on crochet density; adjust your tension or hook size if needed.
  • ๐Ÿ’กIron the leaf parts with steam if they look uneven or curl; simply put a damp cloth on top and steam for a few seconds.
  • ๐Ÿ’กMake sure you crochet tight enough so the stuffing inside the bells and berries does not show through the holes.
  • ๐Ÿ’กThe pattern uses V and X look single crochet, which affects the texture; maintain consistency in how you grab the yarn.

This charming Christmas Bells pattern brings the festive spirit right into your home! With its classic design and jingling details, it is sure to become a treasured part of your holiday decor. Enjoy every stitch of this merry project! ๐ŸŽ„๐Ÿ””โœจ

You ask,

we answer.

FAQs

What is the finished size of the ornament?

The finished product is approximately 4.7 x 5.1 inches (12 x 13 cm) including the loop.

What specific yarn should I use?

The pattern recommends Yarn Art Jeans, a DK weight yarn that is a blend of 55% cotton and 45% acrylic.

Do I need real bells for this pattern?

Yes, the pattern calls for 'Tambourines' or metal jingle bells to be attached inside the crocheted bell shells for sound.

What is the Crab stitch used for?

The Crab stitch, or Reverse Single Crochet, is used on the final round of the bells to create a decorative, finished edge.