🧢 Beautiful ✨ Detailed πŸ’ Adorable

Tick the Rabbit Amigurumi Pattern

Tick the Rabbit Amigurumi Pattern
4.4β˜… Rating
5-7 Hours Time Needed
2.8K Made This
βœ‚οΈ

Intermediate Level

Ideal for those with basic crochet experience, featuring slightly more advanced stitches and techniques to expand your skills.

⏱️

Weekend Treat

Takes 5-7 hours, making it an enjoyable project to finish over a couple of days.

🧸

Cute Companion

An adorable friend to cherish, handcrafted with love to bring comfort and joy for years to come.

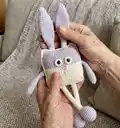
About This Tick the Rabbit Amigurumi Pattern

This pattern creates a small, stretchy rabbit toy with long limbs that can extend and retract for playful interaction. The design features a square body, long ears, sewn-on eyes, and embroidered nose details. It uses two yarn weights and two crochet hook sizes for contrasting textures.

Tick the Rabbit Amigurumi Pattern crochet pattern - detailed view of completed project

You will crochet ears/legs, arms, eyes and two body panels then join and stuff them. The finished toy measures about 30 cm from ears to feet using the recommended materials.

Why You'll Love This Tick the Rabbit Amigurumi Pattern

I absolutely love this pattern because it blends simple shapes with a clever stretchy-limb mechanic that kids adore. I enjoy how the small square body makes assembly straightforward while still allowing for personality with eye placement and embroidery. Making these pieces is relaxing and repetitive in the best way, so I often bring this pattern to crafting meetups. The final toy is both durable and huggable, and it always brings smiles when given as a handmade gift.

Tick the Rabbit Amigurumi Pattern step 1 - construction progress Tick the Rabbit Amigurumi Pattern step 2 - assembly progress Tick the Rabbit Amigurumi Pattern step 3 - details and accessories Tick the Rabbit Amigurumi Pattern step 4 - final assembly and finishing

Switch Things Up

I love customizing this pattern by changing the color palette; try pastel shades for a softer look or bright contrasting colors for a playful version.

I sometimes swap YarnArt Jeans for a different sport-weight yarn and adjust hook sizes to make a slightly larger or smaller rabbit.

I often embroider different facial expressions or add embroidered eyebrows to change the personality of each rabbit.

For a baby-safe toy, I replace safety eyes with crocheted eye discs and embroider the pupils, ensuring no small parts can detach.

Make pocket-sized versions by using thinner yarn and a 1.5–2.0 mm hook to create tiny keychain-friendly rabbits.

I like to add small crocheted accessories like hats, scarves, or tiny vests to create themed characters or seasonal gifts.

Try adding a small loop at the top of the head to hang the rabbit as an ornament or stroller toy for on-the-go play.

To make the limbs less stretchy, use a tighter tension and a slightly smaller hook; to increase stretch, use a looser tension or a slightly larger hook.

If you want posable limbs, insert a thin wire inside the arm or leg tubes before closing, bending the ends to secure the wire away from little hands.

I also experiment with surface crochet or adding felt shapes for cheeks and tongues to give each rabbit a unique charm.

Common Mistakes & How to Fix Them

βœ— Not counting stitches after increases and decreases can shift your shaping unexpectedly; recount at the end of every round and correct errors immediately.
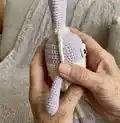
 βœ— Failing to stuff the lilac head/ear piece before continuing will make shaping difficult; stuff gradually at the indicated round to keep form accurate. βœ— Skipping stitch placement when joining body panels leads to misaligned seams; pin or use stitch markers and work methodically when crocheting through both parts. βœ— Pulling yarn too tight during single crochet edges creates puckering; maintain even, moderate tension and relax your hands to keep edges smooth.

Tick the Rabbit Amigurumi Pattern

Create a stretchy, playful rabbit toy that stretches its limbs up and down for endless imaginative play. This pattern walks you through crocheting all parts, assembling them, and adding cute facial details. Perfect as a handmade gift or a fun project to develop your crochet skills.

Intermediate 5-7 Hours

Materials Needed for Tick the Rabbit Amigurumi Pattern

β€” Main Fabric

  • 01
    YarnArt Jeans 50 g / 160 m; 55% cotton, 45% acrylic - shade 19 (lilac)
  • 02
    YarnArt Jeans 50 g / 160 m; 55% cotton, 45% acrylic - shade 03 (white)
  • 03
    YarnArt Iris 20 g / 170 m; 100% cotton - shade 917 (pink) for nose
  • 04
    Polyester fiber filler (amount as needed to stuff pieces)

β€” Tools Required

  • 01
    Crochet hook size 2.0 mm
  • 02
    Crochet hook size 3.0 mm
  • 03
    8 mm safety eyes (2 pieces)
  • 04
    Scissors
  • 05
    Large eye needle for sewing and embroidery
  • 06
    Markers (if necessary) for placement
  • 07
    Yarn needle for weaving ends

Progress Tracker

0% Complete

β€” Ears and legs (make 2) :

Info :

Ears and legs are crocheted in one piece. Begin crocheting in lilac with 2 mm hook.

Round 1 :

6 MR (6)

Round 2 :

(1 SC, INC)*3 (9)

Round 3-4 :

2 rnds straight: 9 SC

Round 5 :

(2 SC, INC)*3 (12)

Round 6 :

(3 SC, INC)*3 (15)

Round 7-8 :

2 rnds straight: 15 SC

Round 9 :

(4 SC, INC)*3 (18)

Round 10-17 :

8 rnds straight: 18 SC

Round 18 :

(DEC, 4 SC)*3 (15)

Round 19 :

2 rnds straight: 15 SC

Round 20 :

(DEC, 3 SC)*3 (12)

Round 21-22 :

2 rnds straight: 12 SC

Round 23 :

1 rnd straight 10 SC

Info :

Stuff the lilac piece.

Info :

Switch to white yarn. Go on crocheting. Don't stuff the white piece.

Round 24-75 :

52 rnds straight: 10 SC

Info :

Switch to lilac yarn.

Round 76 :

(INC, 4 SC)*2 (12)

Round 77 :

(1 SC, INC)*6 (18)

Round 78 :

(2 SC, INC)*6 (24)

Round 79 :

(3 SC,INC)*6 (30)

Round 80-83 :

4 rnds straight: 30 SC

Round 84 :

(DEC, 3 SC)*6 (24)

Round 85 :

(DEC, 2 SC)*6 (18)

Round 86 :

(DEC, 1 SC)*6 (12)

Info :

Stuff the piece.

Round 87 :

DEC*6 fasten off.

β€” Arms (make 2) :

Info :

Begin crocheting in lilac with 2 mm hook.

Round 1 :

5 MR (5)

Round 2 :

INC*5 (10)

Round 3-9 :

7 rnds straight: 10 SC

Round 10 :

DEC, 8 SC (9)

Round 11-13 :

3 rnds straight: 9 SC

Info :

Stuff the piece to 13th row.

Round 14 :

DEC, 7 SC (8)

Round 15-20 :

6 rnds straight: 8 SC

Info :

Fold in half and single crochet 4 through both edges. Leave a long yarn tail for sewing.

β€” Eyes (make 2) :

Info :

Begin crocheting in white with 2 mm hook.

Round 1 :

6 MR (6)

Round 2 :

INC*6 (12)

Info :

Install safety eyes in the center of the ring.

β€” Body (make 2) :

Info :

Work in lilac with 3 mm hook.

Info :

The first piece:

Info :

Chain 25, and starting into the 2nd stitch from hook work 24 SC.

Round 1-19 :

19 rows straight: 24 SC, make 1 turning CH at the end of each row.

Round 20 :

1 SC, DEC, 18 SC, DEC, 1 SC (22)

Round 21 :

1 rnd straight: 22 SC

Round 22 :

1 SC, DEC, 16 SC, DEC, 1 SC (20)

Round 23-25 :

3 rnds straight: 20 SC.

Info :

Fasten off and cut yarn.

Info :

Crochet the second piece alike:

Info :

1-16. crochet in white.

Info :

17-25. crochet in lilac.

β€” Assembly :

Info :

Begin joining the body parts together from the right upper corner using 2 mm hook.

Step :

Put the two parts together and work 4 SC through both parts' stitches. You are going to insert the ear-leg piece here. 3 SC across the front part of the body only (skip 3 stitches on the back body part), put the first ear-leg piece and go on crocheting across both body parts 5 SC, 3 SC across the front part of the body only (skip 3 stitches on the back body part), put the second ear-leg piece and go on crocheting across both body parts 4 SC, 2 SC to the corner stitch.

Step :

Get to the side edge. Work 24 SC through both parts' stitches, work 2 SC to the corner stitch. Stuff the body.

Step :

Get to the bottom edge. Work 6 SC through both parts' stitches. You are going to insert the ear-leg piece here. 3 SC across the front part of the body only (skip 3 stitches on the back body part), put the first ear-leg piece and go on crocheting across both body parts 5 SC, 3 SC across the front part of the body only (skip 3 stitches on the back body part), put the second ear-leg piece and go on crocheting across both body parts 6 SC, 2 SC to the corner stitch. Stuff the body.

Step :

Get to the side edge. Work 24 SC through both parts' stitches, work 2 SC to the corner stitch. Stuff the body.

Info :

Eyes: Sew on between rows 17 - 20 in the middle.

Info :

Nose: Embroider a nose with pink yarn.

Info :

Arms: Attach the arms on the back on between rows 14-17.

Assembly Instructions

  • Join the two body panels from the right upper corner using a 2 mm hook, working 4 SC through both parts' stitches and inserting ear-leg pieces when directed.
  • When you reach the side edge after joining the top, work 24 SC through both parts' stitches, then 2 SC to the corner stitch and stuff the body firmly but not overstuffed.
  • At the bottom edge insert the leg pieces as instructed: work 6 SC through both parts, 3 SC across the front only (skip 3 stitches on the back), insert the first ear-leg, then continue 5 SC across both, 3 SC front-only and insert the second leg before finishing the row and stuffing.
  • Sew eyes between rows 17-20 centered, embroider the nose with pink yarn, and attach arms to the back between rows 14-17 using the long yarn tails and secure stitching.

Important Notes

  • πŸ’‘The finished toy size from the recommended materials is approximately 30 cm from ears to feet.
  • πŸ’‘This pattern does not contain crocheting lessons; you should master basic crochet skills to create this toy.
  • πŸ’‘Use stitch markers or pins when aligning body panels to ensure accurate placement of legs and ears.
  • πŸ’‘Stuff the lilac ear/leg pieces before continuing to preserve the shape, and stuff the body gradually while assembling.

This stretchy Tick the Rabbit is a playful handmade companion designed for creative games and fine motor development. It features long stretchy limbs, a square body, and sweet embroidered details you will love to personalize. Perfect as a gift or a cozy toy to make and cherish. 🧢😊

You ask,

we answer.

FAQs

What size will the finished piece be?

The finished toy measures approximately 30 cm from ears to feet when using the recommended yarn and hook sizes.

Can I use different yarn weights for this pattern?

You can use different yarn weights, but the final size and stretchiness will change; choose appropriate hook sizes to maintain fabric density.

Do I need prior crochet experience for this pattern?

This pattern is rated intermediate, so basic knowledge of magic ring, single crochet, increases and decreases is recommended.

How long does this project typically take to complete?

Most crocheters finish this project in 5-7 hours, depending on experience and how much time is spent on assembly and finishing details.